Ciao Guest - You’ve landed at the ultimate Guzzi site. NEW FORUM REGISTRATIONS REQUIRE EMAIL ACTIVATION - CHECK YOUR SPAM FOLDER - Use the CONTACT above if you need help. New to the forum? For all new members, we require ONE post in the Introductions section at the bottom, in order to post in most of the other sections. ALWAYS TRY A SEARCH BEFORE STARTING A NEW TOPIC - Most questions you may have, have likely been already answered. DON'T BE A DRIVE-BY POSTER: As a common courtesy, check back in and reply within 24 hours, or your post will be deleted. Note there's decades of heavily experienced Guzzi professionals on this site, all whom happily give endless amounts of their VALUABLE time for free; BE COURTEOUS AND RESPECTFUL!
There is ZERO tolerance on personal attacks and ANY HYPERLINKS to PRODUCT(S) or other competing website(s), including personal pages, social media or other Forums. This ALSO INCLUDES ECU DIAGnostic software, questions and mapping. We work very hard to offer commercially supported products and to keep info relevant here. First offense is a note, second is a warning, third time will get you banned from the site. We don't have the time to chase repeat (and ignorant) offenders. This is NOT a social media platform; It's an ad-free, privately funded website, in small help with user donations. Be sure to see the GTM STORE link above; ALL product purchases help support the site, or you can upgrade your Forum profile or DONATE via the link above.
Be sure to see the GTM STORE link also above for our 700+ product inventory, including OEM parts and many of our 100% Made-in-SoCal-USA GTM products and engine kits. In SoCal? Click the SERVICE tab above for the best in service, tires, tuning and installation of our products or custom work, and don't miss our GT MotoCycles® (not) art on the BUILDS tab above. WE'RE HERE ONLINE ONLY - NO PHONE CALLS MADE OR RECEIVED - DO NOT EMAIL AND ASK QUESTIONS OR ASK TO CALL YOU.
Like the new V100, GuzziTech is full throttle into the future! We're now running on an all-new server and we've updated our Forum software. The visual differences are obvious, but hopefully you'll notice the super-fast speed. If you notice any glitches or have any issues, please post on the Site Support section at the bottom. If you haven't yet, please upgrade your account which is covered in the Site Support section or via the DONATE tab above, which gives you full site access including the DOWNLOADS section. We really appreciate every $ and your support to keep this site ad-free. Create an account, sign in, upgrade your account, and enjoy. See you on the road in 2024.
I love the hyper lites brake lighs and have had them on several bikes. ANYONE ever install them on a 2V Norge without any problems or special electrical challenges?
I removed them from my 4V Norge shortly after I bought it. They worked fine but many of the LEDs were burnt out and it bugged me. They were tapped into the tail light wires and didn't seem to cause any issues.
I removed them from my 4V Norge shortly after I bought it. They worked fine but many of the LEDs were burnt out and it bugged me. They were tapped into the tail light wires and didn't seem to cause any issues.
Raven, FYI - Contact the company and they will replace free of charge. I had the same issue even out of warranty they stand behind their product. Thanks for the info.
I love the hyper lites brake lighs and have had them on several bikes. ANYONE ever install them on a 2V Norge without any problems or special electrical challenges?
I removed them from my 4V Norge shortly after I bought it. They worked fine but many of the LEDs were burnt out and it bugged me. They were tapped into the tail light wires and didn't seem to cause any issues.
There were on the bike when I bought it. If memory serves me well, they were tapped into the wires under the rear of the seat kinda on top of the fender.
There were on the bike when I bought it. If memory serves me well, they were tapped into the wires under the rear of the seat kinda on top of the fender.
EDITED 4/28/24. (I wrote this from my bad memory and I made a mistake. The 1200 engined bikes with 8v engines utilize hybrid Canbus on the ABS circuit only. Not the brake light. The 1400’s utilize the hybrid CanBus on the brske curcuit. This is visible on the wiring diagram as a twisted pair of wires.)
The 2V Norge and 4V Norge is a standard wiring loom (No CanBus), so you may safely splice right into the brake light circuit.
The 1400 engined bikes, utilize a hybrid Canbus wiring setup so you cannot just tap into the same location as you will alter the resistance on the circuit and it will mess up the CanBus operation.
I opened the original tail light of my Norge 8V. There are two shells sealed together with resin, pay attention if you want open it. Internally there is a circuit without CAN termination, but a simple circuit with a transistor that increase the current into LEDs when stop is pressed. I recovered the schematic and made some modification in red to increase the light. The best is replace the LEDs with more moderns, but I didn't have at the moment.
I opened the original tail light of my Norge 8V. There are two shells sealed together with resin, pay attention if you want open it. Internally there is a circuit without CAN termination, but a simple circuit with a transistor that increase the current into LEDs when stop is pressed. I recovered the schematic and made some modification in red to increase the light. The best is replace the LEDs with more moderns, but I didn't have at the moment.
Yes correct:
Ground (-) is the Blue wire.
Stop (+) command from brake is the Yellow/Green wire
Postiion light (+) is the Yellow / Grey wire.
Pay attention that if you add some load to the stop signal, you 'll sink current from the position signal and LEDs will be less bright.
Although I cringe at modifications to OEM wiring looms, sometimes there just is no way around doing so.
This being said, I invite you to consider using a micro Positap on the BRAKELIGHT SIDE of the wiring loom, thereby preserving the integrity of the stock OEM main loom.
Although I cringe at modifications to OEM wiring looms, sometimes there just is no way around doing so.
This being said, I invite you to consider using a micro Positap on the BRAKELIGHT SIDE of the wiring loom, thereby preserving the integrity of the stock OEM main loom.
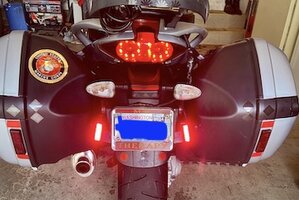
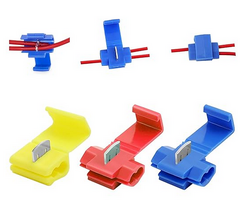
Thanks Scott - I think I also need to install a diode or two? - to get it to flash? Do I use one or two diodes as there are two lines separate from ground. *Positaps thanks! Here is what it looks like attached now. Lighting up but not flashing as it should. I believe I need to add a Diode, but to which or both wires is my understanding? I did use quick connectors of a flat kind not as good as posi-taps.
I'm not sure what you are referring to. Diodes are not used here as far as I know. Diodes are for asymmetric electrical connections where you want power to flow only one direction.
Do you mean terminating resisters? Those only apply to CanBus connections.
I'm sorry I cannot give you an answer here. I can tell you that the connectors you used are one of if not the worst quality ones out there. I'm sorry but they truly are.