• Ciao Guest - You’ve landed at the ultimate Guzzi site. NEW FORUM REGISTRATIONS REQUIRE EMAIL ACTIVATION - CHECK YOUR SPAM FOLDER - Use the CONTACT above if you need help. New to the forum? For all new members, we require ONE post in the Introductions section at the bottom, in order to post in most of the other sections. ALWAYS TRY A SEARCH BEFORE STARTING A NEW TOPIC - Most questions you may have, have likely been already answered. DON'T BE A DRIVE-BY POSTER: As a common courtesy, check back in and reply within 24 hours, or your post will be deleted. Note there's decades of heavily experienced Guzzi professionals on this site, all whom happily give endless amounts of their VALUABLE time for free; BE COURTEOUS AND RESPECTFUL!
  • Be sure to see the GTM STORE link also above for our 700+ product inventory, including OEM parts and many of our 100% Made-in-SoCal-USA GTM products and engine kits. In SoCal? Click the SERVICE tab above for the best in service, tires, tuning and installation of our products or custom work, and don't miss our GT MotoCycles® (not) art on the BUILDS tab above. WE'RE HERE ONLINE ONLY - NO PHONE CALLS MADE OR RECEIVED - DO NOT EMAIL AND ASK QUESTIONS OR ASK TO CALL YOU.
  • There is ZERO tolerance on personal attacks and ANY HYPERLINKS to PRODUCT(S) or other competing website(s), including personal pages, social media or other Forums. This ALSO INCLUDES ECU DIAGnostic software, questions and mapping. We work very hard to offer commercially supported products and to keep info relevant here. First offense is a note, second is a warning, third time will get you banned from the site. We don't have the time to chase repeat (and ignorant) offenders. This is NOT a social media platform; It's an ad-free, privately funded website, in small help with user donations. Be sure to see the GTM STORE link above; ALL product purchases help support the site, or you can upgrade your Forum profile or DONATE via the link above.

Odometer stopped working - 2004 V11 Cafe Sport

ploose

Tuned and Synch'ed
Joined
Nov 21, 2011
Messages
36
Reaction score
8
Location
Santa Fe, TX
Hello,
the odometer on my Cafe Sport stopped working recently. Symptoms were slowing turn over on the dial and dancing speedometer needle. While riding I hit the instruments and the speedo reacted normal but the odometer counter (trip and and total mileage stopped working..). Any suggestions? I know one big cable housing below the instrument cluster routes under the tank.....have not investigated any further yet. Suggestions..solutions? Thanks a bunch!
 
Classic V11 issue.

Almost always -- as I recall from my now-sold (darn it) Ballabio -- the speedo cable's near-bizarre "hard turn" down where it enters (again, as I recall) the tranny case.

The stress of that bend apparently is too much for cable and it often fails.

I always carried a spare. OEM's can be pricey, so I think I went to "close enoughs" from NAPA, etc.

Back to taxes! :swear:

Best,

Bill
 
The odometer gearing is not the best. The speedometer may continue to work, but the gears (plastic) for the odometer go bad. I've seen many of these fail. Best recourse is replacement. You mat want to see about going to an electronic speedometer/odometer unit. I've had these units repaired by Palo Alto speedometer, but the cost is about the same as a replacement. http://paspeedo.com/
 
The Cafe Sport uses the black and grey faced ITI gauges. These are unrepairable, and the speedo is no longer available in MPH. There aren’t many options for replacement, but a few GPS units and digital converter versions found in the Archive tab above.
If your bike uses the right angle adapter to the trans, which I don’t believe it does, update to the new cable that threads in directly.
 
As all reading this -- I'm figuring that's likely only "present company" of OP, John Z, and Todd :giggle: -- know, I am always wary of wading into anything that remotely implicates "tech stuff." Thus you may imagine my fear of saying more given "Present Company's" comments. :sweating:

But I was under the impression that the Cafe Sport was an up-gunned Ballabio (which I had), with the only (but rather significant) difference being Ohlins front and rear.

If so, as my Ballabio had that "right-turn" design that even fervent prayer could not keep in one piece :swear:, I thought same was so for Cafe Sport.

Furthermore (This) Deponent Saith Not. ;)

Bill
 
I found various forum content related to the ITI gauges. The older 'Veglia' gauges white faced, used in the 99-02 models, have odometer issues and are repairable. Mine are the ITI gauges (03-05, black faced), which are not repairable, at least I haven't found a way or source that confirms that it can be done. I looked at mine and the body is sealed and glued shut at the glass. When I took the gauge off the bike, a plastic piece fell out the illumination bulb socket hole.

So there are mainly two routes that people take:

1. UK made ETB gauges, slightly customizable, and powered by an ACEWELL Speed sensor that needs light surgery to fit the M14 thread (I believe) at the gearbox.

2. US made GPS Speedhut Speedometer gauges, highly customizable. Speedhut has also a non GPS version. For some reason nobody found a working sensor to power the gauge without major surgery. So I'm not sure there is an out of the box sensor......all alternatives don't fit the M14 thread unless undergoing major surgery or part swaps with the old cable drive. I have also found no reference that the Speedhut gauges can be used with the Acewell sensor?

I fount NO reference of swapping out the ITI gauge with a better original Moto Guzzi gauge...maybe something from a later model year (Griso, Breva, etc...). I also know that you can still buy the original ITI Speedo, of course the same weak odometer design and parts.

Soooo, anybody out there that found an out of the box sensor and hooked it up to a Speedhut gauge? Please let me know. THX
 
I put a Speedhut GPS speedometer on my 2004 Ballabio. Works just fine. I specified the remote (vs. in the gauge face) control button and mounted it on the handlebar. I mounted the GPS antenna on the underside of the fairing. Some of the other forums have examples of how people set up the speed sensor. I simply used the GPS version since I didn't want to screw around with it. There are a couple of specific option requests you would need to put forward with your order should you go this route. I can share those with you should you choose this option.
 
Took the ITI gauge apart, by prying the bezel off the gauge (with screw driver from the back). I was definitely not the first opening the gauge up. Long story short, the spindle gear right next to the worm drive stripped, which stopped turning the gears for the odometer, anything speed is still in tact and working. Metal shavings inside the gauge point to no or insufficient lubrication....so for everybody buying an original, open it up and lube. The gears are mostly metal, which was surprising to me....I ordered a GPS Speedhut..... done with mechanical failure issues and cables. Keep y'all posted.
 

Attachments

  • 20180409_115728[1].webp
    20180409_115728[1].webp
    66 KB · Views: 14
I put a Speedhut GPS speedometer on my 2004 Ballabio. Works just fine. I specified the remote (vs. in the gauge face) control button and mounted it on the handlebar. I mounted the GPS antenna on the underside of the fairing. Some of the other forums have examples of how people set up the speed sensor. I simply used the GPS version since I didn't want to screw around with it. There are a couple of specific option requests you would need to put forward with your order should you go this route. I can share those with you should you choose this option.

After taking apart my ITI unit on my 03 Lemans I found the same thing an irreparable situation. I found this thread and I'm interested in taking the same approach as you. Can you tell me which speedhut unit you installed? What did you do with the cable? etc...

Thanks in advance!
William
Lafayette, LA.
 
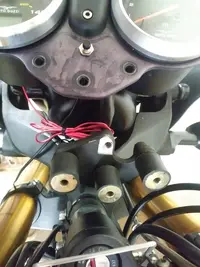
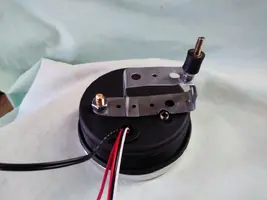
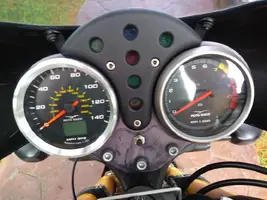
The new SpeedHut GPS speedometer came in.

Wiring is simple, follow the instructions. I used the yellow/black instrument lighting wires of the old speedometer. Yellow is +, black is the 'Ground'.

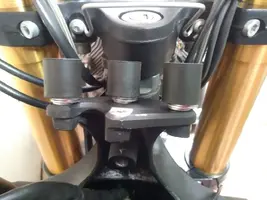
I reused the instrument housing, the instrument seating rubber ring, the rubber/ metal bolts from the old instrument.
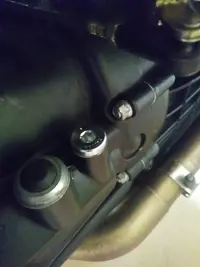
I bought construction metal band, 4mm nuts (for the rubber/ metal bolts0, 7mm nut fixing the metal band over the GPS antenna connection and 16mm nut for the gear box. All real simple and along the lines of some of the V11lemans forum proposed installation options.
I plugged the 16mm cable connection at the gear box and removed the speedometer cable and drive.
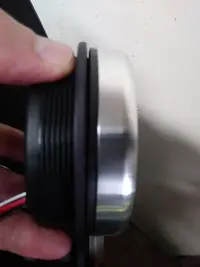
I only used one rubber steel bolt fixing the bezel behind the speedometer, since the Tach has 2 bolts. In all, three bolts hold the old instrument housing from the back, instead of the original 4 bolts. The old rubber seating ring was cut into smaller rings, to allow for the old flush seating of the instrument housing to the gauge and the gauge to the dash plate. Without the seals, the gauge or the bezel won't seat flush. Reason, the 3 3/8" Speedhut gauge diameter is too tight for reuse of the old seating seal. As an alternative you can buy 80mm diameter O-Rings, as one member suggested. The sections of the cut up seal ring go between gauge and dash plate, and between bezel and gauge (on the backside). If you are confused look at the tachometer....and it becomes clear.
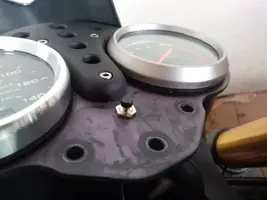
I left the big cut out on the backside (where the original speedo cable entered the bezel, and one bolt hole open, since they are behind the fairing and out of sight). I mounted the remote button gauge control into one of the dash holding bolt holes (drilling it out to 6 or 7mm diameter).
I added the original mileage to the odometer, works like a charm. You can do this with the GPS odometer.
Here are a few pics:
 

Attachments

  • 20180519_083202.webp
    20180519_083202.webp
    29.6 KB · Views: 19
  • 20180519_090903.webp
    20180519_090903.webp
    12.8 KB · Views: 18
  • 20180519_092527.webp
    20180519_092527.webp
    54.8 KB · Views: 17
  • 20180519_092548.webp
    20180519_092548.webp
    39.3 KB · Views: 17
  • 20180519_094027.webp
    20180519_094027.webp
    53.5 KB · Views: 17
  • 20180519_143423.webp
    20180519_143423.webp
    37 KB · Views: 17
  • 20180520_095116.webp
    20180520_095116.webp
    71.6 KB · Views: 16
Back
Top