• Ciao Guest - You’ve landed at the ultimate Guzzi site. NEW FORUM REGISTRATIONS REQUIRE EMAIL ACTIVATION - CHECK YOUR SPAM FOLDER - Use the CONTACT above if you need help. New to the forum? For all new members, we require ONE post in the Introductions section at the bottom, in order to post in most of the other sections. ALWAYS TRY A SEARCH BEFORE STARTING A NEW TOPIC - Most questions you may have, have likely been already answered. DON'T BE A DRIVE-BY POSTER: As a common courtesy, check back in and reply within 24 hours, or your post will be deleted. Note there's decades of heavily experienced Guzzi professionals on this site, all whom happily give endless amounts of their VALUABLE time for free; BE COURTEOUS AND RESPECTFUL!
  • There is ZERO tolerance on personal attacks and ANY HYPERLINKS to PRODUCT(S) or other competing website(s), including personal pages, social media or other Forums. This ALSO INCLUDES ECU DIAGnostic software, questions and mapping. We work very hard to offer commercially supported products and to keep info relevant here. First offense is a note, second is a warning, third time will get you banned from the site. We don't have the time to chase repeat (and ignorant) offenders. This is NOT a social media platform; It's an ad-free, privately funded website, in small help with user donations. Be sure to see the GTM STORE link above; ALL product purchases help support the site, or you can upgrade your Forum profile or DONATE via the link above.
  • Be sure to see the GTM STORE link also above for our 700+ product inventory, including OEM parts and many of our 100% Made-in-SoCal-USA GTM products and engine kits. In SoCal? Click the SERVICE tab above for the best in service, tires, tuning and installation of our products or custom work, and don't miss our GT MotoCycles® (not) art on the BUILDS tab above. WE'RE HERE ONLINE ONLY - NO PHONE CALLS MADE OR RECEIVED - DO NOT EMAIL AND ASK QUESTIONS OR ASK TO CALL YOU.
  • Like the new V100, GuzziTech is full throttle into the future! We're now running on an all-new server and we've updated our Forum software. The visual differences are obvious, but hopefully you'll notice the super-fast speed. If you notice any glitches or have any issues, please post on the Site Support section at the bottom. If you haven't yet, please upgrade your account which is covered in the Site Support section or via the DONATE tab above, which gives you full site access including the DOWNLOADS section. We really appreciate every $ and your support to keep this site ad-free. Create an account, sign in, upgrade your account, and enjoy. See you on the road in 2024.

Brake light flicker: solved

VictorScot

Tuned and Synch'ed
GT Contributor
Joined
Nov 6, 2022
Messages
98
Location
Julian, California
My riding buddy noted my rear brake light was intermittently flashing. My wife noticed it too. I figured I must be touching the rear brake with my foot and adjusted the rear brake lever. It continued. I asked my buddy follow me with my right foot deliberately well clear of the rear brake. Still happened, but I started correlating speed with the occurrence. I watched the front brake lever as wind pressure increased and road conditions bumped up. It was bouncing around. Hmm. Could it be the sensor on the front lever? I asked my friend to watch again as I got up past 65 mph and I applied slight forward pressure to the backside of the front brake lever. It stopped happening.
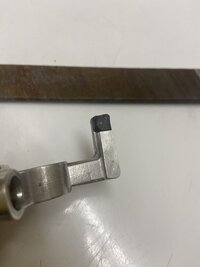
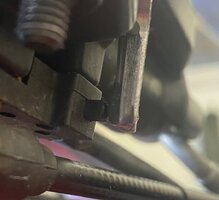
Back home I took a close look at how it all worked. With the slightest of back pressure on the lever I could hear the plunger style sensor "click" as it moved rearwards. There's no adjustment or spring to adjust that I'm aware of, and I did some searching. So I inspected how it all works. The problem is the almost of travel the sensor makes before master cylinder pressure stops the lever movement. I figured I'd just loosen and slightly move the brake light sensor. Nope, it's indexed in place and can't rotate. I decided to carefully shim the distance between the lever and the sensor. That's shown here. It worked nicely.
Are there simpler fixes, like wrapping the lever actuator spot with tape? Sure. Could I have built up the end of the sensor with JB Weld instead. Yes.
But my solution made me happy and is easily removed, added to, or filed down.
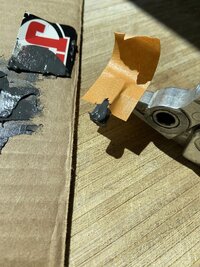
IMG 3613 IMG 3614 IMG 3628 IMG 3629
 
You could have reduced or increased the slack via a grub screw adjustment. This is for the clutch but the brake operates the same.

 
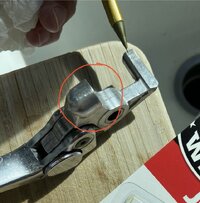
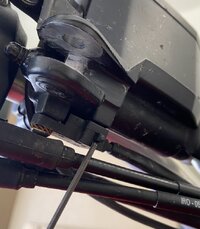
Thanks Scott. I know what you're referring to because I just adjusted my clutch via the lever as well, but the brake lever is different and does not have that adjustability... unless I'm really missing something. See photo.
(P.S. In this photo I'm indicating with the pencil where I built it up with JB Weld.)
Scot
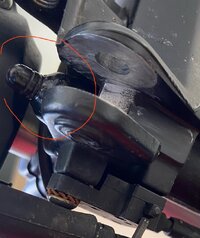
IMG 3612
 
Look at the reservoir side. Is it there?

Something is not right with your brake because you should never have to do this and in fact, I have never ever seen anybody jury-rig something like this.
 
I don’t mean to hurt you but of all the components on your motorcycle that you want to function exactly as designed, your brakes should be at the very top of the list.

My concern here is what is causing this failure that you have now crafted a jury-rig solution?

It’s your motorcycle not mine.
 
I don’t mean to hurt you but of all the components on your motorcycle that you want to function exactly as designed, your brakes should be at the very top of the list.

My concern here is what is causing this failure that you have now crafted a jury-rig solution?

It’s your motorcycle not mine.
I'm just kidding. But seriously, I cannot see any way to take up slack/play between the front brake lever and the master cylinder. There's no failure in the braking system other than an overly sensitive brake light switch.
 
How do I adjust that?

I honestly don’t know because I have never needed to adjust a Stelvio, or mine for that matter to compensate for this issue.

Plus I cannot see 3 dimensions in a 2 dimensional photo.

I would likely assume that there is a locking screw not easily visible which allows rotation of the grub.

Did you go read the hyperlink I sent you? You can see his process.

Are there flat surfaces on the screw itself and that is a separate locking ring on the bottom?

I cannot see fully.

Only you can see this one Victor. I just know that on quality brakes, like Brembo, the adjustment is often times there.
I did read that hyperlink, in fact prior to jumping into this project. I actually did quite a bit of Googling. I knew I'd get the, "Use the search function!" from someone. LOL.
 
Victor, did you rotate the lever to see behind that gumdrop screw? Curious as to what you discovered and if I was wrong.

I’m not perfect any means.
 
I had a comparable issue when I fitted after market span adjustable levers for my stubby fingers to my V9
It meant that the safety system would not allow me to start the bike in gear as it didn't know that the clutch was pulled.
I was able to shim the switch to resolve that problem

I belive that the clutch switch logic is the opposite to the brake switch, ie
Clutch lever pulled opens the contact
Brake lever pulled closes the contact

Could it be that the probe on the micro switch is worn such that it's not long enough to be keep the contact open with the lever releasd?

Alternatively it could be sticking

Replacing the switch might be a solution for you, as would making sure that the switch is clean and freely moving

PS I busted the clutch switch on my B1100 due to my stupidity
However, I read the numbers on it and found that it was a Honeywell part number and got an identical part from an electronic conponent supplier
 
Last edited:
Back
Top