It just keeps raining so I`ll just write the instructions without test ride.
Please read carefully to the end, especially the "caution" part and remember that everything you do, you do at your own risk. This was just the way I did it. I saw another post (in FB) where somebody had used just Dremel with cutting discs and cutted the db-killer to two pieces and removed then. But honestly I think this was easier and result looks better + if you want them back, it`s easier with this method. He/she said that with hole saw it takes forever, but I can`t agree with that. Use good quality hole saw. But the choice is yours how to do it.
I`m sorry but I don`t know how to convert metric measurements to imperial. The hole saw had both markings in it, but otherwise google gives too precise answer when trying to convert like; 6mm=0.236220472" I`m sure you will know better how to do it. And if you can advice me how to do it I would appreciate it.
If there is something you don`t understand, feel free to ask more. I`m not native English speaker so there might be wrong words, especially in the specific tool names.
CAUTION;
When the hole saw finally went through it jammed and almost twisted my wrist. Thank god my drill had "automatic cut off" for situations if the drill bit jams. Otherwise I would have broke my wrist and might have done some damage to the bike because the drill might have hit it. It would have been totally my own fault. I was using it with wooden deck on the same day and forgot to change from "drill" to "torque setting". So make sure your drill has some type limit/cut off. And of course; use at least eye protection.
First of all I made small dots with automatic center punch tool to db-killer and to end cap that are aligned. Just in case; if I ever want them to welded back, they are easier to align with dots. I made them just to top, but when I thought about it now, it would have been better to make them bottom too.
I used this little customized hole saw combination;

It consist;
- 37mm (1 7/16") hole saw and hole saw "base"
- 6mm thread rod
- approx 30mm diameter plywood disc (14mm thick).
- nuts for adjusting the plywood disc placement
Other things that you need;
-Drill with torque setting or automatic "cut off" if (=when) it jams. Remember that cord versions have even more power (and usually are older without any safety features).
-Cutting oil (I used spray).
-Dremel multitool or similar
-Plastic sheet for covering your bike. I used the one that comes in rolls and is equipped with tape. Mostly used for covering walls, windows etc. in home before painting. Metal chips and oil will fly everywhere. (Didn`t figure out the right name for this.)
-EYE PROTECTION and I recommend hearing protection and gloves too, edges are sharp after drilling.
Hole saw
I had 35mm and 38mm hole saws in toolbox but 35mm was too small and 38mm felt too loose. I would have tried 36mm but it wasn`t available anywhere near so I would had to order it (expensive and delivery time 2-4weeks). I don`t recommend using bigger than 38mm because the risk of hole being bigger than the perforated tube increases. In FB post was said that under 42mm is safe, but I wouldn`t go with bigger than 38mm.
Maybe with 36mm you wouldn`t need the guide disc but it might also be too small. I made the guide disc because 37mm was also little loose and I wanted to be sure not ruining these expensive silencers. I chose to use quality brand tool for this project and I recommend it to everybody doing this. End caps are probably stainless steel and with "no-brand" tools it might take forever or never get through. I don`t know is "Bahco" quality brand in general (there is pretty mixed opinions about that), but in this case it worked perfect and is still very sharp afterwards. This was so-called "Bi-Metal" hole saw.
Guide bit
This might be overkill; I removed the original guide drill bit from hole saw base, cut a 77mm long piece from M6 thread rod. Then used bench drill to cut plywood disc from 14mm plywood. I used 14mm plywood just because I had it in my hands. Probably little bit thinner would also be okay, but I wouldn`t go much thicker than that (there is a curve in the db-killer tube). Hole saw I used making the disc was something between 32-34mm...I think. Can`t say for sure (because I made it in workplace) but it wasn`t perfect fit so I had to sand diameter little bit smaller. It was easy using hand drill, thread rod and nuts (to lock the disc in place). Size is right when it fits inside the db-killer tube and it`s not loose or tight.
Because the original guide drill bit was 6.4mm the 6mm thread rod was little loose in the base. I added round or two of electric tape to thread rod base end to make it snug. Nuts are used to keep the guide disc in correct height. That is something that you just have try and adjust. I adjusted it so that the disc was 1-2mm higher than tooths in the hole saw. I also left the disc little loose so it can spin easily. Two nuts to each side fo the disc so they are locked and won`t start to spin with the disc.


Drilling & sanding
Drilling was pretty simple and fast job. I used "Makita DDF484" cordless drill. Recommended speed for 37mm hole saw & stainless steel combo is 120rpm (according to chart). Mine had just two settings and slower was 0-500rpm so I used it and tried not to drill in full speed but the speed was probably everything between 0-500rpm I used a lot of cutting oil and applied it before the previously added starts to smoke. I also gave "the tool to do its job" so I didn`t add much pressure when drilling. BTW. Did you remember to cover up your bike ? Oil and chips will fly everywhere so it`s better be safe than sorry.
Right one was pretty fast to drill, but I almost broke my wrist like I mentioned in the caution. So use the limited torque setting in the drill. Left one took more time because there was thicker welding in bottom. Finally it was totally loose but the drill started to hit against the torque limiter and I didn`t want to risk my wrists anymore so I used pliers and moved it up/down/right/left to break the last bit of welding. <- I don`t know the right word for that movement. Tubes came out pretty easy with pliers, even though the hole is tight. Drilling leaves very sharp edges so watch out for your fingers.
After drilling I used brake cleaner and paper towels to clean the cutting oil and most of metal chips (remember to use gloves and be careful not getting cuts to your fingers, edges are sharp). I had to use little cutting disc in Dremel to remove the thick welding in bottom of the left silencer. Then I used grinding stone in dremel to smoothen the sharp edges and after that sanding drum (about 15mm diameter, pretty rough coarseness, there was no markings in the drums) in Dremel to finish it. I had just "generic tool set" for dremel and the grinding stones were poor quality or maybe I used wrong ones. They wore out very fast (as you can see in photo) but made the job. Dremel recommends "aluminum oxide" stones for stainless steel. I don`t know what material mine was although the color was similar I`m not professional in metal works and stainless steel always gives problems in grinding and sanding, but maybe somebody can show the right product.
After the whole process was done, I used construction vacuum cleaner, paper towels etc. to get most of the oil and metal chips&dust out of the silencers. Personally I think this was pretty unnecessary because oil will burn and metal chips blow out after the first ride.
I was doing this all by myself so forgot to take pictures about the drilling and smoothing.

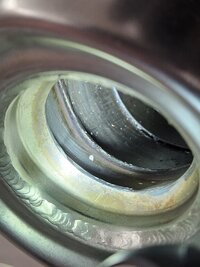
This is what came out;

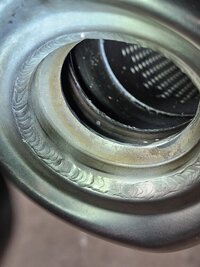
And this is what it looks after the smoothing;

Conclusion and about the sound;
I would rather have wrote this after the test ride but it looks like the ******* rain is going to last until sunday (earlier they said it stops on friday). So all my opinions are based on running the bike in the garage that is about 35m2, full of stuff and makes everything sound loud. Anyway I was assuming effect would be very modest (after all db-killers are just straight pipes with little bit smaller diameter) but this definitely increased sound more than I thought. Much deeper and more low tones than with killers/baffles. Stock sounded pretty good when idling but like an "stock ATV" in higher rpms. Now it definitely has lower sound when idling and sounds like motorbike when opening throttle. It`s not loud like Ducati DS1100 with straight pipes and termignoni silencers...which you couldn`t use in the same garage without hearing protection.
Also it backfired little (when you gave it revs). Didn`t do that before and I`m very strict to not to rev engine before it is warmed up so I would say it needs remapping. Might also be that it now runs cooler and takes more time to get in the same runninng temperature. After warming up it didn`t backfire anymore. I already installed Upmap (aftermarket exhaust without db-killers -map) but because of the work and neighbors I haven`t had chance to test. If you are not in hurry I would advise to wait what Todd does with his ecu-magic. It will pretty sure be better than UpMap. I got my UpMap very cheap from local Guzzist who sold his bike before installing it. So it was no-brainer deal for me.
I took video about the sound before drilling and will take video about the sound after removing db-killers when I have the time. I`ll upload it to youtube when it`s done, but because of the garage I can`t promise it will tell much. It might take some time, because I haven`t edited videos in years and never ever uploaded anything to youtube
Please read carefully to the end, especially the "caution" part and remember that everything you do, you do at your own risk. This was just the way I did it. I saw another post (in FB) where somebody had used just Dremel with cutting discs and cutted the db-killer to two pieces and removed then. But honestly I think this was easier and result looks better + if you want them back, it`s easier with this method. He/she said that with hole saw it takes forever, but I can`t agree with that. Use good quality hole saw. But the choice is yours how to do it.
I`m sorry but I don`t know how to convert metric measurements to imperial. The hole saw had both markings in it, but otherwise google gives too precise answer when trying to convert like; 6mm=0.236220472"
I`m sure you will know better how to do it. And if you can advice me how to do it I would appreciate it. If there is something you don`t understand, feel free to ask more. I`m not native English speaker so there might be wrong words, especially in the specific tool names.
CAUTION;
When the hole saw finally went through it jammed and almost twisted my wrist. Thank god my drill had "automatic cut off" for situations if the drill bit jams. Otherwise I would have broke my wrist and might have done some damage to the bike because the drill might have hit it. It would have been totally my own fault. I was using it with wooden deck on the same day and forgot to change from "drill" to "torque setting". So make sure your drill has some type limit/cut off. And of course; use at least eye protection.
First of all I made small dots with automatic center punch tool to db-killer and to end cap that are aligned. Just in case; if I ever want them to welded back, they are easier to align with dots. I made them just to top, but when I thought about it now, it would have been better to make them bottom too.
I used this little customized hole saw combination;
It consist;
- 37mm (1 7/16") hole saw and hole saw "base"
- 6mm thread rod
- approx 30mm diameter plywood disc (14mm thick).
- nuts for adjusting the plywood disc placement
Other things that you need;
-Drill with torque setting or automatic "cut off" if (=when) it jams. Remember that cord versions have even more power (and usually are older without any safety features).
-Cutting oil (I used spray).
-Dremel multitool or similar
-Plastic sheet for covering your bike. I used the one that comes in rolls and is equipped with tape. Mostly used for covering walls, windows etc. in home before painting. Metal chips and oil will fly everywhere. (Didn`t figure out the right name for this.)
-EYE PROTECTION and I recommend hearing protection and gloves too, edges are sharp after drilling.
Hole saw
I had 35mm and 38mm hole saws in toolbox but 35mm was too small and 38mm felt too loose. I would have tried 36mm but it wasn`t available anywhere near so I would had to order it (expensive and delivery time 2-4weeks). I don`t recommend using bigger than 38mm because the risk of hole being bigger than the perforated tube increases. In FB post was said that under 42mm is safe, but I wouldn`t go with bigger than 38mm.
Maybe with 36mm you wouldn`t need the guide disc but it might also be too small. I made the guide disc because 37mm was also little loose and I wanted to be sure not ruining these expensive silencers. I chose to use quality brand tool for this project and I recommend it to everybody doing this. End caps are probably stainless steel and with "no-brand" tools it might take forever or never get through. I don`t know is "Bahco" quality brand in general (there is pretty mixed opinions about that), but in this case it worked perfect and is still very sharp afterwards. This was so-called "Bi-Metal" hole saw.
Guide bit
This might be overkill; I removed the original guide drill bit from hole saw base, cut a 77mm long piece from M6 thread rod. Then used bench drill to cut plywood disc from 14mm plywood. I used 14mm plywood just because I had it in my hands. Probably little bit thinner would also be okay, but I wouldn`t go much thicker than that (there is a curve in the db-killer tube). Hole saw I used making the disc was something between 32-34mm...I think. Can`t say for sure (because I made it in workplace) but it wasn`t perfect fit so I had to sand diameter little bit smaller. It was easy using hand drill, thread rod and nuts (to lock the disc in place). Size is right when it fits inside the db-killer tube and it`s not loose or tight.
Because the original guide drill bit was 6.4mm the 6mm thread rod was little loose in the base. I added round or two of electric tape to thread rod base end to make it snug. Nuts are used to keep the guide disc in correct height. That is something that you just have try and adjust. I adjusted it so that the disc was 1-2mm higher than tooths in the hole saw. I also left the disc little loose so it can spin easily. Two nuts to each side fo the disc so they are locked and won`t start to spin with the disc.
Drilling & sanding
Drilling was pretty simple and fast job. I used "Makita DDF484" cordless drill. Recommended speed for 37mm hole saw & stainless steel combo is 120rpm (according to chart). Mine had just two settings and slower was 0-500rpm so I used it and tried not to drill in full speed but the speed was probably everything between 0-500rpm
I used a lot of cutting oil and applied it before the previously added starts to smoke. I also gave "the tool to do its job" so I didn`t add much pressure when drilling. BTW. Did you remember to cover up your bike ? Oil and chips will fly everywhere so it`s better be safe than sorry.Right one was pretty fast to drill, but I almost broke my wrist like I mentioned in the caution. So use the limited torque setting in the drill. Left one took more time because there was thicker welding in bottom. Finally it was totally loose but the drill started to hit against the torque limiter and I didn`t want to risk my wrists anymore so I used pliers and moved it up/down/right/left to break the last bit of welding. <- I don`t know the right word for that movement. Tubes came out pretty easy with pliers, even though the hole is tight. Drilling leaves very sharp edges so watch out for your fingers.
After drilling I used brake cleaner and paper towels to clean the cutting oil and most of metal chips (remember to use gloves and be careful not getting cuts to your fingers, edges are sharp). I had to use little cutting disc in Dremel to remove the thick welding in bottom of the left silencer. Then I used grinding stone in dremel to smoothen the sharp edges and after that sanding drum (about 15mm diameter, pretty rough coarseness, there was no markings in the drums) in Dremel to finish it. I had just "generic tool set" for dremel and the grinding stones were poor quality or maybe I used wrong ones. They wore out very fast (as you can see in photo) but made the job. Dremel recommends "aluminum oxide" stones for stainless steel. I don`t know what material mine was although the color was similar
I`m not professional in metal works and stainless steel always gives problems in grinding and sanding, but maybe somebody can show the right product.After the whole process was done, I used construction vacuum cleaner, paper towels etc. to get most of the oil and metal chips&dust out of the silencers. Personally I think this was pretty unnecessary because oil will burn and metal chips blow out after the first ride.
I was doing this all by myself so forgot to take pictures about the drilling and smoothing.
This is what came out;
And this is what it looks after the smoothing;
Conclusion and about the sound;
I would rather have wrote this after the test ride but it looks like the ******* rain is going to last until sunday (earlier they said it stops on friday). So all my opinions are based on running the bike in the garage that is about 35m2, full of stuff and makes everything sound loud. Anyway I was assuming effect would be very modest (after all db-killers are just straight pipes with little bit smaller diameter) but this definitely increased sound more than I thought. Much deeper and more low tones than with killers/baffles. Stock sounded pretty good when idling but like an "stock ATV" in higher rpms. Now it definitely has lower sound when idling and sounds like motorbike when opening throttle. It`s not loud like Ducati DS1100 with straight pipes and termignoni silencers...which you couldn`t use in the same garage without hearing protection.
Also it backfired little (when you gave it revs). Didn`t do that before and I`m very strict to not to rev engine before it is warmed up so I would say it needs remapping. Might also be that it now runs cooler and takes more time to get in the same runninng temperature. After warming up it didn`t backfire anymore. I already installed Upmap (aftermarket exhaust without db-killers -map) but because of the work and neighbors I haven`t had chance to test. If you are not in hurry I would advise to wait what Todd does with his ecu-magic. It will pretty sure be better than UpMap. I got my UpMap very cheap from local Guzzist who sold his bike before installing it. So it was no-brainer deal for me.
I took video about the sound before drilling and will take video about the sound after removing db-killers when I have the time. I`ll upload it to youtube when it`s done, but because of the garage I can`t promise it will tell much. It might take some time, because I haven`t edited videos in years and never ever uploaded anything to youtube
Last edited:
")

")


