Navigation
Install the app
How to install the app on iOS
Follow along with the video below to see how to install our site as a web app on your home screen.
Note: This feature may not be available in some browsers.
More options
-
Ciao Guest - You’ve landed at the ultimate Guzzi site. NEW FORUM REGISTRATIONS REQUIRE EMAIL ACTIVATION - CHECK YOUR SPAM FOLDER - Use the CONTACT above if you need help. New to the forum? For all new members, we require ONE post in the Introductions section at the bottom, in order to post in most of the other sections. ALWAYS TRY A SEARCH BEFORE STARTING A NEW TOPIC - Most questions you may have, have likely been already answered. DON'T BE A DRIVE-BY POSTER: As a common courtesy, check back in and reply within 24 hours, or your post will be deleted. Note there's decades of heavily experienced Guzzi professionals on this site, all whom happily give endless amounts of their VALUABLE time for free; BE COURTEOUS AND RESPECTFUL!
-
There is ZERO tolerance on personal attacks and ANY HYPERLINKS to PRODUCT(S) or other competing website(s), including personal pages, social media or other Forums. This ALSO INCLUDES ECU DIAGnostic software, questions and mapping. We work very hard to offer commercially supported products and to keep info relevant here. First offense is a note, second is a warning, third time will get you banned from the site. We don't have the time to chase repeat (and ignorant) offenders. This is NOT a social media platform; It's an ad-free, privately funded website, in small help with user donations. Be sure to see the GTM STORE link above; ALL product purchases help support the site, or you can upgrade your Forum profile or DONATE via the link above.
-
Be sure to see the GTM STORE link also above for our 700+ product inventory, including OEM parts and many of our 100% Made-in-SoCal-USA GTM products and engine kits. In SoCal? Click the SERVICE tab above for the best in service, tires, tuning and installation of our products or custom work, and don't miss our GT MotoCycles® (not) art on the BUILDS tab above. WE'RE HERE ONLINE ONLY - NO PHONE CALLS MADE OR RECEIVED - DO NOT EMAIL AND ASK QUESTIONS OR ASK TO CALL YOU.
-
Like the new V100, GuzziTech is full throttle into the future! We're now running on an all-new server and we've updated our Forum software. The visual differences are obvious, but hopefully you'll notice the super-fast speed. If you notice any glitches or have any issues, please post on the Site Support section at the bottom. If you haven't yet, please upgrade your account which is covered in the Site Support section or via the DONATE tab above, which gives you full site access including the DOWNLOADS section. We really appreciate every $ and your support to keep this site ad-free. Create an account, sign in, upgrade your account, and enjoy. See you on the road in 2024.
You are using an out of date browser. It may not display this or other websites correctly.
You should upgrade or use an alternative browser.
You should upgrade or use an alternative browser.
Eldo input nut?
- Thread starter GTM®
- Start date
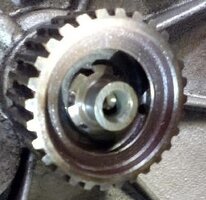
Apologies, Todd as I'm doing this from memory. It look the same set up as on the T3 I owned way back. It's the splines that go into the clutch plates? If so, yes, I believe that nut retains the splined shaft in your photo.
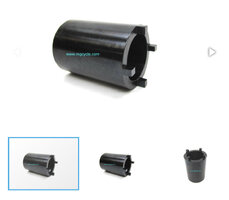
My tool is GU14912600 from old, I have a big nut welded to opposite side for torquing.
In the B11 or Norge book it says to use this for swingarm locknut, it is a different tool but almost the same(narrower lugs on old) MG cycle sells an alt or same tool. Good luck.
In the B11 or Norge book it says to use this for swingarm locknut, it is a different tool but almost the same(narrower lugs on old) MG cycle sells an alt or same tool. Good luck.
Yes, thanks, but it's a 6-prong castle nut as noted/shown. Ever seen that one before?Apologies, Todd as I'm doing this from memory. It look the same set up as on the T3 I owned way back. It's the splines that go into the clutch plates? If so, yes, I believe that nut retains the splined shaft in your photo.
TBH, it's so long ago that I honestly can't recall.Yes, thanks, but it's a 6-prong castle nut as noted/shown. Ever seen that one before?
Amboman
Cruisin' Guzzisti
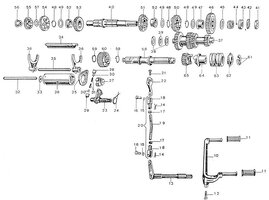
That's a four-speed transmission from a V700 or Ambassador. No nut on those - just circlips holding the clutch hub in position - one in front and one behind. The "nut" you're seeing is actually the input shaft. #59 are the circlips. I find it easiest to replace the front seal with the input shaft removed, which means almost completely disassembling the transmission. There are a few "tricks" one must know to reassemble them correctly. Done wrong you end up with a two-speed.


Amboman
Cruisin' Guzzisti
Also, that hub looks pretty notched, may be best to replace it. A hub with the deeper (4 mm) splines is available.
To make a 4 spd. leak proof takes a bit of work as well. Often the throw-out bearing bore is worn. Patrick Hayes can sleeve it in stainless steel, and also add an o-ring groove to the cover over the shift selector, so that an o-ring from a 5 spd. can be fitted. The clutch pushrod "seal" (just a tight fitting plastic tube) should be replaced with eiher the later "cone" seals (I had those leak though) or a stack of six unusually sized o-rings (I buy them in bulk and can send some to you).
To make a 4 spd. leak proof takes a bit of work as well. Often the throw-out bearing bore is worn. Patrick Hayes can sleeve it in stainless steel, and also add an o-ring groove to the cover over the shift selector, so that an o-ring from a 5 spd. can be fitted. The clutch pushrod "seal" (just a tight fitting plastic tube) should be replaced with eiher the later "cone" seals (I had those leak though) or a stack of six unusually sized o-rings (I buy them in bulk and can send some to you).
Last edited:
Agreed. It’s pretty hammered. Check your email again.Also, that hub looks pretty notched, may be best to replace it. A hub with the deeper (4 mm) splines is available.


