• NOTICE: The owner of this website and GTMotoCycles.com completely lost his home on the morning of January 8th in the L.A. Wildfire Storm. Most of his neighborhood is gone, and a few friends were killed along with their pets. The GTM SHOP and STORE are functioning normally, but we DEMAND EXTREME PATIENCE on orders as we are a SMALL business and Todd usually has his hands on nearly every order before it goes out. You can find more info on a post named L.A. Wildfires in the USA section. Our heart and best go out to everyone effected in this horrific disaster.
  • Ciao Guest - You’ve landed at the ultimate Guzzi site. NEW FORUM REGISTRATIONS REQUIRE EMAIL ACTIVATION - CHECK YOUR SPAM FOLDER - Use the CONTACT above if you need help. New to the forum? For all new members, we require ONE post in the Introductions section at the bottom, in order to post in most of the other sections. ALWAYS TRY A SEARCH BEFORE STARTING A NEW TOPIC - Most questions you may have, have likely been already answered. DON'T BE A DRIVE-BY POSTER: As a common courtesy, check back in and reply within 24 hours, or your post will be deleted. Note there's decades of heavily experienced Guzzi professionals on this site, all whom happily give endless amounts of their VALUABLE time for free; BE COURTEOUS AND RESPECTFUL!
  • Be sure to see the GTM STORE link also above for our 700+ product inventory, including OEM parts and many of our 100% Made-in-SoCal-USA GTM products and engine kits. In SoCal? Click the SERVICE tab above for the best in service, tires, tuning and installation of our products or custom work, and don't miss our GT MotoCycles® (not) art on the BUILDS tab above. WE'RE HERE ONLINE ONLY - NO PHONE CALLS MADE OR RECEIVED - DO NOT EMAIL AND ASK QUESTIONS OR ASK TO CALL YOU.
  • There is ZERO tolerance on personal attacks and ANY HYPERLINKS to PRODUCT(S) or other competing website(s), including personal pages, social media or other Forums. This ALSO INCLUDES ECU DIAGnostic software, questions and mapping. We work very hard to offer commercially supported products and to keep info relevant here. First offense is a note, second is a warning, third time will get you banned from the site. We don't have the time to chase repeat (and ignorant) offenders. This is NOT a social media platform; It's an ad-free, privately funded website, in small help with user donations. Be sure to see the GTM STORE link above; ALL product purchases help support the site, or you can upgrade your Forum profile or DONATE via the link above.

Heated Grips for MGX

Update: yes it works on a Cali 1400 Custom build 2013 too!
Not that I doubted Vizir ;)

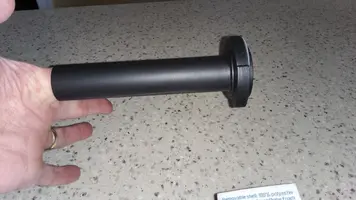
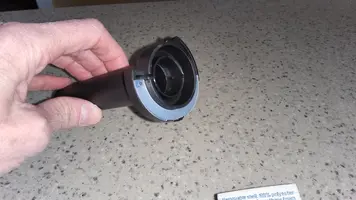
I took a slightly different approach. I ordered the spare L+R Hand Grips Grips (OF691T7 & OF691C6). Makes no sense to buy a controller to throw it away.
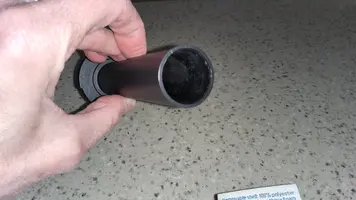
Installation was easy, no glue or heating required. Both left and right grip were a tight fit and could be moved over the handlebar with some twisting and pushing. I only needed to remove the ridge on the end of throttle (used a hobby knife for that):
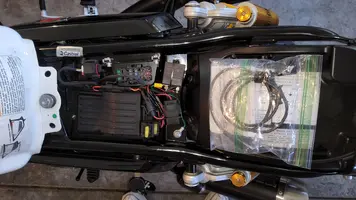
View attachment 35224
Since I had difficulties to order the molex plugs I decided to replace the MG side with the same type of connecter that the Oxford Grips have. If in the future one of the Oxford grips fails I wil ba able to replace it without changing plugs. For the ones willing to go the same route, the connector you need is: L6.2 6.2mm Plug (female). Also referred to as L6.2 2p, L6.2 2.0 or sometimes KET 2p Tamiya style.....

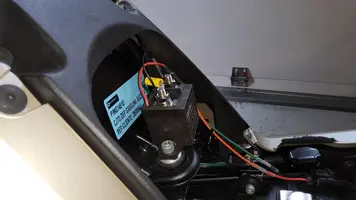
Then Vilim messed up my plans by announcing there might be a Piaggio solution that required the original connectors to be on the Guzzi.... To keep all options open for the future I decided to grab me the Molex connectors too and just make an extension cable with both types of connectors:
View attachment 35225
Works perfect. The grips heat up very fast in mode 3..

If someone wants to go this route then I can make one extra pair of extension cables with the remaining connectors I ordered.
As you can see with the Vilim experience, you did well to buy the "oxford" solution :))
 
I have been using the heated grips for a month now. Luckily it was still cold in the Netherlands.
At first I was not convinced of this solution. They heat up the inside of your hands, but the outside will still be cold due to the wind passing over.
Somewhere in this post I found a picture of wind deflectors on the handle bar and I ordered me the National Cycles N5502 hand deflectors:
IMG_1564.jpeg

This will keep the wind from blowing over my hands. The combination works perfect for me. Unfortunately now the weather here has improved and I don't need the heating anymore ;)
Only thing is that the MG should cycle differently through the power settings since I tend to start at "3" and then if the grips are warm, in just a few minutes, I return to "1". So it should be: 0, 3, 2, 1 and not 0, 1, 2, 3.
 
Last edited:
I ordered the Piaggio heated grip kit and installed it without any major issues. Bike controls recognized them and powered 'em up.
Scrounged up a couple spacers for bar end clearance and they work well. A bit warm down here in Alabama right now so this winter I'll see how they do.
 
I ordered the Piaggio heated grip kit and installed it without any major issues. Bike controls recognized them and powered 'em up.
Scrounged up a couple spacers for bar end clearance and they work well. A bit warm down here in Alabama right now so this winter I'll see how they do.
Wonder if you could provide some pictures to show exactly how the fit is and what you did with the spacers you mentioned? I am planning on adding heated grips to my soon to arrive 2020 Cali 1400 Touring and you seemed to have found the easiest adaptation.
 
Wonder if you could provide some pictures to show exactly how the fit is and what you did with the spacers you mentioned? I am planning on adding heated grips to my soon to arrive 2020 Cali 1400 Touring and you seemed to have found the easiest adaptation.
Sure. I'll get out to the garage this afternoon and post some pics.
 
Here are a couple pics... the middle one shows where I used a small spacer to keep the bar end from fouling the throttle tube. IMG_1202.webpIMG_1203.webpIMG_1204.webp
The left one shows that the power wire is oriented differently from the M/G ones but it doesn't get in the way. All plug n play and they work well.
 
Here are a couple pics... the middle one shows where I used a small spacer to keep the bar end from fouling the throttle tube. View attachment 39070View attachment 39071View attachment 39072
The left one shows that the power wire is oriented differently from the M/G ones but it doesn't get in the way. All plug n play and they work well.
Wow! Thanks for the pics. I greatly appreciate this. Will probably be my very first mod after I get the bike in a week or so. Thanks again.
 
Wonder if you could provide some pictures to show exactly how the fit is and what you did with the spacers you mentioned? I am planning on adding heated grips to my soon to arrive 2020 Cali 1400 Touring and you seemed to have found the easiest adaptation.
From memory the OEM heated grips will not fit the later models with full fly-by-wire throttle, the diameter is different from the ealier models.
 
From memory the OEM heated grips will not fit the later models with full fly-by-wire throttle, the diameter is different from the ealier models.
Thanks for that confirmation. I am now looking at some alternatives such as heated grip wraps that just go over the existing grips. Would be a seasonal install rather than permanent.
 
The Oxford Touring PRO will fit the 2024 V7's throttle tube (no fly by wire) once the ribs are smoothed off. The V85TT with the fly-by wire throttle tube is too large and has to be turned down on a lathe to the right O.D. Take-off a bit at a time to get the on-size fit. But correct that the fly-by wire throttle tube O.D. is too large. Use a lathe and CONES in each end to center the throttle tube (take it apart) and lathe it to size. While you're at it, move the SPRING inside the throttle foreward to make the twist force much more bearable. Those one-way screws are pesky and you need to drill them out. See the Internet for more on that. Your hand will thank you for the lighter throttle!

The heated grips come in two basic designs it looks like. The Oxford design uses a thermistor to keep the temperature CONSTANT by adjusting the current. The stock GUZZI grips seem, I repeat, seem to run a steady state current in steps. I've found that the Oxford Touring PRO hold a much more steady surface temp than my Guzzi grips on my 2025 V85TT TRAVEL. I replaced the stock Guzzi grips with the Oxford touring PRO's.

I also changed the circuit to send power to the grips to use a 12V RELAY in the GROUND wire (green wire) connected to the FRAME such that the grips are "off" with the key no matter what. DO NOT put the relay in the HOT side, leave that on the battery. Check with a VOM that the frame ground is the same hunk of metal that the battery ground lead is connected to (continuity). The realy will have a set of two wires that turns the normally OPEN relay CLOSED to pass voltage when the key is switched on. I used the switched USB power plug to send that 12V to the relay.

I've set-up the V7 and V85TT's heated grips grips this way (pictures below). And true, the Oxford grips are supposed to sense the voltage drop when the charging current stops, but I don't trust that so I went my own way. Being in the middle of no where and finding out the battery is dead is no fun. Now it is impossible to have a fault that discharges the battery.
 

Attachments

  • 20250123_101702.webp
    20250123_101702.webp
    139.9 KB · Views: 2
  • 20240911_085348.webp
    20240911_085348.webp
    138.2 KB · Views: 2
  • 20241121_140307.webp
    20241121_140307.webp
    90 KB · Views: 2
From memory the OEM heated grips will not fit the later models with full fly-by-wire throttle, the diameter is different from the ealier models.
1 x left HotGrip (22mmØ I/D) + 0.7mtr Wiring
1 x right HotGrip (25.4mmØ I/D) + 0.65mtr Wiring

The above is the 'spec' diameter requirements for the Oxford Touring PRO grips. The throttle side is ~25.4 mm and will need the fly-by-wire throttle tube turned down on a lathe. Take the throttle apart and use CONES to center it and lathe to size SLOWLY. Can't put the plastic back!
 

Attachments

  • 20250123_101710.webp
    20250123_101710.webp
    147.5 KB · Views: 0
  • 20250123_101702.webp
    20250123_101702.webp
    139.9 KB · Views: 0
  • 20250123_101719.webp
    20250123_101719.webp
    129.6 KB · Views: 0
FWIW, I've done three v85's with Oxford grips. Never turned down the throttle. But, I chamfered the leading edge, took a big round file, and cleaned all the crap out of the Oxford and opened it up a bit. Final step is to forget the glue. Put plenty of dish soap on the throttle and in the new grip. Start the bike with the grips turned onto high, get the right grip red hot, and shove it on hard and fast, having a block of wood and a small hammer ready for the last 1/4" if necessary.
 
FWIW, I've done three v85's with Oxford grips. Never turned down the throttle. But, I chamfered the leading edge, took a big round file, and cleaned all the crap out of the Oxford and opened it up a bit. Final step is to forget the glue. Put plenty of dish soap on the throttle and in the new grip. Start the bike with the grips turned onto high, get the right grip red hot, and shove it on hard and fast, having a block of wood and a small hammer ready for the last 1/4" if necessary.
Did the bikes use the drive-by-wire Piaggio group throttle body? My 2025 throttle tube is going to resist tremendously! The grip can be damaged with too much force on the end, so that's risky to whack away at it too hard. Oxford warns to not do that. But if you are all done and it works, hey, no strike no foul. Given the availability to turn the throttle tube down a touch is less risky to damage the $$$ grip. It is, I agree, aggravatingly a touch too big and some material management can get it done. The silicone rubber flashing inside the heated grip is, as you point out, part of the problem.

I would try your method first, but if too much force is encountered, be careful and decide how far to go and to not damage the grip. Turning the throttle tube down to 25.4 mm eliminates the risk of damage.
 
Back
Top