• Ciao Guest - You’ve landed at the ultimate Guzzi site. NEW FORUM REGISTRATIONS REQUIRE EMAIL ACTIVATION - CHECK YOUR SPAM FOLDER - Use the CONTACT above if you need help. New to the forum? For all new members, we require ONE post in the Introductions section at the bottom, in order to post in most of the other sections. ALWAYS TRY A SEARCH BEFORE STARTING A NEW TOPIC - Most questions you may have, have likely been already answered. DON'T BE A DRIVE-BY POSTER: As a common courtesy, check back in and reply within 24 hours, or your post will be deleted. Note there's decades of heavily experienced Guzzi professionals on this site, all whom happily give endless amounts of their VALUABLE time for free; BE COURTEOUS AND RESPECTFUL!
  • There is ZERO tolerance on personal attacks and ANY HYPERLINKS to PRODUCT(S) or other competing website(s), including personal pages, social media or other Forums. This ALSO INCLUDES ECU DIAGnostic software, questions and mapping. We work very hard to offer commercially supported products and to keep info relevant here. First offense is a note, second is a warning, third time will get you banned from the site. We don't have the time to chase repeat (and ignorant) offenders. This is NOT a social media platform; It's an ad-free, privately funded website, in small help with user donations. Be sure to see the GTM STORE link above; ALL product purchases help support the site, or you can upgrade your Forum profile or DONATE via the link above.
  • Be sure to see the GTM STORE link also above for our 700+ product inventory, including OEM parts and many of our 100% Made-in-SoCal-USA GTM products and engine kits. In SoCal? Click the SERVICE tab above for the best in service, tires, tuning and installation of our products or custom work, and don't miss our GT MotoCycles® (not) art on the BUILDS tab above. WE'RE HERE ONLINE ONLY - NO PHONE CALLS MADE OR RECEIVED - DO NOT EMAIL AND ASK QUESTIONS OR ASK TO CALL YOU.
  • Like the new V100, GuzziTech is full throttle into the future! We're now running on an all-new server and we've updated our Forum software. The visual differences are obvious, but hopefully you'll notice the super-fast speed. If you notice any glitches or have any issues, please post on the Site Support section at the bottom. If you haven't yet, please upgrade your account which is covered in the Site Support section or via the DONATE tab above, which gives you full site access including the DOWNLOADS section. We really appreciate every $ and your support to keep this site ad-free. Create an account, sign in, upgrade your account, and enjoy. See you on the road in 2024.

Norge starter removal - how to

Sempervee1

Tuned and Synch'ed
Joined
Sep 22, 2022
Messages
93
Location
Seattle wa
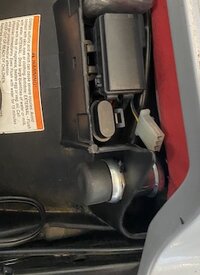
Wanting to add emergency quick start button before I need to on my 07 Norge with nearly 50 K miles. I have the waterproof start button and double male adapter for the solenoid to wire to + side of battery button and wire direct to solonoid, but cannot seem to reach it under the fairing body.

Q: Must the side fairing be removed to access the starter? Is there an easier way? Never took off fairing body surrounding tank area.

Thinking of putting Amazon start button in place of the ABS button on fairing as I never turn ABS off. Looks like a direct fit. Just will disconnect and tape off ABS button wiring. *Seem reasonable or ideas for other spot? I know others have put it under the seat. Yes, already has "Startus Interuptus fix.

Thanks for any input..
 

Attachments

  • Screen Shot 2024-03-20 at 08.05.23.png
    Screen Shot 2024-03-20 at 08.05.23.png
    38.5 KB · Views: 3
Since you have the "startus interuptus" installed I doubt you will need that extra start button. However, you just need to get to the spade connector on the solenoid. If you can't so it by feel, then you will need to remove the side panel
 
Since you have the "startus interuptus" installed I doubt you will need that extra start button. However, you just need to get to the spade connector on the solenoid. If you can't so it by feel, then you will need to remove the side panel
That is what I was ocncerned with. I can't seem to get to the spade and need to pull the L side fairing back it seems. I already have the lower fairing and nose off as that is how I ride it. stripped down. Thanks.
 
Just pull 2 bolts it will slide back into the shifter to swing it out. There may be a cover on it also, can't remember.
I use a needle nose pliers to pull wire off, you'll need a 13mm box to get the big power wire off.
 
I'm trying to get to the solenoid spade connector to replace it with a piggy back double connector, one that goes to the relay and other to the aux start button I have installed under the seat just in case for emergencies. Should have been simple but it is not. Trying not to take off faring and take off starter to get to it without damaging it.
 

Attachments

  • Aux start button.jpeg
    Aux start button.jpeg
    34.5 KB · Views: 7
There is 2 screws to take off start cover, 4mm allen above & below, screws go in a stand off that hold ground wires to block. You should clean the connections once in awhile. Something to think about.
 
With the lower fairing removed you would need to remove the two 13mm bolts holding the back end of the upper fairing from the bracket. Then remove the cover mentioned with the allen screws holding it on. Slide it back, pull front out and remove. Use two long 3/8" extensions and a 13mm socket to remove the bottom bracket bolt that also holds the bottom of the starter. The top bolt I remove with a ratcheting 13mm combination wrench. Starter slides to the rear and pull front out. You will have easy access to your spade connector now!
 
Back
Top