• Ciao Guest - You’ve landed at the ultimate Guzzi site. NEW FORUM REGISTRATIONS REQUIRE EMAIL ACTIVATION - CHECK YOUR SPAM FOLDER - Use the CONTACT above if you need help. New to the forum? For all new members, we require ONE post in the Introductions section at the bottom, in order to post in most of the other sections. ALWAYS TRY A SEARCH BEFORE STARTING A NEW TOPIC - Most questions you may have, have likely been already answered. DON'T BE A DRIVE-BY POSTER: As a common courtesy, check back in and reply within 24 hours, or your post will be deleted. Note there's decades of heavily experienced Guzzi professionals on this site, all whom happily give endless amounts of their VALUABLE time for free; BE COURTEOUS AND RESPECTFUL!
  • There is ZERO tolerance on personal attacks and ANY HYPERLINKS to PRODUCT(S) or other competing website(s), including personal pages, social media or other Forums. This ALSO INCLUDES ECU DIAGnostic software, questions and mapping. We work very hard to offer commercially supported products and to keep info relevant here. First offense is a note, second is a warning, third time will get you banned from the site. We don't have the time to chase repeat (and ignorant) offenders. This is NOT a social media platform; It's an ad-free, privately funded website, in small help with user donations. Be sure to see the GTM STORE link above; ALL product purchases help support the site, or you can upgrade your Forum profile or DONATE via the link above.
  • Be sure to see the GTM STORE link also above for our 700+ product inventory, including OEM parts and many of our 100% Made-in-SoCal-USA GTM products and engine kits. In SoCal? Click the SERVICE tab above for the best in service, tires, tuning and installation of our products or custom work, and don't miss our GT MotoCycles® (not) art on the BUILDS tab above. WE'RE HERE ONLINE ONLY - NO PHONE CALLS MADE OR RECEIVED - DO NOT EMAIL AND ASK QUESTIONS OR ASK TO CALL YOU.
  • Like the new V100, GuzziTech is full throttle into the future! We're now running on an all-new server and we've updated our Forum software. The visual differences are obvious, but hopefully you'll notice the super-fast speed. If you notice any glitches or have any issues, please post on the Site Support section at the bottom. If you haven't yet, please upgrade your account which is covered in the Site Support section or via the DONATE tab above, which gives you full site access including the DOWNLOADS section. We really appreciate every $ and your support to keep this site ad-free. Create an account, sign in, upgrade your account, and enjoy. See you on the road in 2024.

Norge starting blowing fuse and relay

Sempervee1

Tuned and Synch'ed
Joined
Sep 22, 2022
Messages
93
Location
Seattle wa
Read lots of no start posts - but have not seen one like this. Purchased bike with fused extra relay to battery from starter relay installed. Had to replace one bad one starter relay last month and yesterday a 20 amp blown fuse connected to the starter relay.

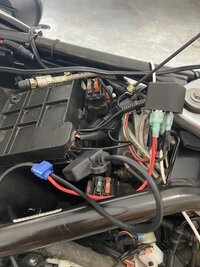
Read about replacing thicker (I did with 18 Gauge) from battery to relay from what looked like 10 or 12 gauge skinny wire prior owner used. Is using thick 18 gauge wire from fuse to battery OK? Have not read any posts where it is spoken of what gauge wiring to use? Does it really matter or hinder things if too large? What about replacing thicker wire to solenoid leading away from the relay but I don't see how? What am I missing? Thin yellow wire off starter relay to fused aux relay and battery is done with heavier 18 ga wire now. see pic. Bat connections are tight.

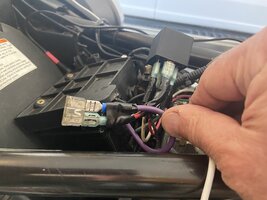
I have 4 wires from the additional relay, 3 lead up towards the front with 2 of them powering the horn. One is a green wire I cannot figure out what it connects to yet on my 07 Norge. The 4th wire is the shared starter auxiliary battery fused relay. What does the green wire power? Is it OK to keep the 18 gauge thick wire from battery to fuse? See pic. Thanks
 

Attachments

  • Startus Wiring - Purple.jpg
    Startus Wiring - Purple.jpg
    110 KB · Views: 10
Last edited:
Wire gauges, the larger the number, the smaller the wire. 14 gauge wire would be best to use when beefing up a circuit. If you upgrade your account, you can get the schematic for your bike and troubleshoot the circuits. https://www.guzzitech.com/forums/threads/user-account-upgrade-donations.14025/ Also check this tread on troubleshooting circuits. Somewhere something is going to ground and you need to find that circuit and repair. https://www.guzzitech.com/forums/threads/troubleshooting-circuits.3001/
 
I believe the previous owner installed a new horn and ran the wiring to the yellow wire in the starter relay and connected that to another relay for the horn and powered both thru Battery 20 amp fused connection to the battery + post. Has 3 wires, Red, Green and black heading towards the front that I need trace for connection solidness. I have the Norge wiring schematic but can not understand it.
 
I believe the previous owner installed a new horn and ran the wiring to the yellow wire in the starter relay and connected that to another relay for the horn and powered both thru Battery 20 amp fused connection to the battery + post. Has 3 wires, Red, Green and black heading towards the front that I need trace for connection solidness. I have the Norge wiring schematic but can not understand it.

You need to identify the horn setup.

It should be a simple relay that is triggered by your horn button, to open the pathway to the battery positive terminal to the horn itself.

Remember, relays are where you use a small current source, to open the pathway (the relay) to a higher current source (usually the battery positive post) that powers a device like a horn.
Thanks Scott... Will be tearing into that later this afternoon.
 
Fixed the wiring spagetti. (See pic) - yes wrapped in black elec tape for now with dedicated 20 amp inline fuse. It is to help with starting yellow wire to relay & fuse and batt+ connection. Now on to another question; as I cannot see where the red and green wires disappear into the front so leaving until later if and when fairing removed. **Thinking I might bypass all of this with a wire from the solenoid spade to a momentary start button to battery? Need I fuse it or install yet another relay with the button to battery + post? What say you? Thanks. I have already seen that the yellow wire of
 

Attachments

  • fuse fix.jpeg
    fuse fix.jpeg
    90.2 KB · Views: 4
That was going to a great deal of trouble when you could have gotten the starter relay fix from MPH. The real question is, did this stop the fuse from blowing?
 
That was going to a great deal of trouble when you could have gotten the starter relay fix from MPH. The real question is, did this stop the fuse from blowing?
Yes. The fix of some sort (unsure if it is the exact MPH fix) It was already in place when I purchased the machine. Relay from (yellow wire) starter and 3 others for the horn apparently.
 
Last edited:
John, Even more so I am going to wire in an emergency waterproof automotive style button fix from solenoid to battery for this all too common problem to most CARC owners.
 
John, Even more so I am going to wire in an emergency waterproof automotive style button fix from solenoid to battery for this all too common problem to most CARC owners.
That really shouldn't be necessary. The relay mod from MPH that you have will take care of the starting issue if installed correctly.
 
Back
Top