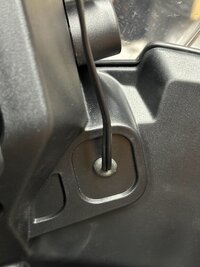
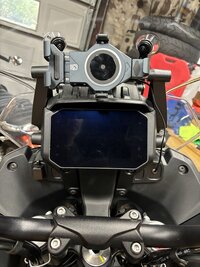
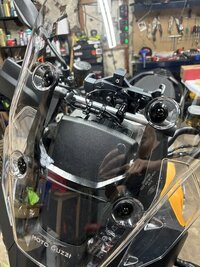
Has anyone found a good way to route an SAE cable up from the battery for a GPS mount? The USB port 1. isn't waterproof, and 2. doesn't provide enough current (only like 2.5W or something). My thought here was to run a cable up the right side, and out a small hole made into the 2nd USB port area, but then I'd still need to ugly route the cable up the right side of the LCD panel to the GPS on the bar. I've not done anything yet, but wondering if anyone has found a good solution here. If not, I'll post what I come up with after I rig it up.
Navigation
Install the app
How to install the app on iOS
Follow along with the video below to see how to install our site as a web app on your home screen.
Note: This feature may not be available in some browsers.
More options
-
Ciao Guest - You’ve landed at the ultimate Guzzi site. NEW FORUM REGISTRATIONS REQUIRE EMAIL ACTIVATION - CHECK YOUR SPAM FOLDER - Use the CONTACT above if you need help. New to the forum? For all new members, we require ONE post in the Introductions section at the bottom, in order to post in most of the other sections. ALWAYS TRY A SEARCH BEFORE STARTING A NEW TOPIC - Most questions you may have, have likely been already answered. DON'T BE A DRIVE-BY POSTER: As a common courtesy, check back in and reply within 24 hours, or your post will be deleted. Note there's decades of heavily experienced Guzzi professionals on this site, all whom happily give endless amounts of their VALUABLE time for free; BE COURTEOUS AND RESPECTFUL!
-
There is ZERO tolerance on personal attacks and ANY HYPERLINKS to PRODUCT(S) or other competing website(s), including personal pages, social media or other Forums. This ALSO INCLUDES ECU DIAGnostic software, questions and mapping. We work very hard to offer commercially supported products and to keep info relevant here. First offense is a note, second is a warning, third time will get you banned from the site. We don't have the time to chase repeat (and ignorant) offenders. This is NOT a social media platform; It's an ad-free, privately funded website, in small help with user donations. Be sure to see the GTM STORE link above; ALL product purchases help support the site, or you can upgrade your Forum profile or DONATE via the link above.
-
Be sure to see the GTM STORE link also above for our 700+ product inventory, including OEM parts and many of our 100% Made-in-SoCal-USA GTM products and engine kits. In SoCal? Click the SERVICE tab above for the best in service, tires, tuning and installation of our products or custom work, and don't miss our GT MotoCycles® (not) art on the BUILDS tab above. WE'RE HERE ONLINE ONLY - NO PHONE CALLS MADE OR RECEIVED - DO NOT EMAIL AND ASK QUESTIONS OR ASK TO CALL YOU.
-
Like the new V100, GuzziTech is full throttle into the future! We're now running on an all-new server and we've updated our Forum software. The visual differences are obvious, but hopefully you'll notice the super-fast speed. If you notice any glitches or have any issues, please post on the Site Support section at the bottom. If you haven't yet, please upgrade your account which is covered in the Site Support section or via the DONATE tab above, which gives you full site access including the DOWNLOADS section. We really appreciate every $ and your support to keep this site ad-free. Create an account, sign in, upgrade your account, and enjoy. See you on the road in 2024.
You are using an out of date browser. It may not display this or other websites correctly.
You should upgrade or use an alternative browser.
You should upgrade or use an alternative browser.
Routing SAE cable for GPS mount
- Thread starter Francis Lukesh
- Start date
Racer242
Tuned and Synch'ed
I ran a cable up the right side. Starting from the front of the battery down toward the swing arm pivot, around the frame mount and then alongside the clutch line, over the right intake runner and over the radiator. I then went up to the bars and use it to power a phone charger. I use the USB port to power a CarPlay repeater and get all my nav functions from the phone.
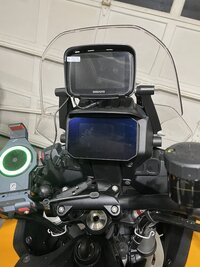

a CarPlay repeater
I’ve never heard of this.
What is it and what does it do for you please?
Racer242
Tuned and Synch'ed
It connects to your phone via Bluetooth, Apple or Android and acts as a repeater. Apple Maps, Google Maps, Gaia GPS, music and phone functions can then be displayed on a larger screen. It's a simplified version of Apple CarPlay. Resolution is very good and initial pairing is easy the only issue I encounter and could well be due to my own incompetence is that sometimes it needs to be re-paired when you shut down for say, a gas stop. They are fairly inexpensive, much less so than a Garmin unit and the technology stays as current as the phone you connect it to.I’ve never heard of this.
What is it and what does it do for you please?
So this isn’t interfacing with the Moto Guzxi TFT display then, correct?
You have a separate display entirely then, right?
You have a separate display entirely then, right?
Racer242
Tuned and Synch'ed
It's totally separate from the vehicle. Mount it anywhere you have 12 v or USB power. It comes with two power cords. The unit consist of the display which snaps in to a combined sunshield and holder. The holder has a standard 1 inch ball mount on the back. You can unsnap the display for security issues but it's useless without the power supply. The unit has little if any "computing power". That's why I used the word repeater, it's taking what's on the phone and putting it on a larger screen. You still do all your course plotting on the phone or tablet. Great for a V100 because doesn't MG expect you to store your phone under the seat?
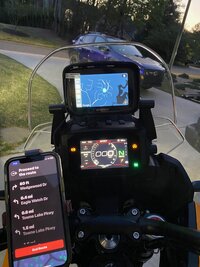
Here it is in action. The phone can go to sleep but the nav stays active on the repeater. Apple phone recognizes that it's connected to a CarPlay because as soon as it pairs, the phone screen goes from map view to line by line directions. Something like $140.

Here it is in action. The phone can go to sleep but the nav stays active on the repeater. Apple phone recognizes that it's connected to a CarPlay because as soon as it pairs, the phone screen goes from map view to line by line directions. Something like $140.
Last edited:
Wow, that's all I have to say. Never seen that much dash.
Thanks for explaining.
That’s way too much gobbledygook for me.
I have the navigation feature from Moto Guzzi and that’s more than enough for me I think. Turn left, turn right…
It seems a lot of guys want a dashboard like a cruise ship with electronic everything all over the place but yo me, that ruins the reason I ride in the first place, to get away from the modern world.
All of that becomes a massive distraction to me. I would most likely crash while trying to look at it!
I am very grateful for the explanation as I did not know these things.
Thank you very much.
Wrinkley
Tuned and Synch'ed
Spliced mine into the back of the USB socket on the dash. Works fine, and it's switched.
This is a great idea. I made a y-splice 2-pin weatherproof connector and just plugged into the USB 2-pin connector in the dash. Then I ran it to an SAE cable around to the other side and then up to the GPS mount. It provides 12V of power (vs 5V) and looks really clean. I'm kicking myself for not taking pictures of behind the dash, but it wasn't hard to figure out. I will say that taking panels off of the Stelvio is an exercise in removing fasteners like I was not expecting. Thankfully I don't need to get back there often.Spliced mine into the back of the USB socket on the dash. Works fine, and it's switched.

