I have a V85TT with 450 miles on it. I bought it new last month. Sadly I picked up a nail in the rear tire already. My dealer wont plug it, said I had to buy a new tire. Well I plugged it myself, I'm not spending $330 for a tire just yet. Do people not plug tires these days? I thought that was one good thing of running tubless tires.
Navigation
Install the app
How to install the app on iOS
Follow along with the video below to see how to install our site as a web app on your home screen.
Note: This feature may not be available in some browsers.
More options
-
Ciao Guest - You’ve landed at the ultimate Guzzi site. NEW FORUM REGISTRATIONS REQUIRE EMAIL ACTIVATION - CHECK YOUR SPAM FOLDER - Use the CONTACT above if you need help. New to the forum? For all new members, we require ONE post in the Introductions section at the bottom, in order to post in most of the other sections. ALWAYS TRY A SEARCH BEFORE STARTING A NEW TOPIC - Most questions you may have, have likely been already answered. DON'T BE A DRIVE-BY POSTER: As a common courtesy, check back in and reply within 24 hours, or your post will be deleted. Note there's decades of heavily experienced Guzzi professionals on this site, all whom happily give endless amounts of their VALUABLE time for free; BE COURTEOUS AND RESPECTFUL!
-
There is ZERO tolerance on personal attacks and ANY HYPERLINKS to PRODUCT(S) or other competing website(s), including personal pages, social media or other Forums. This ALSO INCLUDES ECU DIAGnostic software, questions and mapping. We work very hard to offer commercially supported products and to keep info relevant here. First offense is a note, second is a warning, third time will get you banned from the site. We don't have the time to chase repeat (and ignorant) offenders. This is NOT a social media platform; It's an ad-free, privately funded website, in small help with user donations. Be sure to see the GTM STORE link above; ALL product purchases help support the site, or you can upgrade your Forum profile or DONATE via the link above.
-
Be sure to see the GTM STORE link also above for our 700+ product inventory, including OEM parts and many of our 100% Made-in-SoCal-USA GTM products and engine kits. In SoCal? Click the SERVICE tab above for the best in service, tires, tuning and installation of our products or custom work, and don't miss our GT MotoCycles® (not) art on the BUILDS tab above. WE'RE HERE ONLINE ONLY - NO PHONE CALLS MADE OR RECEIVED - DO NOT EMAIL AND ASK QUESTIONS OR ASK TO CALL YOU.
-
Like the new V100, GuzziTech is full throttle into the future! We're now running on an all-new server and we've updated our Forum software. The visual differences are obvious, but hopefully you'll notice the super-fast speed. If you notice any glitches or have any issues, please post on the Site Support section at the bottom. If you haven't yet, please upgrade your account which is covered in the Site Support section or via the DONATE tab above, which gives you full site access including the DOWNLOADS section. We really appreciate every $ and your support to keep this site ad-free. Create an account, sign in, upgrade your account, and enjoy. See you on the road in 2024.
You are using an out of date browser. It may not display this or other websites correctly.
You should upgrade or use an alternative browser.
You should upgrade or use an alternative browser.
tire plug
- Thread starter #TK
- Start date
Louisv97
Cruisin' Guzzisti
It's all about liability these days my friend.I have a V85TT with 450 miles on it. I bought it new last month. Sadly I picked up a nail in the rear tire already. My dealer wont plug it, said I had to buy a new tire. Well I plugged it myself, I'm not spending $330 for a tire just yet. Do people not plug tires these days? I thought that was one good thing of running tubless tires.
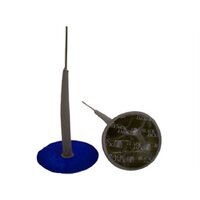
If the nail was not near the sidewall, then plugging is OK. That said, the only plug I would trust is an internal patch plug. This requires removing the tire and installing from the inside. Patching does lower the speed rating, but for US roads that shouldn't be an issue.I have a V85TT with 450 miles on it. I bought it new last month. Sadly I picked up a nail in the rear tire already. My dealer wont plug it, said I had to buy a new tire. Well I plugged it myself, I'm not spending $330 for a tire just yet. Do people not plug tires these days? I thought that was one good thing of running tubless tires.

Louisv97
Cruisin' Guzzisti
These work amazing compared to regular patchesIf the nail was not near the sidewall, then plugging is OK. That said, the only plug I would trust is an internal patch plug. This requires removing the tire and installing from the inside. Patching does lower the speed rating, but for US roads that shouldn't be an issue.
View attachment 33917View attachment 33917
kildareman
Cruisin' Guzzisti
I've always had long term success with the sticky string repair plugs, even with double punctures (fencing U nail)
Many times, I used the exact same patch John shows, but it requires removing the tire from the rim, repairing it and then remounting and rebalancing.
Many years ago, I found a better method for me.
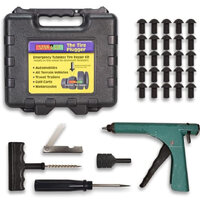
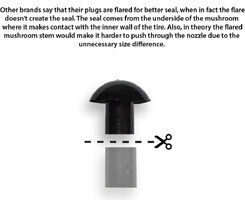
For simple small punctures well within the tread area, I would usually just insert a mushroom plug from the outside. They will last the entire life of the tire, they wear the same as the rubber compound of the tire, and I never ever had a single one fail me or begin to leak air ever again.


I like the looks of that. I could leave it in our BMW which came with run flats, that I quickly replaced. When I go for a long ride, bring it on the bike.
Another vote for the mushroom plug here, I've used them on cars but not had a need on a bike yet. One car I did 20,000 miles with one in the rear tyre with no problems.
I like the looks of that. I could leave it in our BMW which came with run flats, that I quickly replaced. When I go for a long ride, bring it on the bike.
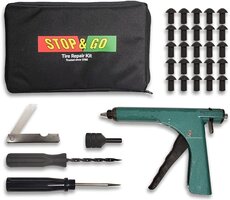
I have a Stop & Go Tire Plugger with me at all times. Usually the plastic case version on trips and a soft pouch one for day rides or short durations or when space is at a premium. They make various kits in either the plastic case or soft pouch.
Everything you need is in the kit and it is so simple.
1. You just remove the foreign object and confirm that it is a puncture and not a cut or slice.
2. You put the insertion point tool onto the punch awl, and insert it into the tire.
3. You then remove the awl, place the plug into the insertion gun, then screw this onto the already inserted insertion point tool.
4. Gently squeeze the tool to eject the plug into the tire and then remove the insertion point tool, leaving the tire plug perfectly in place.
5. You then very gently pull the plug just a little to make sure the mushroom head seats onto the inside of the tire, and then with the included razor blade cutter, simply slice the excess stem off flush with the tread of the tire.
6. Air that sucker up and that’s that!
7. Go use your tire just like normal until the tire wears completely out however many thousands of miles later. The plug will naturally wear with the tire tread compound.
I have never encountered a simpler, more straightforward tire repair tool in my whole life and in the hundreds and hundreds of plugs that I have used, not once, has one ever failed me.
*** NOTE: Every tire plug company will tell you that ALL PLUGS are temporary repairs. They say this for liability reasons in this insanely litigious society that we live in. I have ridden several tires from virtually 1 week old tire with a plug, to tires with several thousand miles on them and then requiring a plug. I have ridden them all until the tire needed normal replacement, and never had a single issue. Never. FWIW: I have done so many of these I can usually get a plug inserted and be airing up a tire in about 3 minutes now. It’s that simple and easy once you learn to do it CORRECTLY. Follow the directions EXACTLY as they instruct you. I have seen guys destroy numerous plugs and tires thinking that they could just shove things in all Willy Nilly. You cannot. You must follow the procedure paying especially close attention to the insertion of the ploughing itself in the insertion gun, and inverting the mushroom cap like they tell you and show you in the video. Follow the directions and it works perfect 100% of the time.
I love this thing and highly recommend it!
It has saved me and literally a hundred other people on the side of the road that I have stopped to help. Between this and my portable compressor, I have repaired motorcycle, boat, car, RV, and trailer tires for all sorts of people out there.
You can buy replacement packs of plugs in like #25 or #50 packages. I forget.
Last edited:
They still make the smaller Stop & Go kit. I carry one all the time on the motorcycles and in my electric car (which has no spare tire). Although I don’t think much of the stringy plugs with glue, I also carry a cheap package in the car. I used a full package once to plug a sidewall cut so I could drive home (about 5 miles, slowly) where I could jack up the car and take the wheel to purchase a new tire.
I also keep a very small kit from BMW (original came in tool kit with R1150RS) that has plugs, glue, insertion tools, and CO2 cartridges for inflating after repair in a suitable storage space on each bike so I always have something. I have used several of those one-time use kits over the years and they are still available. I used one to plug a hole in the rear tire on my V85TT and rode 20 miles to get home. Although it did not leak, I did not feel comfortable with the way the plug went in on that particular repair so I replaced the tire. Other times, I ran plugged tires for the remaining tread life.
I also keep a very small kit from BMW (original came in tool kit with R1150RS) that has plugs, glue, insertion tools, and CO2 cartridges for inflating after repair in a suitable storage space on each bike so I always have something. I have used several of those one-time use kits over the years and they are still available. I used one to plug a hole in the rear tire on my V85TT and rode 20 miles to get home. Although it did not leak, I did not feel comfortable with the way the plug went in on that particular repair so I replaced the tire. Other times, I ran plugged tires for the remaining tread life.
Last edited:
I have a Stop & Go Tire Plugger with me at all times. Usually the plastic case version on trips and a soft pouch one for day rides or short durations or when space is at a premium. They make various kits in either the plastic case or soft pouch.
Everything you need is in the kit and it is so simple.
1. You just remove the foreign object and confirm that it is a puncture and not a cut or slice.
2. You put the insertion point tool onto the punch awl, and insert it into the tire.
3. You then remove the awl, place the plug into the insertion gun, then screw this onto the already inserted insertion point tool.
4. Gently squeeze the tool to eject the plug into the tire and then remove the insertion point tool, leaving the tire plug perfectly in place.
5. You then very gently pull the plug just a little to make sure the mushroom head seats onto the inside of the tire, and then with the included razor blade cutter, simply slice the excess stem off flush with the tread of the tire.
6. Air that sucker up and that’s that!
7. Go use your tire just like normal until the tire wears completely out however many thousands of miles later. The plug will naturally wear with the tire tread compound.
I have never encountered a simpler, more straightforward tire repair tool in my whole life and in the hundreds and hundreds of plugs that I have used, not once, has one ever failed me.
*** NOTE: Every tire plug company will tell you that ALL PLUGS are temporary repairs. They say this for liability reasons in this insanely litigious society that we live in. I have ridden several tires from virtually 1 week old tire with a plug, to tires with several thousand miles on them and then requiring a plug. I have ridden them all until the tire needed normal replacement, and never had a single issue. Never. FWIW: I have done so many of these I can usually get a plug inserted and be airing up a tire in about 3 minutes now. It’s that simple and easy once you learn to do it CORRECTLY. Follow the directions EXACTLY as they instruct you. I have seen guys destroy numerous plugs and tires thinking that they could just shove things in all Willy Nilly. You cannot. You must follow the procedure paying especially close attention to the insertion of the ploughing itself in the insertion gun, and inverting the mushroom cap like they tell you and show you in the video. Follow the directions and it works perfect 100% of the time.
I love this thing and highly recommend it!
It has saved me and literally a hundred other people on the side of the road that I have stopped to help. Between this and my portable compressor, I have repaired motorcycle, boat, car, RV, and trailer tires for all sorts of people out there.
You can buy replacement packs of plugs in like #25 or #50 packages. I forget.
View attachment 33943
thanks for sharing. I absolutly will be getting myself and my son one of these kits.
Thats what I did plug the tire with. Good to hear others had sucsess with them.I've always had long term success with the sticky string repair plugs, even with double punctures (fencing U nail)
Speciality
Cruisin' Guzzisti
The quickest and simplest ones to use are simply a screw in a shaped plastic tube. Remove the nail, ream out the hole a little, screw the screw in and inflate. They come in two sizes and cost peanuts. BTW CO2 canisters often need an adapter to use on the valve because they cannot always be used because there is insufficient room above the valve. Hondas come with right-angled valves as standard - much better IMHO. The answer? Forget CO2 canisters - I carry a lithium battery powered inflator. It charges via USB and a full charge can inflate two car tyres. You can even pre-set the tyre pressures for two vehicles. The inflator comes in its own bag and is easily small enough to stash on the bike. I have one of the kits described above too, but sometimes you need to fix a puncture in a dangerous place where speed matters to minimise exposure to risk from being hit. The repair screws work well.
The quickest and simplest ones to use are simply a screw in a shaped plastic tube.
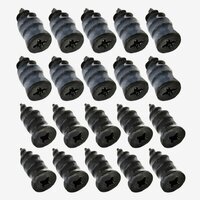
These?
I would not recommend these at all. Here’s why.
I’ve seen them used and although they may be ok temporarily for the thicker carcass of a car, truck, or RV tire, they are ridiculously oversized and inappropriate for a motorcycle tire. If you could see one still in a tire which has been removed from a motorcycle rim, you would never use them either!
They also do not seal in the best method. Let’s face it, they are shaped like a screw!
I would never do this to any motorcycle tire unless it was just to get off of the motorway as fast as possible with the complete intention of replacing the tire immediately.
The Stop & Go rubber plugs I recommend above, are soft natural rubber, completely pliable, and the mushroom head, once inserted into the tire carcass, is permanent and seals absolutely perfectly due to it’s design. It takes only seconds to properly insert one into a tire. The pressure within the tire itself, reinforces the tightness of the sealing surface of the mushroom head.
I always have recommended that people find a old tire, at any motorcycle shop or tire shop, and practice once or twice using the Stop & Go Plugger and once you do it a couple times, you will be able to do it so easily and fast.
Last edited:
Speciality
Cruisin' Guzzisti
They are for temporary use. The ones I have are by no means too big (I have larger ones for the car). For local get-you-home riding they are fine. Then do a longer lasting job when you're less likely to be mown down.
If you unscrew these temporary plugs, do you think a Stop & Go plug could be used for a permanent repair?
I would say yes. The screw in plastic ones are pretty worthless… Get you home at best, and as Scott says, I wouldn’t trust them in a moto tire. I tried them in my van tire, and they hold air for a few days max.If you unscrew these temporary plugs, do you think a Stop & Go plug could be used for a permanent repair?
Speciality
Cruisin' Guzzisti
What can I say. We had a workshop session in our local advanced riding club. Three methods were tried for speed, ease of use and whether or not any leaks were detected. The three were mushrooms, string, and screw. The screw type was easily the quickest and easiest to use. The mushroom one leaked a little. The string one worked ok but was slower to fit. Several members of the club have been using the screw type with no failures. They are not intended as permanent but they are quick and easy. I should perhaps add that the demonstrators and those who use them are all skilled, high mileage and experienced riders. I have used the mushroom type, of the sort that used to be supplied with BMWs. They worked well, good enough to be a permanent fix, as the first time I had a vulcanised patch inserted later and the fitter had a helluva job removing the the plug..
If you unscrew these temporary plugs, do you think a Stop & Go plug could be used for a permanent repair?
It really would depend upon many different things. Basically yes.
However, think about a small finish nail puncture. That screw device actually ENLARGES the hole by at least several orders of magnitude!
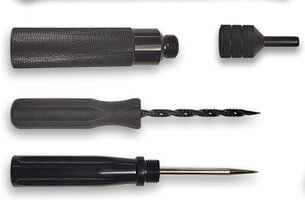
The Stop & Go Plugger device uses a very small insertion nozzle (top right).
It’s also perfectly round and non cutting to the tire.
The installation awl and reamer are very small too.
Thanks to Todd and Scott for your replies confirming my opinions about the screw type. I may buy a package of the screw type to add to my collection (as strictly temporary), but the Stop & Go will remain my main method for the car and motorcycles.
