• Ciao Guest - You’ve landed at the ultimate Guzzi site. NEW FORUM REGISTRATIONS REQUIRE EMAIL ACTIVATION - CHECK YOUR SPAM FOLDER - Use the CONTACT above if you need help. New to the forum? For all new members, we require ONE post in the Introductions section at the bottom, in order to post in most of the other sections. ALWAYS TRY A SEARCH BEFORE STARTING A NEW TOPIC - Most questions you may have, have likely been already answered. DON'T BE A DRIVE-BY POSTER: As a common courtesy, check back in and reply within 24 hours, or your post will be deleted. Note there's decades of heavily experienced Guzzi professionals on this site, all whom happily give endless amounts of their VALUABLE time for free; BE COURTEOUS AND RESPECTFUL!
  • There is ZERO tolerance on personal attacks and ANY HYPERLINKS to PRODUCT(S) or other competing website(s), including personal pages, social media or other Forums. This ALSO INCLUDES ECU DIAGnostic software, questions and mapping. We work very hard to offer commercially supported products and to keep info relevant here. First offense is a note, second is a warning, third time will get you banned from the site. We don't have the time to chase repeat (and ignorant) offenders. This is NOT a social media platform; It's an ad-free, privately funded website, in small help with user donations. Be sure to see the GTM STORE link above; ALL product purchases help support the site, or you can upgrade your Forum profile or DONATE via the link above.
  • Be sure to see the GTM STORE link also above for our 700+ product inventory, including OEM parts and many of our 100% Made-in-SoCal-USA GTM products and engine kits. In SoCal? Click the SERVICE tab above for the best in service, tires, tuning and installation of our products or custom work, and don't miss our GT MotoCycles® (not) art on the BUILDS tab above. WE'RE HERE ONLINE ONLY - NO PHONE CALLS MADE OR RECEIVED - DO NOT EMAIL AND ASK QUESTIONS OR ASK TO CALL YOU.
  • Like the new V100, GuzziTech is full throttle into the future! We're now running on an all-new server and we've updated our Forum software. The visual differences are obvious, but hopefully you'll notice the super-fast speed. If you notice any glitches or have any issues, please post on the Site Support section at the bottom. If you haven't yet, please upgrade your account which is covered in the Site Support section or via the DONATE tab above, which gives you full site access including the DOWNLOADS section. We really appreciate every $ and your support to keep this site ad-free. Create an account, sign in, upgrade your account, and enjoy. See you on the road in 2024.

V85TT Evap and Tip Info

GTM®

Administrator
Staff member
GT di Razza Pura
Joined
Jul 1, 2009
Messages
15,175
Location
Malibu
First service done yesterday on the GTM V85TT, which included some exploratory investigation on the inner workings. Below is info on the evap and tip valve to eliminate the fuel tank pressurization and future running issues, like all other V7/V9s.
Tank removal is fairly easy. Under the key cover is two front bolts, and one in the rear, unplug the connectors/fuel lines, and off it comes. Info on the SAS Kit is HERE (which is also the same as the V7/V9s.)

1. Key cover, one bolt on each side, slide forward and lift.
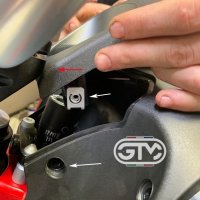
CA55F4E2 937C 48D2 A5B1 A4E5A8E88971

2. This exposes the two tank bolts (one shown missing below), and the grey/green valve is the infamously notorious tip-over valve:
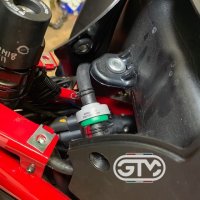
BB79A650 619F 4185 9A4D BCE83E28E141

3. Fuel line and rear tank bolt arrowed:
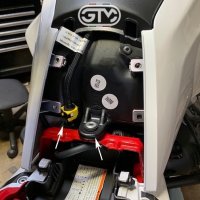
F7D069F9 4ED3 4686 9C72 3999A62EB107

4. L to R, fuel pump connector, breather/overflow and fuel line disconnect. For the fuel line, slide the yellow safety clip back, and depress the white tabs on each side with your fingers, and wiggle off. These all can be done prior to tank removal via easy access under the tank frame mount bracket shown.
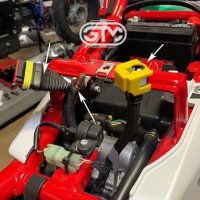
0B7FB691 23D8 45B1 8B69 731A8AB90110

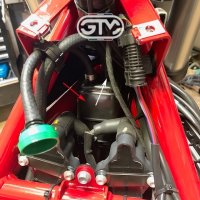
5. With the tank removed looking forward, the tip valve shown apart and gutted (use heat from a hair dryer or eq, and a small screwdriver to pop apart, then can be snapped back together), and red arrow is the evap can. For E4 models, the line partially hidden (white arrowed) below can be removed and plugged with a bolt or eq. For E5 models, see below.
7A2919D8 3325 4957 865E 0D30B329DD09

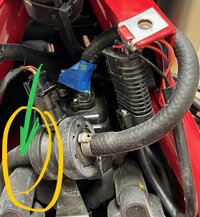
6. E5 models, It is recommended to remove the line below from the Bosch valve, and plug with a bolt or eq. The valve should remain in place/plugged in and the valve end left open to the atmosphere.
IMG 1982
 
Thanks for the info but, What problems can happen If it stay as a factory ?
 
Hi Todd!

I was going to remove my tank tonight to facilitate installation of straps for a tank bag. I got everything disconnected except for the tip over valve. I tugged on it, but stopped when I saw no progress and figured I was going to break it. It looks as if you've split your valve in half? I didn't think of that. Is the valve then simply pressed back together?

I also considered breaking the clamp at the evap can and then putting it back together with a tie strap, but thought perhaps I should leave well enough alone.

My tank has the pressurization problem you mentioned. There's a distinct whoosh of air when the tank is opened. So, I should nip and plug the line you've mentioned above?

BTW, I got my straps installed simply by lifting the tank.

Thanks a lot! :)
 
I also considered breaking the clamp at the evap can and then putting it back together with a tie strap, but thought perhaps I should leave well enough alone.

This is basically what I did when removing the tank though the hose lifted off the evap can easily with a gentle pry from a screwdriver.
 
Thanks for the info but, What problems can happen If it stay as a factory ?
Annoying things.
Basically what happens is the tank does not vent properly which causes a fuel issue.
I had a California Black Eagle that would "run out of gas" until I opened the fuel cap.
Did the above fix & never had the problem again.
 
Annoying things.
Basically what happens is the tank does not vent properly which causes a fuel issue.
I had a California Black Eagle that would "run out of gas" until I opened the fuel cap.
Did the above fix & never had the problem again.

Ok, thanks.

I until now I don't feel nothing of that. Yes, it's correct that is there overpressure, in my bike this issue distorts remaining mileage.

I know that some people have asked to Piaggio about this overpressure, the answer of the brand is that isn't an issue.

But I'll keep that in mind, ;)
 
I know that some people have asked to Piaggio about this overpressure, the answer of the brand is that isn't an issue.
Incorrect... it's that they don't know how to resolve it with their constraints. There is decades of evidence as to why this is very bad for the fuel system and tank.
It looks as if you've split your valve in half? I didn't think of that. Is the valve then simply pressed back together?
Yes, well covered in this section. A little hair dryer heat and a small screwdriver to pop it apart, and snap it back together.
 
Incorrect... it's that they don't know how to resolve it with their constraints. There is decades of evidence as to why this is very bad for the fuel system and tank.

Ok, So I understand that cut the evap line signed by white arrow or disconnect it it's enough, yes ?. It doesn't necessary sealed of evap line cutted and evap can ?
 
Got the block off kit for the secondary air injection installed last weekend. The front bolt on the right cover is a bear to get to, due to the brake line coming off the ABS controller right in front of it. Got the evap canister taken care of as well.
Any progress on the fueling? Mine needs help at low rpm/throttle openings.
 
Disconnect the purge line? Is that correct?

Thanks!

IMG-20191004-201752146-1.jpg
 
New V85 is a week old. On the way home I noted some pressure escaping when I opened the tank to fill up, but not too bad. Fast forward to Saturday in Tucson, bike sitting in the shade but temps getting hotter than I'd seen since getting the bike. I filled up on the way home and was greeted with a loud whoosh along with a lot of expelled fuel mist as I opened the lid.

At the moment I'm unsure of my local dealer and would like to not make changes noticeable in the event of a service.
Will the simple removal/gutting of the topover valve fix this problem? In the past I've removed the canister as well, but as I'm unsure of my local dealership I'd prefer to leave that in place. I could always cap the vacuum line on the throttle body and then hook it back up if needed, just making sure removing the check valve will not cause extra strangeness if the canister is left hooked up.
 
Will the simple removal/gutting of the topover valve fix this problem? The gas blew up and out of the tank in a vapor, it was more pressurization than a suck.
Based on above, it should, but blow air (via mouth) through the evap canister to be sure there’s no pinched lines or a clog.
 
Have I missed where someone has explained how the quick-connect for the fuel line works?
It looks nothing like the one on my 1200 Sport, which I hated, and all the instructions just say to disconnect.
 
I've done it several times, a different connector but same principle. Run motor, disconnect fuel pump power, and wait until motor stumbles and dies. Then press the button in the quick connector and it should release.

It's been a while, so my memory ain't what it used to be, but I think this fairly accurate.
 
I got it sorted, you have to pull that yellow thing back to uncover the little white buttons. Squeeze the little white buttons, hold your mouth just right, and the fuel line comes apart.
 
I got it sorted, you have to pull that yellow thing back to uncover the little white buttons. Squeeze the little white buttons, hold your mouth just right, and the fuel line comes apart.

Easier said than done if the connector face with a little white button is facing the tank. I'll be replacing with a metal one later in the year.
 
Back
Top