manofsteel1
Just got it firing!
What is a hugger????My hugger arrived today, I'm very pleased with the quality and design.
View attachment 20827 View attachment 20828 View attachment 20829 View attachment 20830
Follow along with the video below to see how to install our site as a web app on your home screen.
Note: This feature may not be available in some browsers.
What is a hugger????My hugger arrived today, I'm very pleased with the quality and design.
View attachment 20827 View attachment 20828 View attachment 20829 View attachment 20830
Has anyone sourced a shorter screen? Yes, shorterI have just tried a Givi airflow but found it terrible. And it confirmed that I definitely don't like looking through a screen. Even using just the bottom part it creates too much turbulence. So back to the original, which is currently the lesser of 3 evils


I went the "roll your own" route. First pic is the stock screen cut down and still masked, sitting on top of an unmodified stock screen. Second one is the cut screen installed. It took away the horrendous roar I was getting but still isn't as quiet as when I stand up. If I plan any long trips with hours of highway riding I might spring for a massive screen but for 90% of my riding this will work fine. Previous bikes were sportbikes and naked so I'm not used to large screens and ok with no screen at all.
View attachment 20985 View attachment 20986 View attachment 20987
Skene light controller and Stedi 25w spots. Skene drops power to 30% (user set %) while running and goes to 100% on high beam.
I wired mine in independent to the bike, using the Skene wiring diagram. The spots power is adjustable through the controller and it goes to full power on high beam. the spots are on with the power of the bike. Last bike I had, the lights would only be on with engine on, but the V85tt runs with ignition.That looks awesome! Does that controller just plug straight into the Guzzi's loom? I saw a comment somewhere that with the standard setup you can only have either the DRL eagle on it's own, or the main light with the auxiliary lights - not the eagle with auxiliary lights??

Thanks, that’s good food for thought.I wired mine in independent to the bike, using the Skene wiring diagram. The spots power is adjustable through the controller and it goes to full power on high beam. the spots are on with the power of the bike. Last bike I had, the lights would only be on with engine on, but the V85tt runs with ignition.
View attachment 20989
Thanks for the pics, that looks pretty good. I'm thinking I may have to do the same, but might see if I can source another standard screen before I start cutting!
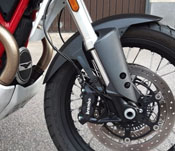
I just did two hours ago -- front fender for a Aprilia Caponord Rally 1200, part number 2B0024475 -- and that thing is one tight fit. It looks great, like all the photos people here have posted, and it didn't fall off, catch fire, or explode when I took it out for a test ride, but that thing is a fairly tight fit. Indeed, there's so little clearance between it an and the tire that I was reluctant to add the Pyramid fender extender that's languishing on the desk beside me even as I type these words lest I reduce that clearance still further.You also mount the caponord Rally model on the V85TT

Which smells like plastic because some idiot stuck a fender in the oven last night

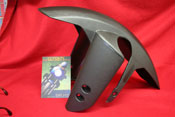
 Carbon look mudguard upgrade that hugs the front wheel to reduce spray from your front wheel. A popular modification for bikes that will mainly be used on road


I'm so happy to be living where I can ride all year. (with all due respect to your part of the world of course) I don't like the thought of having to park the bikes up for the winterIt's in storage now and isn't coming out until spring.
Hi all,
I just purchased my v85tt but second hand, very good condition though
However the tool bag seems quite empty (only have a spring adjustment spanner)
I have a feeling thats not right and now it gets me wondering what else is missing under the seat.
Someone even mentioned a glove box??!!
Can anyone show me a picture of what comes under the seat so I know what I'm missing
Most grateful
Yes as well as the spring adjustment spanner, you should also find two allen keys under the seat.
Spanners that fit the mirrors attachments are always a must, as is a 13mm & 10mm ring and open end spanner. A small dual pozidrive and flat screwdriver may also be required at some stage. I also added a right angle tyre valve extension to allow top up at service stations that appear to only cater for cage drivers.
The bolt & nut that holds the rear wheel on are of unusual sizes, so you might want to carry sockets for these on a trip. I've only once ever had a puncture on the front tyre, it's always the rear that cops it. I also carry a spare tube as it is an uncommon size.
