• Ciao Guest - You’ve landed at the ultimate Guzzi site. NEW FORUM REGISTRATIONS REQUIRE EMAIL ACTIVATION - CHECK YOUR SPAM FOLDER - Use the CONTACT above if you need help. New to the forum? For all new members, we require ONE post in the Introductions section at the bottom, in order to post in most of the other sections. ALWAYS TRY A SEARCH BEFORE STARTING A NEW TOPIC - Most questions you may have, have likely been already answered. DON'T BE A DRIVE-BY POSTER: As a common courtesy, check back in and reply within 24 hours, or your post will be deleted. Note there's decades of heavily experienced Guzzi professionals on this site, all whom happily give endless amounts of their VALUABLE time for free; BE COURTEOUS AND RESPECTFUL!
  • There is ZERO tolerance on personal attacks and ANY HYPERLINKS to PRODUCT(S) or other competing website(s), including personal pages, social media or other Forums. This ALSO INCLUDES ECU DIAGnostic software, questions and mapping. We work very hard to offer commercially supported products and to keep info relevant here. First offense is a note, second is a warning, third time will get you banned from the site. We don't have the time to chase repeat (and ignorant) offenders. This is NOT a social media platform; It's an ad-free, privately funded website, in small help with user donations. Be sure to see the GTM STORE link above; ALL product purchases help support the site, or you can upgrade your Forum profile or DONATE via the link above.
  • Be sure to see the GTM STORE link also above for our 700+ product inventory, including OEM parts and many of our 100% Made-in-SoCal-USA GTM products and engine kits. In SoCal? Click the SERVICE tab above for the best in service, tires, tuning and installation of our products or custom work, and don't miss our GT MotoCycles® (not) art on the BUILDS tab above. WE'RE HERE ONLINE ONLY - NO PHONE CALLS MADE OR RECEIVED - DO NOT EMAIL AND ASK QUESTIONS OR ASK TO CALL YOU.
  • Like the new V100, GuzziTech is full throttle into the future! We're now running on an all-new server and we've updated our Forum software. The visual differences are obvious, but hopefully you'll notice the super-fast speed. If you notice any glitches or have any issues, please post on the Site Support section at the bottom. If you haven't yet, please upgrade your account which is covered in the Site Support section or via the DONATE tab above, which gives you full site access including the DOWNLOADS section. We really appreciate every $ and your support to keep this site ad-free. Create an account, sign in, upgrade your account, and enjoy. See you on the road in 2024.

Where is this greasy hose suppose to be connected to? Airbox? How to take off...?

Sempervee1

Tuned and Synch'ed
Joined
Sep 22, 2022
Messages
85
Location
Seattle wa
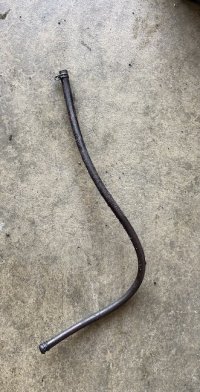
07 Norge with very greasy engine... I got underneath to look and clean and this hose fell out? Now I know why it is so filty greasy in there. Looks like it has not been attached for some time - I have not taken the tank off yet, not sure how to yet, Has a full tank of gas, I'm thinking breather of some kind that needs to be emptied as there is a plug on the bottom... Air box? Is there a way to re attache to or need I take the gas tank off and Air box off? ** Well, I guess I am going to learn all about her interior soon enough!!
 

Attachments

  • hose .jpeg
    hose .jpeg
    124.3 KB · Views: 14
I cant quite make out one end of the hose but does it have a bung in there? if so the other end goes onto the air box. It drains any oil that collects in the air box. It exits on the RHS by the footrest.
Well it was suppose to. I guess I am going to be pulling the tank and underneath a lot sooner than I anticipated. I just got the bike and filled up the gas tank with PURE GAS. I *FINALLY found where it is suppose to attach and I will not be able to get at it without dis assembly.
 
It attaches to the aft left underside of the airbox. The crankcase is vented into the airbox so no fumes escape to the atmosphere (emission stuff). Most of the oil-mist is sucked into the intakes. What settles at the bottom of the airbox will find it's way down this tube to be drained at regular service intervals, by pulling the little plug in the end of the hose. It is draining from the left side so it works best on the side-stand. You may be able to re-attach it, as there is a fair amount of work removing the tank and the airbox. Look in the area at the bottom of the left side of the airbox, where the intake tracts exit the airbox towards the throttle bodies. You may find a 1/2" or longer spigot pointing downward, where you should re-attach the hose.
Like Kevin.NZ, I have re-routed the vent into the airbox to a catch-bottle outside the airbox, which I check and empty regularly. This line runs over the top of the airbox, so removing the tank is needed.
Re-attaching the little hose would be an easy way to get you on the road without too much disassembly.
Best of luck with it.
 
Last edited:
It attaches to the aft left underside of the airbox. The crankcase is vented into the airbox so no fumes escape to the atmosphere (emission stuff). Most of the oil-mist is sucked into the intakes. What settles at the bottom of the airbox will find it's way down this tube to be drained at regular service intervals, by pulling the little plug in the end of the hose. It is draining from the left side so it works best on the side-stand. You may be able to re-attach it, as there is a fair amount of work removing the tank and the airbox. Look in the area at the bottom of the left side of the airbox, where the intake tracts exit the airbox towards the throttle bodies. You may find a 1/2" or longer spigot pointing downward, where you should re-attach the hose.
Like Kevin.NZ, I have re-routed the vent into the airbox to a catch-bottle outside the airbox, which I check and empty regularly. This line runs over the top of the airbox, so removing the tank is needed.
Re-attaching the little hose would be an easy way to get you on the road without too much disassembly.
Best of luck with it.
Will try to reattach first from underneath. Thank you for concise description.
 
amazon sells them too

Ruibapa Spark Plug Removal Pliers 11inch Long Reach Hose Grip Pliers For Car P-027​

 
Great idea… I can see more than a few uses. 😊

Indeed. I use these (3 different sizes) virtually daily.

You can remove or install hoses and vacuum lines. You can with a little practice, remove spring clips on hoses with them as well.

They have little teeth ridges cut on the inside of the clamping surface at the tip. Helps to hold things but be careful, they can allow the end to tear into hoses if you get too aggressive with your force.

Smooth and steady pressure works best, and human spit allows smooth installation of said hoses and then completely evaporates away.
 
I make everything mechanical harder than it has to be. ;)

Yet, even with that disclaimer, I found rerouting that [many expletives deleted] hose difficult. :swear:

And, that was with the tank off!

There are all sorts of "in the way" items between attaching it to the drain hole and daylight down below.

I eventually used a light coat-hanger wire to push it down and through.

Have since sold my Norge (sigh), but were that to happen again, I'd do the Kevin.NZ & Nordicnorm "catch bottle" approach. :clap:

Bill
Thanks BIll, I'm in the same class as you. Thru sheer determination I get it done. LOL!
 
It attaches to the aft left underside of the airbox. The crankcase is vented into the airbox so no fumes escape to the atmosphere (emission stuff). Most of the oil-mist is sucked into the intakes. What settles at the bottom of the airbox will find it's way down this tube to be drained at regular service intervals, by pulling the little plug in the end of the hose. It is draining from the left side so it works best on the side-stand. You may be able to re-attach it, as there is a fair amount of work removing the tank and the airbox. Look in the area at the bottom of the left side of the airbox, where the intake tracts exit the airbox towards the throttle bodies. You may find a 1/2" or longer spigot pointing downward, where you should re-attach the hose.
Like Kevin.NZ, I have re-routed the vent into the airbox to a catch-bottle outside the airbox, which I check and empty regularly. This line runs over the top of the airbox, so removing the tank is needed.
Re-attaching the little hose would be an easy way to get you on the road without too much disassembly.
Best of luck with it.
Located my LONG handle needle nose plyers and still can't even find the outlet to install the hose while on the cneterstand looking up!! Think I may ride the FULL tank of ethanol free gas down a few gallons in case I have to pull the tank and air box. My torch ran down battery wise trying to locate that damn hose nipple!!
 
Located my LONG handle needle nose plyers and still can't even find the outlet to install the hose while on the cneterstand looking up!! Think I may ride the FULL tank of ethanol free gas down a few gallons in case I have to pull the tank and air box. My torch ran down battery wise trying to locate that damn hose nipple!!


49805 536327  MG 4079
 
Last edited:
Oh shit, I'm so tired. I marked the wrong nipple. The one I marked is the stepper motor hose attachment point. It's the other one on the left side in the very rear of the airbox.. I'll fix the images.

UPDATE:

I replaced the 2 images with one, which is correctly annotated in red and green. Apologies for the confusion.

I have been really exhausted and I had a brain fart there...but hey, at least I realized it and caught it fairly quickly. :p

49805 536327  MG 4079
 
Scott, no problem - **I'll be able to tell - It's the oily nipple missing a hose when I take off the air box if I can't find it from underneath. :)

Sorry you are having to put in so many hours. I know what the feels like. I decided I can always make more money but not more time; as most of my time is behind me now. Why I finally took that vacation been putting off for so many years to Italy&France a few weeks back.
Understand the time thing. Hit 71 this weekend. We have scheduled some great cruises to go on. All the way to Columbia this December, and October 23 one from Rome to Ft Lauderdale!! We plan to go to Rome early and spend some time touring the city.
 
I took a look under my airbox today to refresh my memory. At 75 it's hard enough getting down on my knees! Man, that's a tough one to get to. I can see the nipple (mine's closed off), but to get the hose back on would be awkward to say the least. And yes, I have those magic plyers from Harbor Freight.
You have to look back from the intake tract after removing the starter motor cover to see it properly.
I hate to say "Good Luck" again. This is how we bond with our motorcycles and make them "ours".:mad:
 
Back
Top