• Ciao Guest - You’ve landed at the ultimate Guzzi site. NEW FORUM REGISTRATIONS REQUIRE EMAIL ACTIVATION - CHECK YOUR SPAM FOLDER - Use the CONTACT above if you need help. New to the forum? For all new members, we require ONE post in the Introductions section at the bottom, in order to post in most of the other sections. ALWAYS TRY A SEARCH BEFORE STARTING A NEW TOPIC - Most questions you may have, have likely been already answered. DON'T BE A DRIVE-BY POSTER: As a common courtesy, check back in and reply within 24 hours, or your post will be deleted. Note there's decades of heavily experienced Guzzi professionals on this site, all whom happily give endless amounts of their VALUABLE time for free; BE COURTEOUS AND RESPECTFUL!
  • There is ZERO tolerance on personal attacks and ANY HYPERLINKS to PRODUCT(S) or other competing website(s), including personal pages, social media or other Forums. This ALSO INCLUDES ECU DIAGnostic software, questions and mapping. We work very hard to offer commercially supported products and to keep info relevant here. First offense is a note, second is a warning, third time will get you banned from the site. We don't have the time to chase repeat (and ignorant) offenders. This is NOT a social media platform; It's an ad-free, privately funded website, in small help with user donations. Be sure to see the GTM STORE link above; ALL product purchases help support the site, or you can upgrade your Forum profile or DONATE via the link above.
  • Be sure to see the GTM STORE link also above for our 700+ product inventory, including OEM parts and many of our 100% Made-in-SoCal-USA GTM products and engine kits. In SoCal? Click the SERVICE tab above for the best in service, tires, tuning and installation of our products or custom work, and don't miss our GT MotoCycles® (not) art on the BUILDS tab above. WE'RE HERE ONLINE ONLY - NO PHONE CALLS MADE OR RECEIVED - DO NOT EMAIL AND ASK QUESTIONS OR ASK TO CALL YOU.
  • Like the new V100, GuzziTech is full throttle into the future! We're now running on an all-new server and we've updated our Forum software. The visual differences are obvious, but hopefully you'll notice the super-fast speed. If you notice any glitches or have any issues, please post on the Site Support section at the bottom. If you haven't yet, please upgrade your account which is covered in the Site Support section or via the DONATE tab above, which gives you full site access including the DOWNLOADS section. We really appreciate every $ and your support to keep this site ad-free. Create an account, sign in, upgrade your account, and enjoy. See you on the road in 2024.

GTM Fuel Kit - E5 V85TT Performance Mods & Dyno graphs and PC6 info

GTM®

Administrator
Staff member
GT di Razza Pura
Joined
Jul 1, 2009
Messages
15,167
Location
Malibu
We can FINALY offer a FULL dynamic FUEL kit for the E5 V85TT only (sorry, no '19-20 E4 models)... Despite our painfully slow and frustratingly unresponsive suppliers.

Bone stock E5 models pull ~65 RWHP on our Axis Dyno. Below is an overlay for the mods and power at the tire. You must use BOTH the UpMap AND PC6/AT-300 if you want full power.
At the bottom are some quick notes on installation for the PC6. Our maps are developed around our SAS Kit, and big power numbers include an opened air box lid with high-flow element. In order to use the AT-300, your exhaust MUST have large M18 02-sensor bungs - the GTM Headers or Full System is ready for them. OEM sensors are M12. All can be found on the (GTM) STORE link above. For questions about these products, use the CONTACT on the (GTM) STORE link above.

Overlays on the same '22 V85TT E5 bike below show a completely Stock bike but with Upmap & GTM SAS (67 RWHP/50 lb.ft - yellow/blue-grey trace), second is GTM Hdrs/Y with Stock muffler and opened air box lid with K&N, UpMap and custom mapped PC6 (77 RWHP/59 lb.ft - orange/purple trace) and Full GTM Exhaust System w/long muffler and opened air box lid with K&N, UpMap & Custom mapped PC6 (83.6 RWHP/62.5 lb.ft - red/blue trace). That's~18 RWHP/15 lb.ft (~30% total) gain over stock!
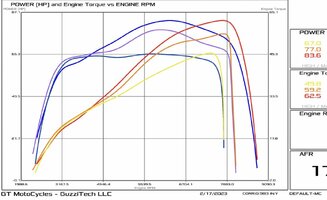
V85TT E5 GTM DYNO


Basic installation notes:

1. Remove seat and battery cover to expose throttle body plug below.

2. The PC6 will intercept the plug shown below (green circle, plugged into the throttle body). DO NOT CONNECT ANYTHING ADDITIONAL TO THIS PLUG, INCLUDING THE AUTOTUNE UNIT.
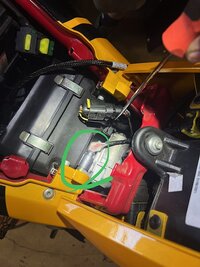
V85TT TB Plug

3. Remove injector covers, and intercept the fuel injector plugs on each side as seen below. The white plugs on the PC6 are NOT used.
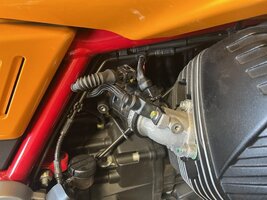
V85TT Inj Plug

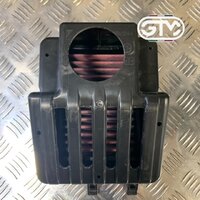
4. You can either remove the rubber snorkels, or for max power, open the air box lid in either fashion shown below. We highly recommend the K&N filter on our online Store above, as the stock element does NOT fit the lid properly and allows dust and dirt into the air box.
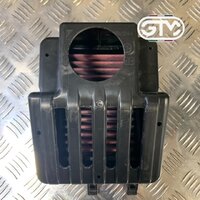
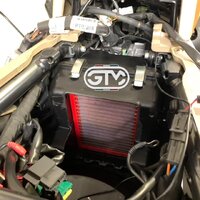
V85TT AirboxMods Part

V85TT AirboxMods Full

5. Ground the PC to the battery. Set the Throttle Position (TP) using the Power Core software. The PC6 is sent pre-mapped for your mods. Pull and send us the map Seasonally as a minimum (a free service when purchased from us).
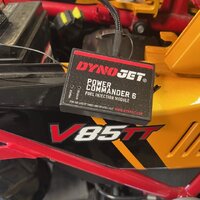
V85TT PC6
 
Considering you are displaying rear wheel horsepower and the factory is talking about crankshaft horsepower we actually have to add about 13 hp to your numbers to have a factory comparison..
You got it to 96.6 HP on the crank ‼️
Just WOW
Congratulations again
 
+18HP/+15lb.ft (30%) is a welcome edition to this platform. I wish it didn't take nearly $3k before labor to do it but I get why it's pricey. Thanks for all the hard work getting more out of the engine.
 
Thanks guys. It's a huge investment, but to those that love the bike, it's worth every penny. The bike lifts the front tire off the ground in first gear, and runs massively cooler. Roll-on acceleration from most any speed is impressively better.
 
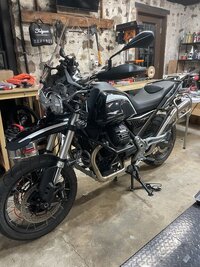
Just wanted to post a customer image so you can see how beautiful it is. I did the full shebang: the full GuzziTech Werks system with the PC6/AT300/UpMap fueling solution. At just about $4K, you might ask yourself if paying 30% more for a bike is worth it. The short answer is yes. As much as we love Moto Guzzi, they are beholden to economic and regulatory forces, and that impacts the quality of their final product. At the end of the day, these are passion machines, so I believe it is worth it to (if you can) take the time, effort, and money to get them running at their full capability.

There are some interesting gotchas I encountered during the install that I'll post about soon, hopefully save some folks some time. In the mean time, take a look at this beauty:

IMG 7439
 
I bet it runs as good as it looks!
Bet on it. Getting people to say how it feels and runs is like pulling teeth. They run astonishingly well with these mods.
We've done many, and hardly anyone has posted or even sent us a note.
 
Just wanted to post a customer image so you can see how beautiful it is. I did the full shebang: the full GuzziTech Werks system with the PC6/AT300/UpMap fueling solution. At the end of the day, these are passion machines, so I believe it is worth it to (if you can) take the time, effort, and money to get them running at their full capability.
Thanks, she's a beauty for sure.
Not many are willing, based on our sales numbers since 2019. ;)
The nay-sayers, though never have tried it (and a few too ignorant to feel the difference), will pile on against it though.
 
Bet on it. Getting people to say how it feels and runs is like pulling teeth. They run astonishingly well with these mods.
We've done many, and hardly anyone has posted or even sent us a note.
I'm hoping to make up for that. Since my buddy has a bone-stock Guardia, we going to take a couple comparison videos as well. The most succinct way to express how it feels is that the bike now feels entirely "correct." He's happy with his (for now).
 
When I bought my V7 Special a few months ago I considered it a canvas… We all know that emission regulations are strangling Guzzi with what they can do… Especially with air cooled engines... And Todd did what Guzzi was not allowed to do... results… See above
Todd needing a V7 E5 bike to do his R&D for the fueling and exhausts.. and me being close by having to do other Time consuming things as well it just became a perfect arrangement for both of us!
Over the last few months I got to know Todd and his team...
And I have to say you cannot ask for anybody more committed and more detail oriented aiming at perfection as these people!
Everything that leaves the shop is dead nuts on… Well, maybe not my bike because I twiddled on it too...
 
Here is my full installation of the GTM Werks system with the PC6/AT300/UpMap fueling solution on my 2022 V85. It's going to be a long one.

I've broken it up in to 6 sections:

01 - Disassembly and overall prep
02 - Evap removal
03 - SAS removal
04 - Exhaust install
05 - PC6 / AT300 install
06 - Mapping and final steps

**DISCLAIMER: This is my personal installation journey. Todd's advice / instructions trumps this in all cases. Hope it helps, but your milage may vary.**

== 01 - Disassembly and overall prep ==

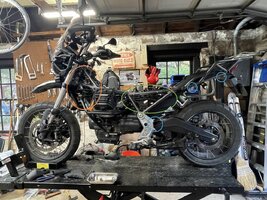
It's really important to get your work area and bike prepared before just tearing into it. I'm fortunate to have a stand, but if you don't I'd recommend a chair or something, because you're going to be spending a lot of time in under and beside your bike. I'm not going to call out all the tools you'll need, but one thing in particular that's pretty important is a set of ball-end hex-bits to access the SAS covers. I'm not sure how you'd do that step otherwise.

Access is also really important. While it seems like a massive pain, I recommend taking a bunch of stuff off and setting it aside so you have access to the various areas of the bike that you'll need throughout installation. You'll need to remove:

1. Seat and tank (instructions here on the other thread about evap/sas)
2. Forward plastic covers (see the orange circle). They're just a few screws, nothing too difficult.
3. Side panels, and both fuel injector covers (green circle)
4. Left side luggage rack and passenger peg assembly (blue circles)
5. I've removed the OEM pipes and muffler in this photo, but this can wait until you're ready to install the new one.

01 prep

It's also a really good idea to do your valves at this point.

[EDIT] SUPER IMPORTANT: The manual says 0.10 intake, 0.15 exhaust. You must adjust the valve lash to 0.15 intake and 0.20 exhaust, not only per Todd's recommendation, but also first-hand experience: 0.10/0.15 clearances causes mid-RPM preignition under load, looser clearances fixes it.

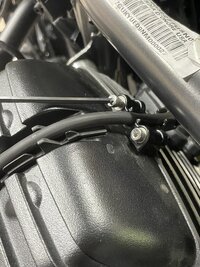
Additionally, I've replace the OEM star fasteners with hex fasteners on the plastic stays for the ignition wire at this point. It makes servicing the valves easier, because you won't need to move the tank as much (if at all) to remove them in the future.

04 valves

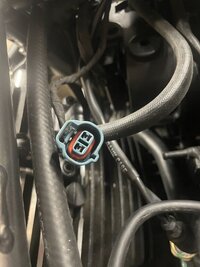
Finally, remove the plugs for the OEM lambda sensors. You'll need to find a home for them eventually, because they won't be used. The new lambda sensors will be controlled by the AT-300.

03 old o2 plugs

== 02 - Evap removal ==

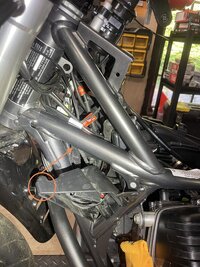
There's already a big thread on this, but here's what I did. I wanted to completely remove the Evap canister, because I wanted to make room in there for cables and things. I was also installing a set of Denali lights, and removing the canister made running those cables easier.

You're going to need to remove this other plastic cable box in order to get full access to the Evap canister. It's not hard, there's only a couple screws. The left side has a screw that attaches to the other side (see orange circle).

02 prep

This gave me access to the zip tie that was holding in the Evap canister. I snipped it, and gutted the whole system.

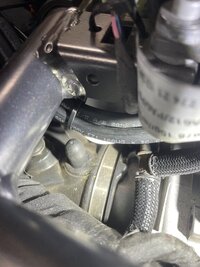
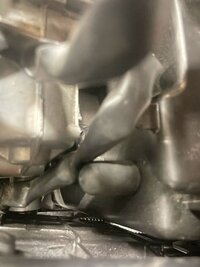
I plugged the port on the intake as shown:

06 evap2

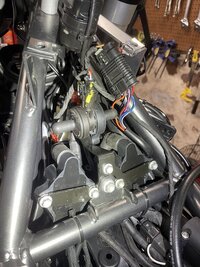
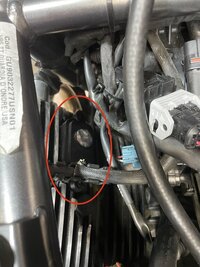
Then I plugged the Bosch valve as shown. It needs to stay plugged in so you don't throw an error:

08 evap4

Alternatively, there are options you can buy that allow you to remove the Bosch valve, but Todd does not sell them, and I'm not sure if they are endorsed by GuzziTech.

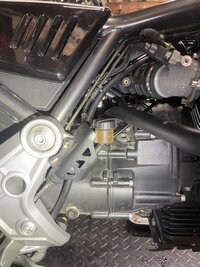
Finally, I just completely removed the tip valve. I used a vacuum connector and a new hose that I ran down the right side of the bike. It terminates right next to the other vent hose:

07 evap3

== 03 - SAS removal ==

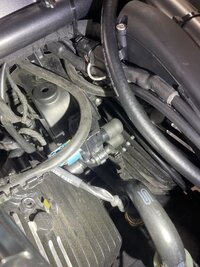
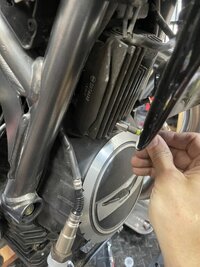
There's another thread on this already, so I won't belabor it, but I'll show you the end state on my install. I really found this set of vacuum caps useful. This is the SAS pump that is basically just functioning as vestigial electronics to prevent errors from showing up.

09 sas

Make sure you plug the port on the airbox:

10 sas2

And install the SAS port covers. This is where those ball-end hex-head bits will come really handy:

11 sas4

(NOTE: These don't look like the block-off plates you get from GuzziTech, because they aren't :) . I'm waiting on a new batch from them, and in the meantime, I took the OEM ones to a local fabricator, and they cut and welded them closed for me. Not pretty, but functional. I highly recommend using the machined ones you get from GuzziTech.)

== 04 - Exhaust installation ==

First, you should modify your airbox cover as detailed in this thread. I didn't grab a picture of mine, but it looks about like this:

V85TT AirboxMods Part

After you remove the old exhaust system, I highly recommend situating the new lambda sensors first. They don't easily fit through the gap in the frame. Also, they're pretty sensitive, so keep the plastic caps on until you're ready to fit them into the new headers.

I needed to temporarily loosen/move the reg/rec in order to create enough space to fit the lambda sensors through the gap:

12 regrec lambda

You'll need to thread them from the inside out. In other words, the big fat connector plug doesn't fit between the frame and the reg/rec area, so thread the lambda sensor through, out to where the exhaust is going to be. Then situate the plug in an accessible way up through the frame. The right side is harder than the left.

Before I installed the headers, I fit the lambda sensors in the bungs, and tightened. It's easier than doing it after the headers are installed, and prevents putting stress on the mounts.

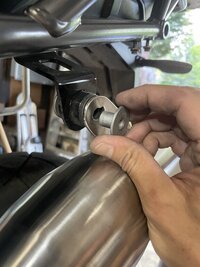
Once the lambda sensors are installed in the headers, then loosely fit everything together: headers, y-pipe, and muffler. Don't tighten yet. A little gotcha on the muffler is that the OEM collar doesn't fit into the muffler, so just get rid of that and replace with an appropriate washer:

16 muffler

When you're confident that everything fits, make sure that the muffler and y-pipe are seated as deeply as possible. If it's not, the sidestand will slam into your muffler. Then, tighten from front to back. The torque specs on the flange bolts are 25NM (~18 lb/ft).

It'll look like this (the exhaust, anyway, the top of your bike will be a total mess at this point):

17 together

== 05 - PC6 / AT300 install ==

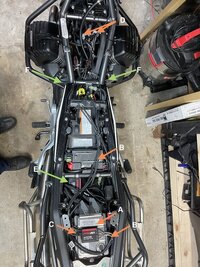
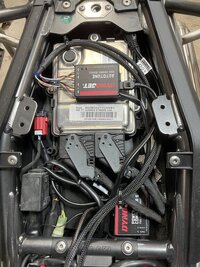
So, just to verify intuition: the left cylinder is cylinder one. You'll need to know that later. First, let's go over the complete setup at a high level:

13 pc at

Orange, relates to AT and lambda sensor wires

A: the AT-300, stuck atop the ECU with included velcro
B: lambda sensor wires that needed to be set into the AT-300
C: the AT-300 is connected to the PC6 here
D: the lambda sensor wires connect to the sensor plugs here. Note: cyl 1 and 2 are noted on the AT-300. Ensure that cyl 1 routes to the left lambda sensor.

Green, relates to the PC6
E: the PC6, stuck to the plastic area behind the battery
F: wires from the PC6 intercept the fuel injector plugs

To install the AT-300 and lambda sensor cables, you'll need to push the colored wires into their respective ports in the AT-300. This is a massive pain in the ass. (Edit: A tip I have learned is to use a small eyeglass screwdriver set, and using the small flat blade, push it into each wire hole and rotate 90 degrees before trying to insert each wire. — GTM) Ensure that they are fully seated when you screw in the little screws. If they are not, they'll easily pull out. I had to clip, strip, and re-solder one of the wires after I completely bungled it trying to get it seated into the AT-300. When that's finally done, make sure the wires are in there solidly. To power the AutoTune unit, there’s a switched plug that is meant to (I think) power a USB connector to the right of the battery. It’s incredibly easy to access. I bought these connectors, and connected AutoTune using one of them. I had to use a multimeter to determine which is switched, I don’t remember which. I will let you know when I’m back from this trip.

Run the wires up to the lambda sensor ports and plug them in. Again, cylinder 1 is left. Take the OEM lambda sensor plugs, and zip tie them out of the way.

To install the PC6, you'll need to unplug the fuel injector cables first. There's a little wire clip around them. Then, run the wires up from the PC6. ***IMPORTANT: the orange FI wire running from the PC6 is cylinder 1 (left). The yellow FI wire is cylinder 2 (right).***

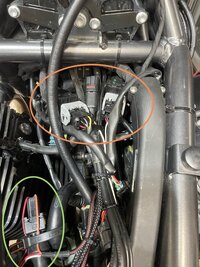
It will be intuitive how to intercept and reinstall the FI plugs. This is a closeup of that area, showing the lambda sensor plugs (orange) and the left FI plug (green). Note the little orange wire in the FI plug indicating it's cylinder 1.:

14 pc at 2

Just for reference, this is a view of the PC6 and AT-300 setup in the tail:

15 pc at 3

(You'll need to connect the PC6 to the throttle body plug and the battery as described in Todd's post at the top of the thread.)

== 06 - Mapping and final steps ==

The first thing you need to do is flash the ECU using UpMap. Follow Todd's instructions and video here. The only weird thing that happened to me was that my UpMap store was in Italian and wasn't clear how to switch to English. The important thing is that you select a full-system map. In other words, either of these would work:

IMG 7429

That being said, I used "FR" which indicates a system w/o DB killers.

Once the ECU has been flashed, move onto the PC6. Your PC6 should have come with Todd's trims pre-loaded, so the only thing you need to do here is to reset the throttle position sensor (TPS).

To do that, you'll need to reinstall the gas tank because the engine needs to be running. I wouldn't necessarily recommend putting everything back together, because if something goes wrong, you'll be... quite upset that you have to disassemble everything again.

With the tank connected, connect your computer to the PC6 with the included cable, and start the bike.

At this point you'll likely giggle like a schoolgirl at this point that it actually runs, as I did. Give yourself a pat on the back. Have a beer maybe.

Once the bike is running, and the PC6 is connected to your bike, you'll be able to do a bunch of fun things.

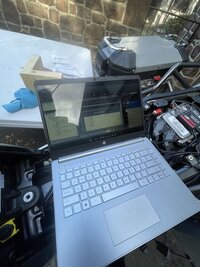
This is my computer connected to my PC6. Don't worry about what's happening on the screen. Todd will tell you if he wants, lol:

18 tps

Anyway, you'll now need to calibrate the TPS. Select Calibrate, and then throttle position sensor (TPS). A little window will appear showing you the current voltage range. The idea is this: you want the PC6 to know the exact voltage of the throttle at 0% and the throttle at 100%. That way, the fuel map squirts out the right air/fuel ratio at the various RPMs and throttle position. Kind of an important detail.

Make sure "auto tune" is checked, and then reset both values. Follow the instructions on the screen, which is basically "blip the throttle to maximum as quickly as possible." You'll be scared to do this, but don't worry. Just do it super quickly and the PC6 will register max throttle. Your engine won't explode. Once that's done, you'll see the TPS voltage range has new numbers that correspond with your throttle. You can then turn the bike off and disconnect your computer from the PC6.

If you're like me, it'll be midnight. You'll be tired. You'll question your reality. But then you'll also put your damn helmet on and test out your new bike and go to bed with a huge smile on your face.

Hope this helps someone out there!
 
Last edited:
Here is my full installation of the GTM Werks system with the PC6/AT300/UpMap fueling solution on my 2022 V85. It's going to be a long one.
Thanks for the thorough post! I wasn’t able to yet document the AutoTune install, so you saved me a ton of time. Next I can’t wait to hear what you think once you get to twist the throttle on your next big ride. It’s an eye-opener. Enjoy!
 
Thank you so much Francis. Its so well done, very thorough and precise, much appreciated. I plan to do the same installation in May. This is such a big help. And that bike is gorgeous, a very special V85!
 
Here is my full installation of the GTM Werks system with the PC6/AT300/UpMap fueling solution on my 2022 V85. It's going to be a long one.

I've broken it up in to 6 sections:

01 - Disassembly and overall prep
02 - Evap removal
03 - SAS removal
04 - Exhaust install
05 - PC6 / AT300 install
06 - Mapping and final steps

**DISCLAIMER: This is my personal installation journey. Todd's advice / instructions trumps this in all cases. Hope it helps, but your milage may vary.**

== 01 - Disassembly and overall prep ==

It's really important to get your work area and bike prepared before just tearing into it. I'm fortunate to have a stand, but if you don't I'd recommend a chair or something, because you're going to be spending a lot of time in under and beside your bike. I'm not going to call out all the tools you'll need, but one thing in particular that's pretty important is a set of ball-end hex-bits to access the SAS covers. I'm not sure how you'd do that step otherwise.

Access is also really important. While it seems like a massive pain, I recommend taking a bunch of stuff off and setting it aside so you have access to the various areas of the bike that you'll need throughout installation. You'll need to remove:

1. Seat and tank (instructions here on the other thread about evap/sas)
2. Forward plastic covers (see the orange circle). They're just a few screws, nothing too difficult.
3. Side panels, and both fuel injector covers (green circle)
4. Left side luggage rack and passenger peg assembly (blue circles)
5. I've removed the OEM pipes and muffler in this photo, but this can wait until you're ready to install the new one.

View attachment 29594

It's also a really good idea to do your valves at this point. Additionally, I've replace the OEM star fasteners with hex fasteners on the plastic stays for the ignition wire at this point. It makes servicing the valves easier, because you won't need to move the tank as much (if at all) to remove them in the future.

View attachment 29595

Finally, remove the plugs for the OEM lambda sensors. You'll need to find a home for them eventually, because they won't be used. The new lambda sensors will be controlled by the AT-300.

View attachment 29596

== 02 - Evap removal ==

There's already a big thread on this, but here's what I did. I wanted to completely remove the Evap canister, because I wanted to make room in there for cables and things. I was also installing a set of Denali lights, and removing the canister made running those cables easier.

You're going to need to remove this other plastic cable box in order to get full access to the Evap canister. It's not hard, there's only a couple screws. The left side has a screw that attaches to the other side (see orange circle).

View attachment 29597

This gave me access to the zip tie that was holding in the Evap canister. I snipped it, and gutted the whole system.

I plugged the port on the intake as shown:

View attachment 29598

Then I plugged the Bosch valve as shown. It needs to stay plugged in so you don't throw an error:

View attachment 29599

Alternatively, there are options you can buy that allow you to remove the Bosch valve, but Todd does not sell them, and I'm not sure if they are endorsed by GuzziTech.

Finally, I just completely removed the tip valve. I used a vacuum connector and a new hose that I ran down the right side of the bike. It terminates right next to the other vent hose:

View attachment 29600

== 03 - SAS removal ==

There's another thread on this already, so I won't belabor it, but I'll show you the end state on my install. I really found this set of vacuum caps useful. This is the SAS pump that is basically just functioning as vestigial electronics to prevent errors from showing up.

View attachment 29601

Make sure you plug the port on the airbox:

View attachment 29602

And install the SAS port covers. This is where those ball-end hex-head bits will come really handy:

View attachment 29603

(NOTE: These don't look like the block-off plates you get from GuzziTech, because they aren't :) . I'm waiting on a new batch from them, and in the meantime, I took the OEM ones to a local fabricator, and they cut and welded them closed for me. Not pretty, but functional. I highly recommend using the machined ones you get from GuzziTech.)

== 04 - Exhaust installation ==

First, you should modify your airbox cover as detailed in this thread. I didn't grab a picture of mine, but it looks about like this:

View attachment 29604

After you remove the old exhaust system, I highly recommend situating the new lambda sensors first. They don't easily fit through the gap in the frame. Also, they're pretty sensitive, so keep the plastic caps on until you're ready to fit them into the new headers.

I needed to temporarily loosen/move the reg/rec in order to create enough space to fit the lambda sensors through the gap:

View attachment 29605

You'll need to thread them from the inside out. In other words, the big fat connector plug doesn't fit between the frame and the reg/rec area, so thread the lambda sensor through, out to where the exhaust is going to be. Then situate the plug in an accessible way up through the frame. The right side is harder than the left.

Before I installed the headers, I fit the lambda sensors in the bungs, and tightened. It's easier than doing it after the headers are installed, and prevents putting stress on the mounts.

Once the lambda sensors are installed in the headers, then loosely fit everything together: headers, y-pipe, and muffler. Don't tighten yet. A little gotcha on the muffler is that the OEM collar doesn't fit into the muffler, so just get rid of that and replace with an appropriate washer:

View attachment 29607

When you're confident that everything fits, make sure that the muffler and y-pipe are seated as deeply as possible. If it's not, the sidestand will slam into your muffler. Then, tighten from front to back. The torque specs on the flange bolts are 25NM (~18 lb/ft).

It'll look like this (the exhaust, anyway, the top of your bike will be a total mess at this point):

View attachment 29608

== 05 - PC6 / AT300 install ==

So, just to verify intuition: the left cylinder is cylinder one. You'll need to know that later. First, let's go over the complete setup at a high level:

View attachment 29609

Orange, relates to AT and lambda sensor wires

A: the AT-300, stuck atop the ECU with included velcro
B: lambda sensor wires that needed to be set into the AT-300
C: the AT-300 is connected to the PC6 here
D: the lambda sensor wires connect to the sensor plugs here. Note: cyl 1 and 2 are noted on the AT-300. Ensure that cyl 1 routes to the left lambda sensor.

Green, relates to the PC6
E: the PC6, stuck to the plastic area behind the battery
F: wires from the PC6 intercept the fuel injector plugs

To install the AT-300 and lambda sensor cables, you'll need to push the colored wires into their respective ports in the AT-300. This is a massive pain in the ass. Ensure that they are fully seated when you screw in the little screws. If they are not, they'll easily pull out. I had to clip, strip, and re-solder one of the wires after I completely bungled it trying to get it seated into the AT-300. When that's finally done, make sure the wires are in there solidly.

Run the wires up to the lambda sensor ports and plug them in. Again, cylinder 1 is left. Take the OEM lambda sensor plugs, and zip tie them out of the way.

To install the PC6, you'll need to unplug the fuel injector cables first. There's a little wire clip around them. Then, run the wires up from the PC6. ***IMPORTANT: the orange FI wire running from the PC6 is cylinder 1 (left). The yellow FI wire is cylinder 2 (right).***

It will be intuitive how to intercept and reinstall the FI plugs. This is a closeup of that area, showing the lambda sensor plugs (orange) and the left FI plug (green). Note the little orange wire in the FI plug indicating it's cylinder 1.:

View attachment 29610

Just for reference, this is a view of the PC6 and AT-300 setup in the tail:

View attachment 29611

(You'll need to connect the PC6 to the throttle body plug and the battery as described in Todd's post at the top of the thread.)

== 06 - Mapping and final steps ==

The first thing you need to do is flash the ECU using UpMap. Follow Todd's instructions and video here. The only weird thing that happened to me was that my UpMap store was in Italian and wasn't clear how to switch to English. The important thing is that you select a full-system map. In other words, either of these would work:

View attachment 29612

That being said, I used "FR" which indicates a system w/o DB killers.

Once the ECU has been flashed, move onto the PC6. Your PC6 should have come with Todd's trims pre-loaded, so the only thing you need to do here is to reset the throttle position sensor (TPS).

To do that, you'll need to reinstall the gas tank because the engine needs to be running. I wouldn't necessarily recommend putting everything back together, because if something goes wrong, you'll be... quite upset that you have to disassemble everything again.

With the tank connected, connect your computer to the PC6 with the included cable, and start the bike.

At this point you'll likely giggle like a schoolgirl at this point that it actually runs, as I did. Give yourself a pat on the back. Have a beer maybe.

Once the bike is running, and the PC6 is connected to your bike, you'll be able to do a bunch of fun things.

This is my computer connected to my PC6. Don't worry about what's happening on the screen. Todd will tell you if he wants, lol:

View attachment 29615

Anyway, you'll now need to calibrate the TPS. Select Calibrate, and then throttle position sensor (TPS). A little window will appear showing you the current voltage range. The idea is this: you want the PC6 to know the exact voltage of the throttle at 0% and the throttle at 100%. That way, the fuel map squirts out the right air/fuel ratio at the various RPMs and throttle position. Kind of an important detail.

Make sure "auto tune" is checked, and then reset both values. Follow the instructions on the screen, which is basically "blip the throttle to maximum as quickly as possible." You'll be scared to do this, but don't worry. Just do it super quickly and the PC6 will register max throttle. Your engine won't explode. Once that's done, you'll see the TPS voltage range has new numbers that correspond with your throttle. You can then turn the bike off and disconnect your computer from the PC6.

If you're like me, it'll be midnight. You'll be tired. You'll question your reality. But then you'll also put your damn helmet on and test out your new bike and go to bed with a huge smile on your face.

Hope this helps someone out there!
Amazing work Francis, looking forward to getting Todd’s maps soon. May I ask what size vacuum caps you used to plug the TB intake for evap removal? I have 8mm ones but think they might be too big?? Thank you
 
I’m not sure the exact size I used, but if you think it’s too small, it probably is.* I’d recommend getting the variety pack and using the one that fits tightly.

*that’s what she said
 
Just for reference, this is a view of the PC6 and AT-300 setup in the tail:
Where did you connect the switched power and ground for the AutoTune?

And WHEN can I see some words from you on how the bike runs?!?!?!
 
Oh, I totally forgot! There’s a switched plug that is meant to (I think) power a USB connector to the right of the battery. It’s incredibly easy to access. I bought these connectors, and connected the AutoTune using one of them. I had to use a multimeter to determine which is switched, I don’t remember which. I will let you know when I’m back from this trip if it’s not sorted out by then.

I will post on the differences after this trip. It’ll be a 600 mile field test by the time I get home tomorrow.
Can you post a picture of how you did this connection?
 
Back
Top