• Ciao Guest - You’ve landed at the ultimate Guzzi site. NEW FORUM REGISTRATIONS REQUIRE EMAIL ACTIVATION - CHECK YOUR SPAM FOLDER - Use the CONTACT above if you need help. New to the forum? For all new members, we require ONE post in the Introductions section at the bottom, in order to post in most of the other sections. ALWAYS TRY A SEARCH BEFORE STARTING A NEW TOPIC - Most questions you may have, have likely been already answered. DON'T BE A DRIVE-BY POSTER: As a common courtesy, check back in and reply within 24 hours, or your post will be deleted. Note there's decades of heavily experienced Guzzi professionals on this site, all whom happily give endless amounts of their VALUABLE time for free; BE COURTEOUS AND RESPECTFUL!
  • There is ZERO tolerance on personal attacks and ANY HYPERLINKS to PRODUCT(S) or other competing website(s), including personal pages, social media or other Forums. This ALSO INCLUDES ECU DIAGnostic software, questions and mapping. We work very hard to offer commercially supported products and to keep info relevant here. First offense is a note, second is a warning, third time will get you banned from the site. We don't have the time to chase repeat (and ignorant) offenders. This is NOT a social media platform; It's an ad-free, privately funded website, in small help with user donations. Be sure to see the GTM STORE link above; ALL product purchases help support the site, or you can upgrade your Forum profile or DONATE via the link above.
  • Be sure to see the GTM STORE link also above for our 700+ product inventory, including OEM parts and many of our 100% Made-in-SoCal-USA GTM products and engine kits. In SoCal? Click the SERVICE tab above for the best in service, tires, tuning and installation of our products or custom work, and don't miss our GT MotoCycles® (not) art on the BUILDS tab above. WE'RE HERE ONLINE ONLY - NO PHONE CALLS MADE OR RECEIVED - DO NOT EMAIL AND ASK QUESTIONS OR ASK TO CALL YOU.
  • Like the new V100, GuzziTech is full throttle into the future! We're now running on an all-new server and we've updated our Forum software. The visual differences are obvious, but hopefully you'll notice the super-fast speed. If you notice any glitches or have any issues, please post on the Site Support section at the bottom. If you haven't yet, please upgrade your account which is covered in the Site Support section or via the DONATE tab above, which gives you full site access including the DOWNLOADS section. We really appreciate every $ and your support to keep this site ad-free. Create an account, sign in, upgrade your account, and enjoy. See you on the road in 2024.

stripped crankcase drain

Marvin W

Wrenching because I have to
GT Contributor
Joined
Aug 22, 2022
Messages
17
Location
Genoa, NV
Hello,
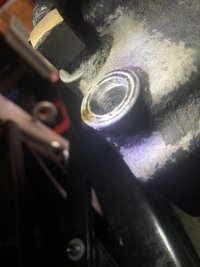
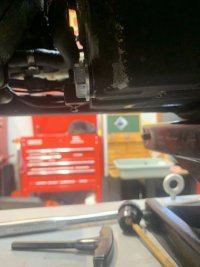
I have an '06 Breva 1100. The drain plug did not come out smoothly on my recent oil change. The steel plug itself is fine, but the crankcase's threads will no longer permit the plug to be tightened properly. Apparently this is a problem with aluminum threads. There is a product, Time-Sert, that can tackle this problem, but here's the but, the exhaust mixer box constrains the space between it and the drain plug, not permitting the tool to be used. Anyone have any experience moving the mixer box out of the way somewhat?
 
This is a common self-induced problem. People over tighten the drain plug insanely tight. The steel plug destroys the aluminum threads by tearing them out when you do this.

Unfortunately, there is only one way to repair this correctly and doing it in situ (in place on the bike) is not the correct way. You will not get the tool properly aligned and the threads will be crooked I assure you.

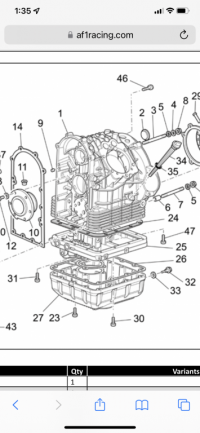
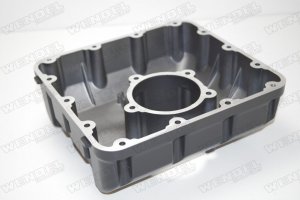
The lower portion of the oil sump must be removed from the motorcycle and the threads repaired.

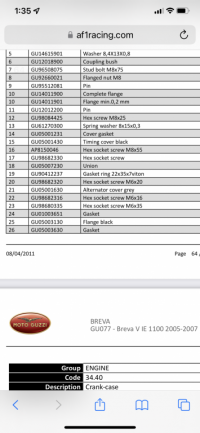
You may just want to purchase a new lower oil sump (and a new gasket). GU05003530. $250 is the average price I believe. Todd (GTM) can obtain these parts for you in the STORE. Send an email to info@GuzziTech.com and he can probably get you a really good price.

By the time you remove the part, buy the tools, get the TimeSert, and do all the work, you could just swap out a new piece and be done in 1 hour. If it were mine, that would be my choice.

GU05003530
GU05003530
 
Last edited:
The alternative is to drop the pan, take it and the drain plug to a machine shop that can make the repair. They can get it aligned correctly. End cost may be less, but will take more time. And you will still need a new gasket but I recommend you get two for the following - While at it, drop the oil filter and remove the upper section and replace that gasket as well as there have been reports of it failing over time. You need to drop the filter as there are screws up there that must be removed.
 
And nobody will agree with this , BUT , if time is of the essence , you could take the drain bolt to
an auto supply store and see if they have any that are a slight oversize , made specifically for this
purpose . I had luck with these on H-D bikes a few years ago , and yes YMMV ! Peter
 
I was conscious of overtightening and I don't think I did. My last oil change was 8/20/18, 1700 miles ago.
 
And nobody will agree with this , BUT , if time is of the essence , you could take the drain bolt to
an auto supply store and see if they have any that are a slight oversize , made specifically for this
purpose . I had luck with these on H-D bikes a few years ago , and yes YMMV ! Peter

Not true Peter!

I will...


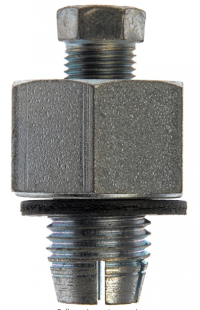
He could use a "piggyback" drain plug, which will crudely cut new threads into the pan, (available at auto parts stores), and I have made emergency repairs with this setup before that people have left in place for years without problems, but it's not the best setup.

If you do choose this route, be sure to slather grease all over the thread cutting end, to keep the metal chaff from going into the pan. You will of course have to reverse it back out to clean out the metal fragments that it cuts.

Be aware that these are sized to match the original size hole and the auto parts store may or may not have the size you need and it may have to be ordered.

I also use grease covered q-tips to fish out any metal chips as well.

IF YOU GO THIS ROUTE, BE SURE TO KEEP THE SELF-TAPPING PLUG STRAIGHT AND LEVEL TO THE OIL PAN. THE RUBBER GASKET HELPS TO TAKE UP OFFSET, BUT IF YOU MUCK IT UP BADLY, IT WILL NOT LAY FLUSH ENOUGH TO SEAL.

Tightness of a stock oil drain plug is snug plus 1-2 mm additional turn. NO MORE. It does not need a torque value nor does it need to be insanely tight. Snug plus 1-2 mm additional rotation MAX.

The ONLY way to bust aluminum threads in a drain plug is by over tightening.

Screen Shot 2022 08 22 at 44140 PM


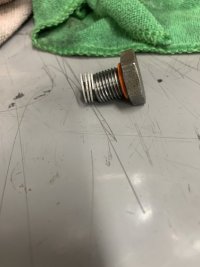
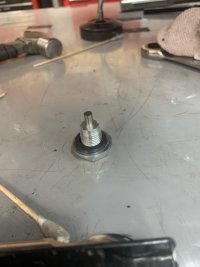
This is another style I used (AND PREFER DUE TO THE MAGNETIC PICKUP) on a Harley-Davidson that the customer overtightened the drain plug.

Customer requested this specific type of repair. It is still holding oil perfectly.


68089572313  E9D06811 F340 4F96 9576 DE2B50A2BF5C

68089569121  37207624 1BE2 45C5 B7BA 7EEC3151C1C3

IMG 8345

IMG 8346
 
Last edited:
I was conscious of overtightening and I don't think I did. My last oil change was 8/20/18, 1700 miles ago.
...the crankcase's threads will no longer permit the plug to be tightened properly...

Unfortunately the metal gets the last word ;)

I won't belabour further, rather gently encourage you to reconsider your technique (and mindset...) if you are going to continue to approach your machine with wrench in hand.
 
...Anyone have any experience moving the mixer box out of the way somewhat?
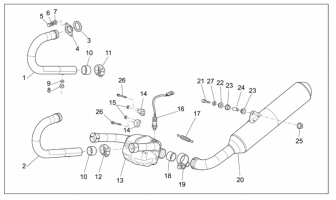
I assume you mean the exhaust system including the catalytic converter?

Yes, you need to remove the exhaust.

1. Remove the exhaust pipe (20) from the catalytic converter (13) by loosening clamp (19) and removing bolt assembly (21 - 25).

2. Disconnect the Λ (lambda) plug. (16)

3. Remove the catalytic converter (13) from the header pipes (1) and (2) by loosening clamps (11) and (12) and removing hanging screws (26).

You will need to spray some lubricant between the space where the pieces connect together [ (1) into (13) and [ (20 into (13) ] to get them to come apart easily. Wipe the excess off before reassembly to avoid the burning smell of the lubricant.

Screen Shot 2022 08 22 at 45505 PM
 
Last edited:
This is a common self-induced problem. People over tighten the drain plug insanely tight. The steel plug destroys the aluminum threads by tearing them out when you do this.

Unfortunately, there is only one way to repair this correctly and doing it in situ (in place on the bike) is not the correct way. You will not get the tool properly aligned and the threads will be crooked I assure you.

The lower portion of the oil sump must be removed from the motorcycle and the threads repaired.

You may just want to purchase a new lower oil sump (and a new gasket). GU05003530. $250 is the average price I believe. Todd (GTM) can obtain these parts for you in the STORE. Send an email to info@GuzziTech.com and he can probably get you a really good price.

By the time you remove the part, buy the tools, get the TimeSert, and do all the work, you could just swap out a new piece and be done in 1 hour. If it were mine, that would be my choice.

GU05003530
View attachment 26226
You mentioned Todd (GTM), please, what's his contact info
 
Unfortunately the metal gets the last word ;)

I won't belabour further, rather gently encourage you to reconsider your technique (and mindset...) if you are going to continue to approach your machine with wrench in hand.

See that red hyperlink. That's his email. info@GuzziTech.com

You are welcome by the way for all of the information and help...
Thank you very much, I truly appreciate your help. Best regards,
 
In an emergency, I once used plumbers tape to hold a sump plug in place just to keep it snug. I used it for several years with no leak - although I wouldn't recommend it (if it fails your back wheel hits the oil first). This is how I learned you don't need to over tighten.
 
The alternative is to drop the pan, take it and the drain plug to a machine shop that can make the repair. They can get it aligned correctly. End cost may be less, but will take more time. And you will still need a new gasket but I recommend you get two for the following - While at it, drop the oil filter and remove the upper section and replace that gasket as well as there have been reports of it failing over time. You need to drop the filter as there are screws up there that must be removed.
I appreciate your help and advise, I am confused when you say get two new gaskets for the "following".
 

Attachments

  • Oil Filters.pdf
    159.3 KB · Views: 10
Back
Top