• Ciao Guest - You’ve landed at the ultimate Guzzi site. NEW FORUM REGISTRATIONS REQUIRE EMAIL ACTIVATION - CHECK YOUR SPAM FOLDER - Use the CONTACT above if you need help. New to the forum? For all new members, we require ONE post in the Introductions section at the bottom, in order to post in most of the other sections. ALWAYS TRY A SEARCH BEFORE STARTING A NEW TOPIC - Most questions you may have, have likely been already answered. DON'T BE A DRIVE-BY POSTER: As a common courtesy, check back in and reply within 24 hours, or your post will be deleted. Note there's decades of heavily experienced Guzzi professionals on this site, all whom happily give endless amounts of their VALUABLE time for free; BE COURTEOUS AND RESPECTFUL!
  • There is ZERO tolerance on personal attacks and ANY HYPERLINKS to PRODUCT(S) or other competing website(s), including personal pages, social media or other Forums. This ALSO INCLUDES ECU DIAGnostic software, questions and mapping. We work very hard to offer commercially supported products and to keep info relevant here. First offense is a note, second is a warning, third time will get you banned from the site. We don't have the time to chase repeat (and ignorant) offenders. This is NOT a social media platform; It's an ad-free, privately funded website, in small help with user donations. Be sure to see the GTM STORE link above; ALL product purchases help support the site, or you can upgrade your Forum profile or DONATE via the link above.
  • Be sure to see the GTM STORE link also above for our 700+ product inventory, including OEM parts and many of our 100% Made-in-SoCal-USA GTM products and engine kits. In SoCal? Click the SERVICE tab above for the best in service, tires, tuning and installation of our products or custom work, and don't miss our GT MotoCycles® (not) art on the BUILDS tab above. WE'RE HERE ONLINE ONLY - NO PHONE CALLS MADE OR RECEIVED - DO NOT EMAIL AND ASK QUESTIONS OR ASK TO CALL YOU.
  • Like the new V100, GuzziTech is full throttle into the future! We're now running on an all-new server and we've updated our Forum software. The visual differences are obvious, but hopefully you'll notice the super-fast speed. If you notice any glitches or have any issues, please post on the Site Support section at the bottom. If you haven't yet, please upgrade your account which is covered in the Site Support section or via the DONATE tab above, which gives you full site access including the DOWNLOADS section. We really appreciate every $ and your support to keep this site ad-free. Create an account, sign in, upgrade your account, and enjoy. See you on the road in 2024.

Mindis V7-850 Mods

Could you “dress” them using a flat file ?
File will probably leave too much of "brushed"...
I have done this before. I found the best implement, a simple piece of 600 grit white Arkansas honing stone.
That's what I had in mind. I have something similar with unknown grit, I gotta test it first on some scrap alOOOOOOminum:)
 
While I have my valve covers off, might as well make a pair of crash guards for them. To have a snug fit I taped the covers and put 3 layers of carbon cloth. I'll fill them with carbon chops once cured and shaped.


On my intake Y I cut open carbon skin and scraped out modeling clay:


I glued the skin back on Y, making sure the hole from SAS is well sealed, patch little holes left from rough sanding and put carbon chops on. I'll have to do half n half and let it cure in between because gravity is not my friend here. 2 days curing for one side, 2 days for the other, 2-3 days for final coats between sandings, one more for final satin finish... Composites are not happening right here and right now LOL

 
Valve cover crash guard skins are peeled and cut:


I boarded around them and got carbon chops on:


I'm getting new rubber for the rear and found out an easy way to break the bead, well, whatever works :)


While taking out rear wheel I found something rather disturbing... As soon as I pulled caliper out of brake disc, one brake pad's friction material fell out while metal part was still inside the caliper like it has to be:


I see some burned paint on that brake pad, what makes me think that at some point it was overheated and because of that delaminated. Looks like it was holding on in place only by them round indents... Calipers slides sideways very smooth, not stuck or binding anywhere. Am I too harsh on rear brakes then??? Pads are OEM from new, I got close 10K kms on my bike and I got new sintered pads from GTM. I knew they were needed to be changed shortly, I was just milking last few miles before closing my season LOL Maybe I shouldn't let them wear out so much and change them earlier? Looks like there's enough meat left, but maybe they heat up more when they get thinner? Now I have a bit of a riddle to find out why it happened. Delaminated pad is the same thickness as the other one at the piston side, so they wear out evenly...
 
Are those dimples actually rivets that did not properly secure the friction material to the backing plate?
 
Quality brake pad manufacture


or NOT


You would need be getting a Awfull lot of Heat into those pads to separate the friction material from the backing plate.
Unless, the purchasing agent found a real deal on some off market brake pads… 🤦‍♂️
 
Are those dimples actually rivets that did not properly secure the friction material to the backing plate?
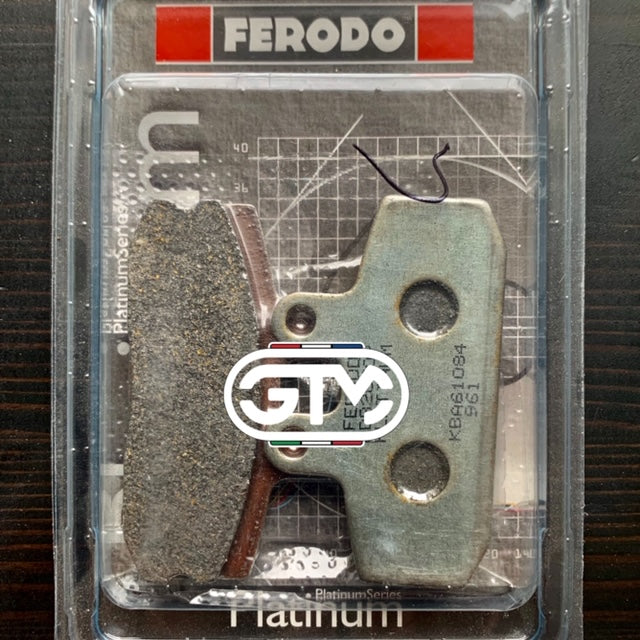
No, it's just friction material, no rivets at all on these pads...
You would need be getting a Awfull lot of Heat into those pads to separate the friction material from the backing plate.
Unless, the purchasing agent found a real deal on some off market brake pads… 🤦‍♂️
That's what I thought, they usually don't come off even with excess heat. And friction material doesn't look burned or anyway abnormal, just unglued. I'll take pads off later then I'll take some close up pics
 
Here's a close up pic of them pads:


There's some dust on the plate, what means that it didn't delaminate just just, it got loose at some point earlier. It's not much so I'm guessing I didn't ride for very long with loosened friction material. And here's another scary part- I wanted to see how well friction material is glued to the plate hoping that I was just "lucky" to have one bad QC pad. I tapped (not hard) friction material with screwdriver 3 times and it popped off!!! Effortless!!!:eek: Jeez.... I remember years ago when I needed a scrap metal plate, I was trying to chisel out friction material off a car's brake pad, not a fekin chance!
 
I do indeed, it's on my shopping list... as well as milling machine, bigger lathe, powdercoating oven, vacuum oven, better Mig and Tig welders, plasma cutter, V100 Mandelo, and so on and on. I'm still single and still in search of a wealthy cougar, if ya know any... :D
If you find one with an equally wealthy cougar give me a holler.
 
On a good note, intake Y is coming along:


That's only first coat after sanding but me likes it so far:) I found out a way how to speed up curing process of my pieces without hauling them in my kitchen for the night. I got a couple of heating mats:


They're not meant or composites or resin casting. They're for sprouting that evil green substance (also known as vegefekintables), but they work like a charm! They give 26C degrees on a surface and ~22C air around, perfect resin curing temperature. one of them uses as much electricity as 35W lightbulb, so I can keep it plugged in 24hrs and I don't have to heat my whole shop to sauna's temperature:) Score! LOL

And I got my front axle sliders on:


I got axle out and on the lathe, drilled and tapped for M6 bolts 10mm deep, and vualia!
 
Sorry I meant if you find one with an equally wealthy cougar friend😂
C'mon there's plenty to share
Either way I'm impressed by that intake. Gorgeous!
Oh, that's what ya meant... ah, ok, cool... but it's still a NO! I can handle two (I think...) so I can add to my whishlist a K75 and new XSR900GP as well!!!
:rofl: :rofl: :rofl:
 
Here's a close up pic of them pads:


There's some dust on the plate, what means that it didn't delaminate just just, it got loose at some point earlier. It's not much so I'm guessing I didn't ride for very long with loosened friction material. And here's another scary part- I wanted to see how well friction material is glued to the plate hoping that I was just "lucky" to have one bad QC pad. I tapped (not hard) friction material with screwdriver 3 times and it popped off!!! Effortless!!!:eek: Jeez.... I remember years ago when I needed a scrap metal plate, I was trying to chisel out friction material off a car's brake pad, not a fekin chance!

I don’t own one from this platform but isn’t the rear brake a Chinese component?

Those sure look like terrible Chinese made pads.
 
I don’t own one from this platform but isn’t the rear brake a Chinese component? Those sure look like terrible Chinese made pads.
Yes it is, and yes they are. I saw above where he mentioned he bought HH pads from GTM, which was fronts only, and confusing at best. Brembo does not make rear pads for this caliper best I know, but Ferodo does, and I generally keep a few pair in stock linked below. For forever, the piston side pads wear faster. Poor pad quality, and 10k KM on rear pads that are often used (city riding even worse) is decent. Highway/minimal use may go farther for those who will want to make me wrong.

 
Back
Top