• Ciao Guest - You’ve landed at the ultimate Guzzi site. NEW FORUM REGISTRATIONS REQUIRE EMAIL ACTIVATION - CHECK YOUR SPAM FOLDER - Use the CONTACT above if you need help. New to the forum? For all new members, we require ONE post in the Introductions section at the bottom, in order to post in most of the other sections. ALWAYS TRY A SEARCH BEFORE STARTING A NEW TOPIC - Most questions you may have, have likely been already answered. DON'T BE A DRIVE-BY POSTER: As a common courtesy, check back in and reply within 24 hours, or your post will be deleted. Note there's decades of heavily experienced Guzzi professionals on this site, all whom happily give endless amounts of their VALUABLE time for free; BE COURTEOUS AND RESPECTFUL!
  • Be sure to see the GTM STORE link also above for our 700+ product inventory, including OEM parts and many of our 100% Made-in-SoCal-USA GTM products and engine kits. In SoCal? Click the SERVICE tab above for the best in service, tires, tuning and installation of our products or custom work, and don't miss our GT MotoCycles® (not) art on the BUILDS tab above. WE'RE HERE ONLINE ONLY - NO PHONE CALLS MADE OR RECEIVED - DO NOT EMAIL AND ASK QUESTIONS OR ASK TO CALL YOU.
  • There is ZERO tolerance on personal attacks and ANY HYPERLINKS to PRODUCT(S) or other competing website(s), including personal pages, social media or other Forums. This ALSO INCLUDES ECU DIAGnostic software, questions and mapping. We work very hard to offer commercially supported products and to keep info relevant here. First offense is a note, second is a warning, third time will get you banned from the site. We don't have the time to chase repeat (and ignorant) offenders. This is NOT a social media platform; It's an ad-free, privately funded website, in small help with user donations. Be sure to see the GTM STORE link above; ALL product purchases help support the site, or you can upgrade your Forum profile or DONATE via the link above.

V100 Mods thread

Notes on the mv-motorrad.de/en/ 40mm peg lowering kit.

I needed to lower the pegs due to R knee ROM issues following a motorcycle 'incident' last year. The MV part is well made and as supplied lowers the OEM peg 35mm, while retaining the same angle of the peg to the brake/shifter pedal. However, they rotate down another 5mm, which I did to get 37mm, beyond that the OEM peg starts to tilt rearward. At 37 mm the peg is essentially flat to the brake/shifter pedal as seen in the pic. I adjusted both shifter and brake so they were at the low point. This basically replicates the set up on my Triumph T900RP, including reach from peg to pedal. I wear size 9 (US) boots and I'm comfortable. A larger boot might require use of the pedal fittings that come with the kit, especially on the shifter side, see below.

PXL_20230808_224108315.MP.jpg
PXL_20230808_224116462.MP.jpg

They also provide fittings to drop the pedals to maintain the same angle when using the 35mm lowering setting. I didn't use them but if you buy these you should know that what was supplied differs from the website pictures. I received the pictured fittings, at left the shifter adaptor (and the website shows the same for the brake) - at right the ugly as sin brake adaptor. I have queried them. Germans don't usually change a design without a reason (safety?) but being August continental Europe is on the long break. Anyway, I will edit the post when I get a response.

PXL_20230808_224255260.jpg

PXL_20230808_224303996.jpg

Cheers. TeeTwo.
 
Notes on the MV Motorrad 40mm peg lowering kit.

I needed to lower the pegs due to R knee ROM issues following a motorcycle 'incident' last year. The MV part is well made and as supplied lowers the OEM peg 35mm, while retaining the same angle of the peg to the brake/shifter pedal. However, they rotate down another 5mm, which I did to get 37mm, beyond that the OEM peg starts to tilt rearward. At 37 mm the peg is essentially flat to the brake/shifter pedal as seen in the pic. I adjusted both shifter and brake so they were at the low point. This basically replicates the set up on my Triumph T900RP, including reach from peg to pedal. I wear size 9 (US) boots and I'm comfortable. A larger boot might require use of the pedal fittings that come with the kit, especially on the shifter side, see below.
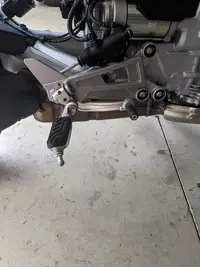
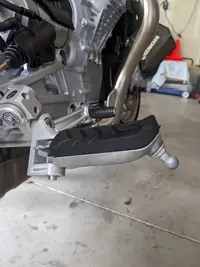
View attachment 31611
View attachment 31612

They also provide fittings to drop the pedals to maintain the same angle when using the 35mm lowering setting. I didn't use them but if you buy these you should know that what was supplied differs from the website pictures. I received the pictured fittings, at left the shifter adaptor (and the website shows the same for the brake) - at right the ugly as sin brake adaptor. I have queried them. Germans don't usually change a design without a reason (safety?) but being August continental Europe is on the long break. Anyway, I will edit the post when I get a response.
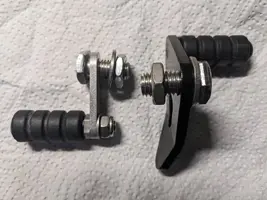
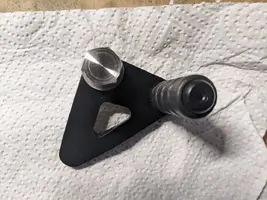
View attachment 31613

View attachment 31614

Cheers. TeeTwo.
Please let me know how this lowering kit effects the seat riding comfort.
Especially for long trips.
I imagine that the thigh lower resting angle might be positive for distributing weight on the pressure points on the seat.
 
Last edited:
Hi , Here’s my beautiful mandello in red. Just up to 700 miles….. only 232 to go 🤣🤣❗
Dave from Worcestershire England
Nice, looks like you have some extra parts.
center stand, cylinder head guards, possibly front fender extender (shorter version)?, and if I’m not wrong - even the larger touring screen?
Off course also the side panniers, and a RAM gps mount.
 
Please let is know how this lowering kit effects the seat riding comfort.
Especially for long trips.
I imagine that the thigh lower resting angle might be positive for distributing weight on the pressure points on the seat.

On a parking lot test ride, with the stock set up and my limited R knee ROM, I felt there was a risk my foot would get hung up on the peg when I went to put the foot to the ground. For ride safety the lowering kit was fitted by the dealer prior to delivery, (I had done measurements on a V100 floor model before purchase). So, I really can't make a before and after comparison on seat comfort.

I only have 625 miles on the bike, the longest ride being about 250 miles, with 150 miles (~3 hours) between fuel stops. I was comfortable, nothing on my rear end was shouting out at me. However, as others have mentioned it is a compact cockpit so there isn't much scope to wriggle around. It was a hot, sunny day (+90°F) and I was able to stand on the pegs to get some under the butt airflow.

I have also rotated the handlebar forward about 5-10°, which raises the grip height ~10-15mm and extends the bars forward slightly to open up the cockpit for my comfort.

Cheers. T2
 
Thanks 👍😁.
Standard height screen. Fender extender. Radiator guard, Chinese copy …£40 👍,stuck a moto guzzi label on it 🤣❗
Engine guards expensive but classy . Didn’t want the black wrap around ones. They look agricultural 😱
Love the gold wheels 😛
RAM extension came from my zzr 1400 centre yoke. Same M8 thread so cut the bolt down to fit , result 👍😁
Dave
 
I adjusted the position of the bars slightly, as well as the clutch and brake levers to suit my preferences. I do that on all my new bikes as soon as I get them home, provided the controls are not pinned in place.
I can't lower my footpegs due to cornering clearances, but I'd love to get the tall heated comfort seat, if only MG would make it available in the same brown that's standard on the Verde V100S.
 
I can't lower my footpegs due to cornering clearances
If you aren't ignoring my posts, as mentioned previously, fix your suspension sag for your weight, and you won't have any clearance issues.
 
If you aren't ignoring my posts, as mentioned previously, fix your suspension sag for your weight, and you won't have any clearance issues.
Who says I haven't set my suspension for my weight ?
As an ex AMA Superbike rider, I am not completely clueless. :)
 
Who says I haven't set my suspension for my weight ?
As an ex AMA Superbike rider, I am not completely clueless. :)
OK, if you say so. ;)
Please post the sag info on the Suspension thread here;

 
OK, if you say so. ;)
Please post the sag info on the Suspension thread here;

Huge thunderstorm last night, and we finally got internet back. Better than some places with power outages, flooding, and even part of the Cherohala Skyway washed away on the Tennessee side.

Anyway, once I am happy with changes I keep trying with the suspension, I'll post them.
I have added 12 turns to the rear preload, and currently have an additional 4 turns of preload added to the forks (the manual warns it's not recommended to adjust), but they tell you how anyway :) ) That gives the front approximately 34mm sag with my 210 pounds onboard.
I'm still playing with the manual sport settings that I have called up for when I'm in sport mode, but right now I'm waiting to change tires before making any more changes.
 
Last edited:
A few days ago I installed a radiator guard, along with twin Hella horns using a splitter harness which I shrink wrapped the OEM connecters to the splitter/extension harness connectors. I have to say, these horns are loud, and a welcome upgrade. They are only about +2mm larger in diameter than the original “Vespa” horn I could hardly hear at speed.

IMG_3672.webp
 
I've had the bike for about four months and I've done a bunch of stuff to it.
-All my bikes and cars have an Anderson Powerpole connector to attach a battery tender. It blends in on the harness going to the swing arm.
-I moved the Knight Design lowering footpegs from the Norge to try it out. Much nicer, I bought a set to replace them on the Norge. The lowered brake toe piece moved over as well.
- Hepco Becker top case rack.
-Cheap Amazon top case. I was actually after another base shoe for the Givi top box I already have. I would have no issue moving the box from bike to bike. Looks like that base is about $75. A whole case on Amazon is only $80. I gave it a shot. It isn't Givi for sure, but it is more than adequate. No regrets. I did remove the padded backrest because the pillion passenger says he doesn't need it and it gives a little more room.
-Heated jacket controller mounted on a plate on the clutch lever. I was just plugging the jacket into the controller on the handlebars but the cord kept getting caught under the winglet when I came to a stop. I drilled a hole right in that matte black plastic "tank" top piece and mounted a coaxial connector. If this doesn't go well at least it will be easy to replace and with any luck not terribly expensive.
-RAM mount for an iPhone 7. I wouldn't buy this RAM mount again. The twist locks are better. I have Rokform on the Norge and like it more. The iPhone 7 is an old surplus phone and is dedicated to the bike for GPS and maybe MIA if I can get it all to work together ever.
-I made a little panel the goes in the front bolts of the handlebar clamp. It has a voltmeter/USB device, the PWM dimmer for my driving lights, a momentary button for my garage door opener, and an on/off button to allow the USB panel to charge with the bike off. This is version 1.0, there will definitely be a V2.0 as I'm not 100% satisfied with this one.
-I added some little o-rings to the front tabs of the plastic head covers. They rattled at various engine RPMs and this provided enough cushion to stop it. Something else still rattles, maybe the windshield mechanism?
-Biondi medium windshield. I wish I'd just gone for the full touring windshield. I moved it up a little higher with a couple of simple brackets but didn't like the angle so I've got a couple of spacers to give it a more upright angle. More to come on this, I'm not done here.
-Factory crash bars. And to these I added some cheap wish.com LED lights. These are more to be seen than to see. I'd like to have them automatically dim as I have on my KLR, but for now I have a manual dimmer knob to turn them down at night.
-MOTO GUZZI eagle and name on the tank. The edge of one of my 3-D eagles was coming up a little and gave me the idea to help it along and add the vintage Guzzi font and eagle logo. The eagles faces forward on both sides, of course. The original eagles are safely stored.
-Factory side luggage and I did the mod suggested here to put a pin through the bottom mount just in case.
-Edited to add a weird and ugly one I forgot about. I has a really hard time with the gas cap and filler neck and California's vapor recovery boots. I just couldn't get the fuel pipe in the fuel hole. With a near empty tank I put a small rag on a gripper stick down into the tanks. With a Shopvac and a knife and a file I made the hole in the filler neck a little bigger. It's not real pretty (if you even knew to look down the hole), but it really worked, made an enormous difference in ease of filling up.
IMG_5835.JPGIMG_5862.JPGIMG_5864.JPG
 
Last edited:
So far, they are working well. They seem to have more feel than the Pirelli Angel GTIIs, but new tires are always nice after taking off worn ones. :)
It will be interesting to see how long they last in comparison to the OEM tires.
Sounds, and looks good, @Florida lime 😁👍. Looking forward to updates down the road 👍

@YellowCX100 - Nice mods! Those decals look nice👍
 
I've had the bike for about four months and I've done a bunch of stuff to it.
-All my bikes and cars have an Anderson Powerpole connector to attach a battery tender. It blends in on the harness going to the swing arm.
-I moved the Knight Design lowering footpegs from the Norge to try it out. Much nicer, I bought a set to replace them on the Norge. The lowered brake toe piece moved over as well.
- Hepco Becker top case rack.
-Cheap Amazon top case. I was actually after another base shoe for the Givi top box I already have. I would have no issue moving the box from bike to bike. Looks like that base is about $75. A whole case on Amazon is only $80. I gave it a shot. It isn't Givi for sure, but it is more than adequate. No regrets. I did remove the padded backrest because the pillion passenger says he doesn't need it and it gives a little more room.
-Heated jacket controller mounted on a plate on the clutch lever. I was just plugging the jacket into the controller on the handlebars but the cord kept getting caught under the winglet when I came to a stop. I drilled a hole right in that matte black plastic "tank" top piece and mounted a coaxial connector. If this doesn't go well at least it will be easy to replace and with any luck not terribly expensive.
-RAM mount for an iPhone 7. I wouldn't buy this RAM mount again. The twist locks are better. I have Rokform on the Norge and like it more. The iPhone 7 is an old surplus phone and is dedicated to the bike for GPS and maybe MIA if I can get it all to work together ever.
-I made a little panel the goes in the front bolts of the handlebar clamp. It has a voltmeter/USB device, the PWM dimmer for my driving lights, a momentary button for my garage door opener, and an on/off button to allow the USB panel to charge with the bike off. This is version 1.0, there will definitely be a V2.0 as I'm not 100% satisfied with this one.
-I added some little o-rings to the front tabs of the plastic head covers. They rattled at various engine RPMs and this provided enough cushion to stop it. Something else still rattles, maybe the windshield mechanism?
-Biondi medium windshield. I wish I'd just gone for the full touring windshield. I moved it up a little higher with a couple of simple brackets but didn't like the angle so I've got a couple of spacers to give it a more upright angle. More to come on this, I'm not done here.
-Factory crash bars. And to these I added some cheap wish.com LED lights. These are more to be seen than to see. I'd like to have them automatically dim as I have on my KLR, but for now I have a manual dimmer knob to turn them down at night.
-MOTO GUZZI eagle and name on the tank. The edge of one of my 3-D eagles was coming up a little and gave me the idea to help it along and add the vintage Guzzi font and eagle logo. The eagles faces forward on both sides, of course. The original eagles are safely stored.
-Factory side luggage and I did the mod suggested here to put a pin through the bottom mount just in case.
-Edited to add a weird and ugly one I forgot about. I has a really hard time with the gas cap and filler neck and California's vapor recovery boots. I just couldn't get the fuel pipe in the fuel hole. With a near empty tank I put a small rag on a gripper stick down into the tanks. With a Shopvac and a knife and a file I made the hole in the filler neck a little bigger. It's not real pretty (if you even knew to look down the hole), but it really worked, made an enormous difference in ease of filling up.
View attachment 32032View attachment 32033View attachment 32034

Hi Yellow
That is a very impressive list of mods.
I will change to your HB rack to cover/replace the "Assassin Grab Rails"
that stabbed my calf when I swung my leg up and down instead of out, when dismounting (I have not heard of anyone else with
problem so maybe I am a little...).
You may want to look at the Aurora Cyclops aux lights which are compact with a a very bright yellow/orange ring
which really catches attention.

Be safe.


Be safe
 
What motorcycle lift are you using in the second picture? Do you find it very usefull?

Mark
Harbor Freight aluminum motorcycle lift. It works well on all my bikes, but actually works the least well on the V100. I think rather than lifting by the frame or sump as on my other bikes it hits and lifts the exhaust pipes on the V100. I've never lifted the V100 because of that, I've only stabilized it upright. I'll have to cut some wood bits or something to actually lift and support the bike when I do my first tire change.
 
Picked up mine a couple days ago. Loving it so far. (only 80 miles on the clock, so,...)

Comments and first impressions? A few negatives first.

For me , at least, definitely NOT an all day saddle. Gonna give an Air Hawk a try for a while before I decide on a saddle rebuild.

Disappointing that no radiator guard was included. A couple well known aftermarket suppliers offer one, make nice ones, but on backorder most places. If you search carefully, you *may* find one.

Topcase is made by Shad, (not HB or GIVI, or OEM) and does NOT quick-release, a little shabby for a top of the line bike. Still, the topcase is the one luggage piece I rarely remove, so, for me,not a biggie.

Screen is too small for effective airflow management. Anyone have experience with the Guzzi-offered "Touring Screen? Claimed increase of 35% size. That doesn't sound like much to me, so I may wait for the aftermarket to catch up before investing.
I have around 4300 miles on my "S" now. The seat works for me on short excursions, but as I discovered on the trip to the MOA Rally in Virginia, I needed help in the "seat" department. Just happened to be a "Wild Ass Seat Cushion" vendor who set me up with a great solution. I've since used it on a couple of other longer trips and works great! I also got the BIONDI mid-high touring screen. Wish I would have opted for the taller one. At 5'11' the mid size screen is adequate, but then, this isn't a Gold Wing either!
 
Back
Top