• Ciao Guest - You’ve landed at the ultimate Guzzi site. NEW FORUM REGISTRATIONS REQUIRE EMAIL ACTIVATION - CHECK YOUR SPAM FOLDER - Use the CONTACT above if you need help. New to the forum? For all new members, we require ONE post in the Introductions section at the bottom, in order to post in most of the other sections. ALWAYS TRY A SEARCH BEFORE STARTING A NEW TOPIC - Most questions you may have, have likely been already answered. DON'T BE A DRIVE-BY POSTER: As a common courtesy, check back in and reply within 24 hours, or your post will be deleted. Note there's decades of heavily experienced Guzzi professionals on this site, all whom happily give endless amounts of their VALUABLE time for free; BE COURTEOUS AND RESPECTFUL!
  • Be sure to see the GTM STORE link also above for our 700+ product inventory, including OEM parts and many of our 100% Made-in-SoCal-USA GTM products and engine kits. In SoCal? Click the SERVICE tab above for the best in service, tires, tuning and installation of our products or custom work, and don't miss our GT MotoCycles® (not) art on the BUILDS tab above. WE'RE HERE ONLINE ONLY - NO PHONE CALLS MADE OR RECEIVED - DO NOT EMAIL AND ASK QUESTIONS OR ASK TO CALL YOU.
  • There is ZERO tolerance on personal attacks and ANY HYPERLINKS to PRODUCT(S) or other competing website(s), including personal pages, social media or other Forums. This ALSO INCLUDES ECU DIAGnostic software, questions and mapping. We work very hard to offer commercially supported products and to keep info relevant here. First offense is a note, second is a warning, third time will get you banned from the site. We don't have the time to chase repeat (and ignorant) offenders. This is NOT a social media platform; It's an ad-free, privately funded website, in small help with user donations. Be sure to see the GTM STORE link above; ALL product purchases help support the site, or you can upgrade your Forum profile or DONATE via the link above.

V7 III Evap/Tip removal

... slip ons, SAS removal, EVAP removal, a good ECU map to suit...

Pretty much the same as what I've done, and all the V7III Racer needs engine-wise far as I'm concerned. :)

The next stage of performance improvements after that is to overhaul the front suspension and fit a better set of tires to get the bike working and handling the way it ought to. I went the extra mile with the fancy Kineo wheels, because I'm like that, but sorting the suspension and putting something better than the Pirellis on there is the important part.
 
I took some pictures while working on disabling the evap can yesterday. Hopefully this will help someone out there... :

Illustrated Procedure:

- remove seat
- remove left side panel (three bolts)
- remove starter cover (two bolts)
- locate vacuum tap line from manifold to canister under the gearbox
- cut vacuum line and block it (I glued an aluminum slug in place)

Follow the line and cut it in a convenient place, then block it ... particularly the upstream side that comes from the inlet manifold.​

Thank you Godfry for the detail – clearly sufficient for most folks to understand.
Want to be sure I understand this specific piece -
“- cut vacuum line and block it (I glued an aluminum slug in place)
Follow the line and cut it in a convenient place, then block it ... particularly the upstream side that comes from the inlet manifold.”

Is it in fact removing a small section of the vacuum line and installing a slug to block/bridge the new gap in the line with nothing else to do in the attached picture? (I understand the later breather valve steps.)

Thanks!
 

Attachments

  • evap1.webp
    evap1.webp
    42.3 KB · Views: 94
Thank you Godfry for the detail – clearly sufficient for most folks to understand.
Want to be sure I understand this specific piece -
“- cut vacuum line and block it (I glued an aluminum slug in place)
Follow the line and cut it in a convenient place, then block it ... particularly the upstream side that comes from the inlet manifold.”

Is it in fact removing a small section of the vacuum line and installing a slug to block/bridge the new gap in the line with nothing else to do in the attached picture? (I understand the later breather valve steps.)

Thanks!

The whole point of this step is to block the vacuum tap on the inlet manifold safely. You could just pull the line off the manifold tap and fit a rubber plug there, but the problem with that is that unless it fits very tightly or is glued/clamped on securely, a little backfire or other pop-back through the intake could blow it off and leave you with a massive (unrideable) vacuum leak on the road. I didn't have the time or patience to take the line off, remove the tap, and thread the hole for a secure plug when I did the job, so I cut the line about six-seven inches from the tap and glued a tight-fitting slug in securely. That way, the line has some flex to it that will absorb any backfire or pop-back without blowing the plug or line off the tap.

The rest of the line just goes down to the canister to provide a small amount of vacuum so it draws gasoline vapor from the fuel tank ... completely unnecessary IMO, So I've now just removed that portion of the line entirely, along with the entire EVAP canister. The line from the fuel tank vent to the canister I've extended another six inches so it hangs down just under the starter. Configured this way, the fuel tank vent is just like the one that was on my '89 LeMans V. :)

One of these days, I'll go back in there, remove the line with the plug, remove the tap from the manifold, thread the manifold for a steel or brass threaded plug, and glue a permanent plug on the manifold. But it's just an aesthetic desire to clean up the under tank looks and tubing at this point, since it works just fine as it is.

Thank you! Finished last night along with the SAS block off kit.
 
So I did my EVAP delete and i think gas is leaking --- yesterday my gas light came on and I filled up at the gas station and it was only at 154 miles.
I noticed it dripped a little from the breather hose this morning b/c I filled it to top but I'll stop filling so much next time.
 
I fill the tank until the fuel touches the bottom of the filler opening's spacer cage. That gives the tank the required amount of minimum air volume needed for venting without pushing fuel down the vent line. :)

The nominal capacity of the tank is 5.5 US gallons. About 0.25 gallon of that capacity is the minimum air space required for venting properly. My "low fuel" light always comes on, and stays on, when I can fit just about exactly 4 US gallons of fuel into the tank, with the fuel just touching the bottom of the spacer cage. My mileage at that point is almost always 200 miles, plus or minus 5 miles or so, for a measured fuel economy of 47 to 51 MPG.

G
 
Last edited:
I fill the tank until the fuel touches the bottom of the filler opening's spacer cage. That gives the tank the required amount of minimum air volume needed for venting without pushing fuel down the vent line. :)

The nominal capacity of the tank is 5.5 US gallons. About 0.25 gallon of that capacity is the minimum air space required for venting properly. My "low fuel" light always comes on, and stays on, when I can fit just about exactly 4 US gallons of fuel into the tank, with the fuel just touching the bottom of the spacer cage. My mileage at that point is almost always 200 miles at that point, plus or minus 5 miles or so, for a measured fuel economy of 47 to 51 MPG.

G

My V7III is doing the same mileage. Can't recall any leaks either. 2>1 Exhaust, evap removal and SAS block off. Nice 350 miles in one day average 48. Ran hard in the foothills of Appalachia, Daniel Boone National Forest.
 
I have a 2018 Carbon DK and installed GT Megs and the SAS kit the end of last year (2018).
I had the mapping "Flash" done for fueling. The bike runs great.
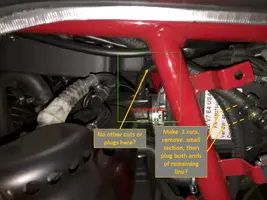
I have been reading the forum again today on the installation of the SAS kit and have some further questions regarding vacume to anyone who can answer them.
I had already removed the canister and plugged in the SAS. I have also plugged the two hoses in the photos one from the canister and the other from the manifold what I read before.
I'm told that only one of the hoses should have been plugged and the other left open, because when I take off the gas cap there is vacuum.
The hose from the manifold still has the breather attached inline. (see photo)
Should I cut above the breather and plug it there?
Therefore there would be no need for the remaining line plugged hanging under the bike.
Fast forward to today... I don't want to further start cutting lines if I don't need to.
I know the 2018 V7's have been tweaked the way they build them at the factory to cut costs a little here and there from what I've been hearing, so what I read in the past may or may not apply to the 2018's.

IMG_3437.webp

Tank Breather Valve.webp
 
I would just get rid of all the hoses and either cap the barb on manifolds or run a line from one to anther. I guess you need to connect it for inspections. The ones from tank are open to underside of bike.
 
Steve, this is a single throttle body V7.

Ray, that tip valve should be gutted or removed, and should go to free air. It cannot be blocked.
 
I would just get rid of all the hoses and either cap the barb on manifolds or run a line from one to anther. I guess you need to connect it for inspections. The ones from tank are open to underside of bike.

Thanks for the info Steve, I followed one of the lines to the breather vent valve which I will remove from the line.
 
while working on my breather hose I just noticed behind the left side cover (2) see through plugs from the air box.
one of them has been rubbing against the hose straight from the factory and has fluid and or white grease in it.
It may may have a tiny hole in it, leaking down the hose I am removing from the breather valve.
any suggestions? thanks. :smirk:

air box1.webp
 
Last edited:
Back
Top