• Ciao Guest - You’ve landed at the ultimate Guzzi site. NEW FORUM REGISTRATIONS REQUIRE EMAIL ACTIVATION - CHECK YOUR SPAM FOLDER - Use the CONTACT above if you need help. New to the forum? For all new members, we require ONE post in the Introductions section at the bottom, in order to post in most of the other sections. ALWAYS TRY A SEARCH BEFORE STARTING A NEW TOPIC - Most questions you may have, have likely been already answered. DON'T BE A DRIVE-BY POSTER: As a common courtesy, check back in and reply within 24 hours, or your post will be deleted. Note there's decades of heavily experienced Guzzi professionals on this site, all whom happily give endless amounts of their VALUABLE time for free; BE COURTEOUS AND RESPECTFUL!
  • Be sure to see the GTM STORE link also above for our 700+ product inventory, including OEM parts and many of our 100% Made-in-SoCal-USA GTM products and engine kits. In SoCal? Click the SERVICE tab above for the best in service, tires, tuning and installation of our products or custom work, and don't miss our GT MotoCycles® (not) art on the BUILDS tab above. WE'RE HERE ONLINE ONLY - NO PHONE CALLS MADE OR RECEIVED - DO NOT EMAIL AND ASK QUESTIONS OR ASK TO CALL YOU.
  • There is ZERO tolerance on personal attacks and ANY HYPERLINKS to PRODUCT(S) or other competing website(s), including personal pages, social media or other Forums. This ALSO INCLUDES ECU DIAGnostic software, questions and mapping. We work very hard to offer commercially supported products and to keep info relevant here. First offense is a note, second is a warning, third time will get you banned from the site. We don't have the time to chase repeat (and ignorant) offenders. This is NOT a social media platform; It's an ad-free, privately funded website, in small help with user donations. Be sure to see the GTM STORE link above; ALL product purchases help support the site, or you can upgrade your Forum profile or DONATE via the link above.

V7 III Evap/Tip removal

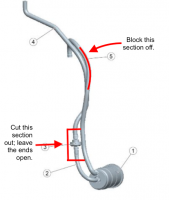
For those who are a bit more visually minded here is a CAD image from the service manual showing where to cut and block the hoses.

To block the vacuum hose I used a $0.68 dowel rod from ACE hardware and a couple of small hose clamps. It's similar to Godfrey's method but using hose clamps rather than glue to secure the plug/dowel.

Thanks for your guides, Godfrey.

View attachment 15283
So the problem in line 5 is that valve. Can I just disconnect it from the canister and leave it open?
 
Would it be a dumb idea to put a small fuel filter at the end of the un-plugged hose? I’m thinking it would both keep any dust from possibly getting up the line, and also slow the flow of any fuel that makes its way down the line. Is there a better filter idea? Or is it pointless?
 
Would it be a dumb idea to put a small fuel filter at the end of the un-plugged hose? I’m thinking it would both keep any dust from possibly getting up the line, and also slow the flow of any fuel that makes its way down the line. Is there a better filter idea? Or is it pointless?
It's a good idea, I believe that Todd was working on one for this exact use, but am not sure.
 
Would it be a dumb idea to put a small fuel filter at the end of the un-plugged hose? I’m thinking it would both keep any dust from possibly getting up the line, and also slow the flow of any fuel that makes its way down the line. Is there a better filter idea? Or is it pointless?

Some people like it and feel more secure doing it. In the distant past I added a small K&N filter to the breather on my Ducati 750GT; I know it was there for 6000 miles but noticed it missing at 36000 miles; never saw any difference in the oil or running behavior of the bike. My LeMans V ran over 100,000 miles with just an open tube as a vent breather on the tank and never had a single problem, as did many other motorcycles I've owned. Because of that, I think it's pointless.

Since I did my EVAP removal, I added a short extension to the tank breather hose so that it hangs down just below the starter/level with the bottom of the transmission, purely because I thought the short hose was a little too short... I've never had any fumes from it nor has there been any evidence that dust has gotten into the tank from it.
 
I've got a 17' V9 bobber , does the evap removal apply to the V9 as it does to the 7. If so could an occasional run away or hanging throttle issue occurring when the bike is hot be caused by the evap system. I've checked the throttle cable and no hang up or pinch, bike only has maybe 2000 miles on it . I have appointment with mech and dealer, but ?
 
I've got a 17' V9 bobber , does the evap removal apply to the V9 as it does to the 7.
Sure is, and shouldn’t cause a hanging idle, no. Sounds like something else may be wrong (though intake leak would cause a high idle.)
 
I just performed this operation after reading through this thread over the past couple of weeks. The whole thing took me less than an hour. Could probably be done in 15 minutes if you’ve done it twice already.

One thing I did, which I haven’t seen mentioned yet, is purchase some stainless barbed plugs on eBay. If you search “1/4 stainless barb plug” you’ll get several results. Worked perfectly to plug the hose. I also used a brass 1/4” barbed coupler from the hardware store to extend the breather hose down below everything. That way if it does leak (which I don’t expect), it’ll leak onto the ground without getting on anything. I used oetiker clamps on all fittings.

I wasn’t having any issues that made this immediately necessary, but it would need to be done when my 2>1 exhaust eventually shows up. I had some free time so figured now’s as good a time as any.
 
For those who are a bit more visually minded here is a CAD image from the service manual showing where to cut and block the hoses.

To block the vacuum hose I used a $0.68 dowel rod from ACE hardware and a couple of small hose clamps. It's similar to Godfrey's method but using hose clamps rather than glue to secure the plug/dowel.

Thanks for your guides, Godfrey.

View attachment 15283

So I think I understand this. If I wanted to remove everything cleanly I could

1) Remove hose 5 from manifold and use a vacuum cap on the manifold stub
2)Remove Hose (5) Canister (1) Hose (2) and Valve (3)
3)Extend Hose (4) down to vent below bike

Keep removed parts for next owner to reinstall if desired.

Am I on the right track? I know this has been explained five different ways, I’m a slow learner.
 
Last edited:
So I think I understand this. If I wanted to remove everything cleanly I could

1) Remove hose 5 from manifold and use a vacuum cap on the manifold stub
2)Remove Hose (5) Canister (1) Hose (2) and Valve (3)
3)Extend Hose (4) down to vent below bike

Keep removed parts for next owner to reinstall if desired.

Am I on the right track? I know this has been explained five different ways, I’m a slow learner.

Step 3 is optional, but yes you’ve got it right. The vac cap on the manifold would need securing of some kind. Otherwise, a backfire could blow it off. Someone mentioned, I think in this thread somewhere, that leaving the hose on and plugging at the end gives the gasses a little expansion room. I don’t know if it’s enough to make a difference...
 
Step 3 is optional, but yes you’ve got it right. The vac cap on the manifold would need securing of some kind. Otherwise, a backfire could blow it off. Someone mentioned, I think in this thread somewhere, that leaving the hose on and plugging at the end gives the gasses a little expansion room. I don’t know if it’s enough to make a difference...
Excellent! Thank you
 
73B5A973-EBF3-47CE-A498-594D8EEC4F1F.webp

So I did the evap delete, here is where my fuel line ended up venting


2BAC8841-A48C-4A74-9DE3-0D5F72836F0E.webp

Here is where I cut and capped the vacuum line to the manifold.


04F37132-E39B-4328-8FC3-4BF6EA09C70E.webp

Here is a photo of what I removed.

Everything was straightforward, not sure about the fuel venting location. Maybe I will put a small filter on the line. I can see vapor coming out of there after a ride.
 
I would drop a few $ to upgrade, rather than amputate, but realize I'm in the minority.
For now, I just leave the fuel filler cap too loose to vacuum seal.

I have to do a lot of stop and go on my commute- sometimes an hour with net speed 8 mph. Usually around the 40 min mark, irrespective of air temp, the idle will kick up a couple hundred rpm. This can happen with no control inputs, dead stop/no jostling, feet on the ground.

I could see it as a design element to increase oiling during hot temps/low rpms, or to increase flow through the cats, but have never read anything along those lines.

Thought maybe the fuel pump was impeded pulling down the fuel when the cap was tight if the evap system wasn't working well, hence the looser cap approach.
 
I brought it to the mechanic today and had this completed.

On the breather line from the gas tank to the Evap canister: the valve is removed / by-passed, so the line is straight and open.

On the vacuum line from the Evap canister to the intake manifold: cut in the middle, jam a slug on the opening closest to the intake manifold (I put yellow clamp and zip-tied to make sure the slug stays in place), on the side to the Evap canister is removed.

Evap canister stays in place and has an open end on the side where the vacuum line used to be attached. Hopefully if I overfill the gas tank, it drips to the Evap canister and evaporates.
 

Attachments

  • 37AED76B-3685-48CE-8F9C-ABF317265371.webp
    37AED76B-3685-48CE-8F9C-ABF317265371.webp
    88.4 KB · Views: 130
I took some pictures while working on disabling the evap can yesterday. Hopefully this will help someone out there... :

Illustrated Procedure:

- remove seat
- remove left side panel (three bolts)
- remove starter cover (two bolts)
- locate vacuum tap line from manifold to canister under the gearbox
View attachment 13677

- cut vacuum line and block it (I glued an aluminum slug in place)

Follow the line and cut it in a convenient place, then block it ... particularly the upstream side that comes from the inlet manifold.​

View attachment 13678

- locate breather line with valve connected to canister
- cut breather line above the valve and below at the canister inlet​

View attachment 13679

View attachment 13680

- leave the breather line open ended behind the starter ... put a filter on it if you worry about environmental dust getting into the tank (but it ain't going to happen... :)

- replace starter cover
- replace side cover
- replace seat
Hope that's clear ... ask if you have any questions.
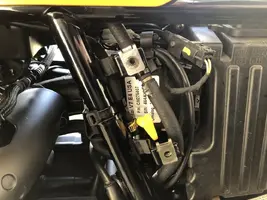
Question: can I disconnect the breather valve from the sensor without causing a CEL?
 
I don't understand the question. There is no sensor in this system, and I'm not sure what a "CEL" is. ??
When I checked my EVAP lines on my 2018 V7 III, I noticed that the breather valve si connect to an electric wire that I assume is a sensor. Will the disconnection of the valve cause a Check Engine Light (CEL)?
 
When I checked my EVAP lines on my 2018 V7 III, I noticed that the breather valve si connect to an electric wire that I assume is a sensor.
Post a photo of this. Never seen this on even one, on any model, all the way up to 2019s.
 
Post a photo of this. Never seen this on even one, on any model, all the way up to 2019s.
Ok I just double checked and you’re right! My bad. The wire I saw is the lambda probe connected to the opposite side. I really appreciate your interest anyhow. I love this forum already and my Guzzi. Thank you again for the support
 
Just removed the evap line. Below some pictures. I removed the breather valve, replaced it with a fitter 1/4 to 3/16 and left the tank line plugged into the canister so the carbon compound will absorb fumes odor. Then I unplugged the intake line from both sides: canister and manifold intake and plugged the hose on both sides with 2 small caps so the hose remains in place but completely disconnected. Ultimately, installed a vacuum cap on the intake manifold with a clamp. A 1/4 vacuum cap works just fine but I preferred a 3/16 so it goes more snug.

F24653FD-6F1D-40F8-A842-C52D964329E5.webp FC8F3B3A-E09F-4311-BCCE-27108940B6DE.webp D041EBDF-FD82-4B34-8EE6-3C3CB257CBCD.webp 1A15F152-5B8A-4F0E-ADD6-881F0E44A1F9.webp CADB81F1-3712-4131-86F5-9DDEC43E824D.webp 41DD0D60-874C-49F5-B7C8-D67581F1AC6D.webp 3B10376A-343D-4531-95BE-13E6AA1814CE.webp 74E84097-AB04-4288-9C9E-C9E36AEBCF8B.webp
 
Back
Top